You’ll want to have a refreshing 4th of July drink on hand (think: strawberry lemonade), a good snack or dip for nibbling, a hearty main, like juicy burgers, crispy fried chicken, or grilled pizza, summery salads and buttery corn on the cob are a must, and of course you’ll need festive 4th of July desserts (a flag cake is classic and firecracker Rice Krispies treats are always a hit).
We’ve got over 62 recipes to help you plan your best and most delicious July 4th yet.
Dip, Salsa, and Snacks
When it comes to summer snacking, you simply can never go wrong with a fresh batch of salsa and chips. Put out a bowl of creamy avocado or 7-layer dip, and you can be sure it will be gobbled up in no time.
7-Layer Dip
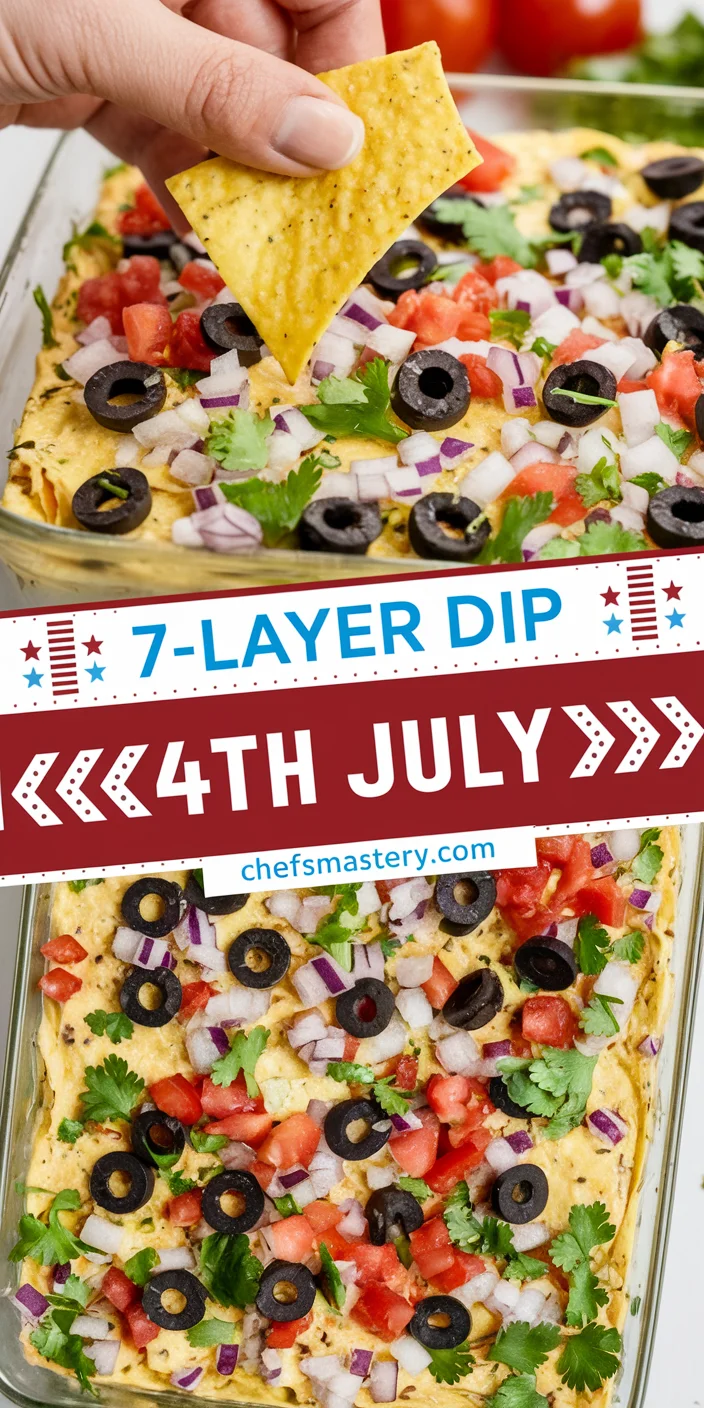
Seven-layer dip is everything you love about a taco, from the beans and guac to sour cream and pico de gallo, served dip-style.
- PREP TIME: 40 minutes
- SERVES: 10 to 12
INGREDIENTS
- 1 (16-ounce) can refried beans
- 2 large cloves garlic
- 1 teaspoon kosher salt, plus more for the tomatoes
- 4 medium avocados
- 1/4 cup freshly squeezed lime juice (from about 2 limes)
- 1/2 cup finely chopped red onion (from 1 small red onion), divided
- 2 tablespoons finely chopped unseeded jalapeño (from 1 small jalapeño, optional)
- 16 ounces sour cream
- 4 ounces cream cheese, very soft
- 1 (1-ounce) package 25% less-sodium taco seasoning mix
- 2 cups salsa
- 2 cups shredded Mexican-blend cheese (8ounces)
- 2 plum or Roma tomatoes, diced
- 1 tablespoon chopped fresh cilantro
- 1 (2.25-ounce) can sliced black olives, drained
- Tortilla chips, for serving
INSTRUCTIONS
- Spread the bean mixture into an even layer in a 9×13-inch or 7×11-inch baking dish.
- Make garlic paste by first mincing the garlic, then sprinkling with the salt. Then hold the blunt side of the knife with both hands, and scrape the sharp end of a knife against the pile of garlic at an angle to flatten the garlic. Work the garlic back into a tidy pile and repeat, pressing and scraping the knife through the pile for 2 to 3 minutes until you have a smooth paste. Transfer the garlic paste to a large bowl.
- Slice the avocados in half lengthwise and remove and discard the pits. Scoop the avocado flesh into the bowl of garlic. Add the lime juice and half of the red onion, then use a fork or potato masher to mash to desired consistency. Stir in the jalapeño, if using. Spread the guacamole into an even layer on top of the refried beans.
- Mix the sour cream, cream cheese, and taco seasoning together in a large mixing bowl with a hand mixer until smooth. Then spread the sour cream mixture over the guacamole into an even layer, covering covering the guacamole completely.
- Spread the salsa over the sour cream layer, spreading into an even layer and top with the cheese.
- Stir the tomato, cilantro, remaining 2 tablespoons red onion, and a pinch of salt together in a small bowl. Scatter evenly over the cheese. Sprinkle the olives on top.
RECIPE NOTES
Make ahead: The dip can be made 1 day in advance. Cover and refrigerate until ready to serve.
Storage: Cover leftovers and refrigerate for up to 2 days.
Creamy Avocado Dip

Take three simple things — ripe avocado, soft goat cheese, and lemon juice — and whirl them together to create the creamiest, dreamiest dip you’ve ever imagined.
- SERVES: 4 to 6
INGREDIENTS
- 2 medium ripe avocados
- 4 ounces fresh goat cheese, crumbled (about 1 cup)
- 1 teaspoon freshly squeezed lemon juice
- 1/4 teaspoon kosher salt
- Freshly ground black pepper
- Vegetable crudités, tortilla chips, or crackers, for serving
INSTRUCTIONS
- Cut the avocados in half and remove the pits. Spoon the flesh of the avocados into a food processor or blender. Add the goat cheese, lemon juice, salt, and pepper. Blend until smooth and creamy, 30 to 40 seconds.
RECIPE NOTES
Storage: Leftovers can be stored in an airtight container in the refrigerator for up to 3 days.
Baked Jalapeño Popper Dip

With just the right amount of heat and a buttery, crunchy Ritz cracker topping, this creamy dip tastes just like a jalapeño popper.
- SERVES: 8
INGREDIENTS
- 1 pound cream cheese, at room temperature
- 1 cup sour cream
- 1 1/2 cups seeded and diced jalapeños (6 to 8 medium jalapeños), plus more for garnish
- 2 cups shredded sharp cheddar cheese (about 8 ounces)
- 1 teaspoon garlic powder
- 1/2 teaspoon kosher salt
- 1/4 teaspoon freshly ground black pepper
- 1 cup finely crushed Ritz crackers (about 24 crackers)
- 1/2 cup finely grated Parmesan cheese (about 1 ounce)
- 4 tablespoons (1/2 stick) unsalted butter, melted
- Chopped fresh parsley leaves, for garnish (optional)
- For serving: wavy potato chips, crudités, pita chips, or pretzels
INSTRUCTIONS
- Arrange a rack in the middle of the oven and heat to 375℉.
- Place the cream cheese and sour cream in a large bowl and stir to combine. Add the jalapeños, cheddar cheese, garlic powder, salt, and pepper and mix until evenly combined. Transfer the dip to a 9-inch cast iron skillet or 2-quart baking dish.
- Place the crushed crackers, Parmesan, and butter in a medium bowl and stir until combined. Sprinkle evenly over the dip.
- Bake until the dip is heated through and the top is golden-brown, 20 to 25 minutes. Let cool for 5 minutes before serving. Top with extra diced jalapeños and parsley if desired. Serve warm with chips, crudités, or pretzels for dipping.
Black Bean & Corn Salsa
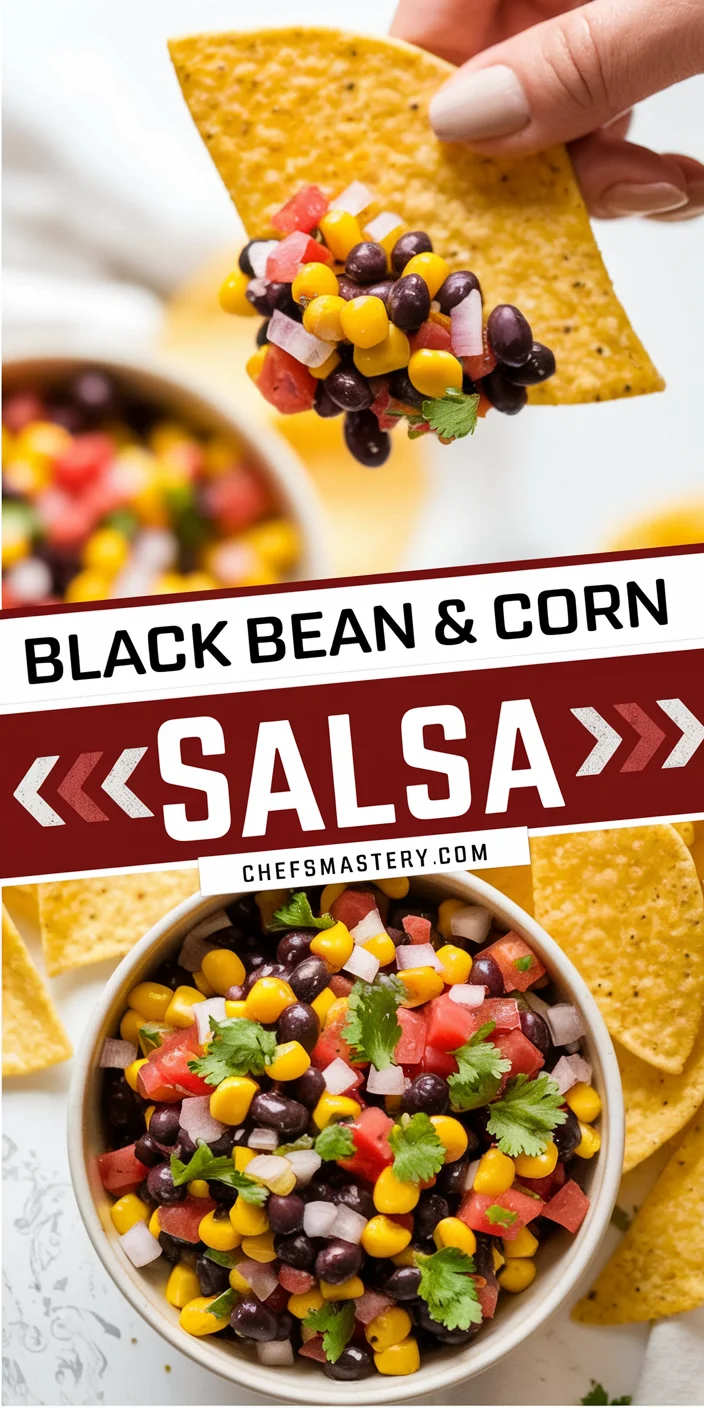
When tossed with lime juice, spicy chipotles, and fresh cilantro, a humble can of black beans and an ear of fresh summer corn are transformed into a bold, full-flavored salsa you’ll want to eat with everything.
- PREP TIME: 10 to 15 mins
- MAKES about 3 cups
INGREDIENTS
- 1 (15.5-ounce) can black beans, drained and rinsed
- 1 heaping cup fresh or thawed frozen corn kernels (if using fresh, about 1 ear)
- 1 medium plum tomato, seeded and diced
- 1/2 small red onion, diced
- 1/2 cup finely chopped fresh cilantro leaves and tender stems
- 1 canned chipotle chile in adobo sauce, finely chopped, plus 2 tablespoons of the adobo sauce
- Juice from 1/2 medium lime
- 1/4 teaspoon kosher salt
INSTRUCTIONS
- Place all the ingredients in a medium bowl and stir to combine. Cover and refrigerate at least 30 minutes before serving to allow the flavors to meld.
Watermelon Salsa
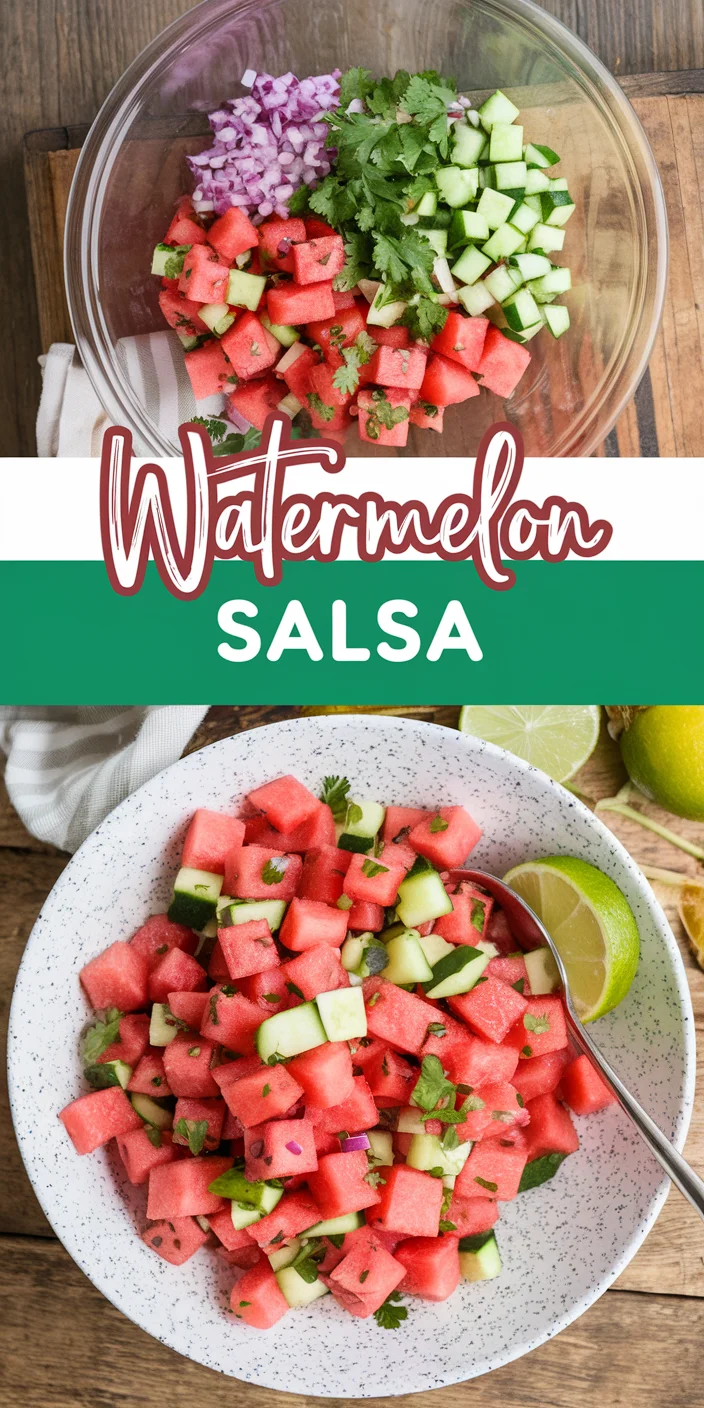
This five-ingredient dip is everything your summer has been missing.
- PREP TIME: 15 minutes
- MAKES: 4 cups
INGREDIENTS
- 1/2 small red onion
- 1 large lime
- 1/2 medium personal-sized watermelon
- 1 small English cucumber
- 1 medium jalapeño pepper
- 1/2 cup fresh cilantro leaves
- 1/2 teaspoon kosher salt
- Tortilla or pita chips, for serving
INSTRUCTIONS
- Finely chop the 1/2 red onion and place in a large bowl. Halve the lime, squeeze the juice over the onion, and toss to combine. Let these two mingle for about 10 minutes while you chop the remaining ingredients.
- Cut the rind from the 1/2 watermelon, then dice the flesh (you should have about 3 cups). Dice the cucumber. Halve the jalapeño, remove the seeds, and finely chop. Coarsely chop the 1/2 cup cilantro leaves.
- Add the watermelon, cucumber, jalapeño, cilantro, and 1/2 teaspoon kosher salt to the onion and toss gently to combine. Refrigerate the salsa for 1 hour before serving with tortilla chips or pita chips for scooping.
Halloumi and Melon Skewers
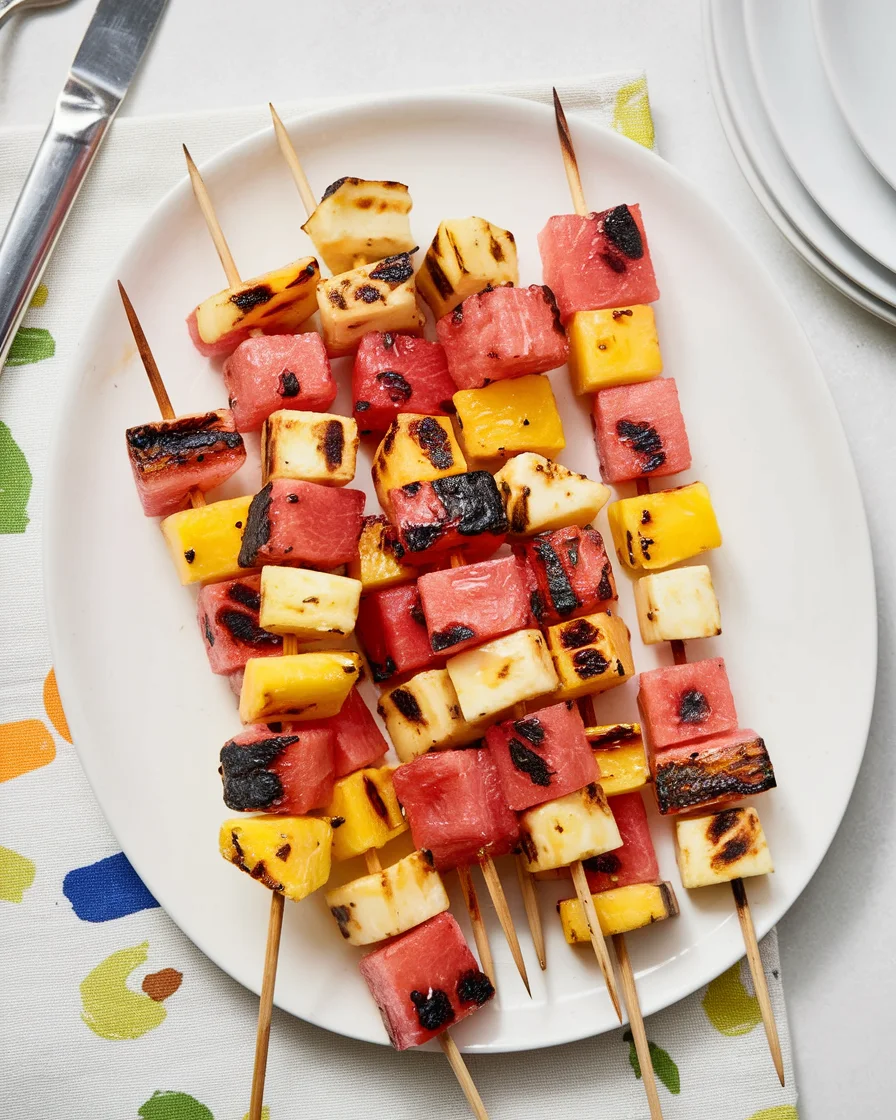
Forget your regular cheese plate, and go for summery skewers loaded with charred melon and briny halloumi brushed with a honey-lime glaze.
- PREP TIME: 15 minutes
- COOK TIME: 6 to 8 mins
- MAKES 7 skewers
INGREDIENTS
- 1/4 cup freshly squeezed lime juice (from 2 limes)
- 2 tablespoons honey
- 3 cups (1-inch pieces) seedless watermelon (1 pound)
- 2 cups (1-inch pieces) cantaloupe (12 ounces)
- 8 ounces (1-inch pieces) halloumi cheese
- 7 (10-inch) skewers, soaked for at least 30 minutes if wooden
INSTRUCTIONS
- Heat a grill to high, direct heat.
- Whisk lime juice and honey together in a small bowl. Thread the watermelon, cantaloupe, and halloumi cheese onto the skewers. Brush with the honey-lime juice.
- Oil the grill grates. Place the skewers on the grill, cover, and cook until grill marks appear, 3 to 4 minutes per side, brushing occasionally with the honey-lime juice. Serve immediately.
Grilled BBQ Chicken Wings
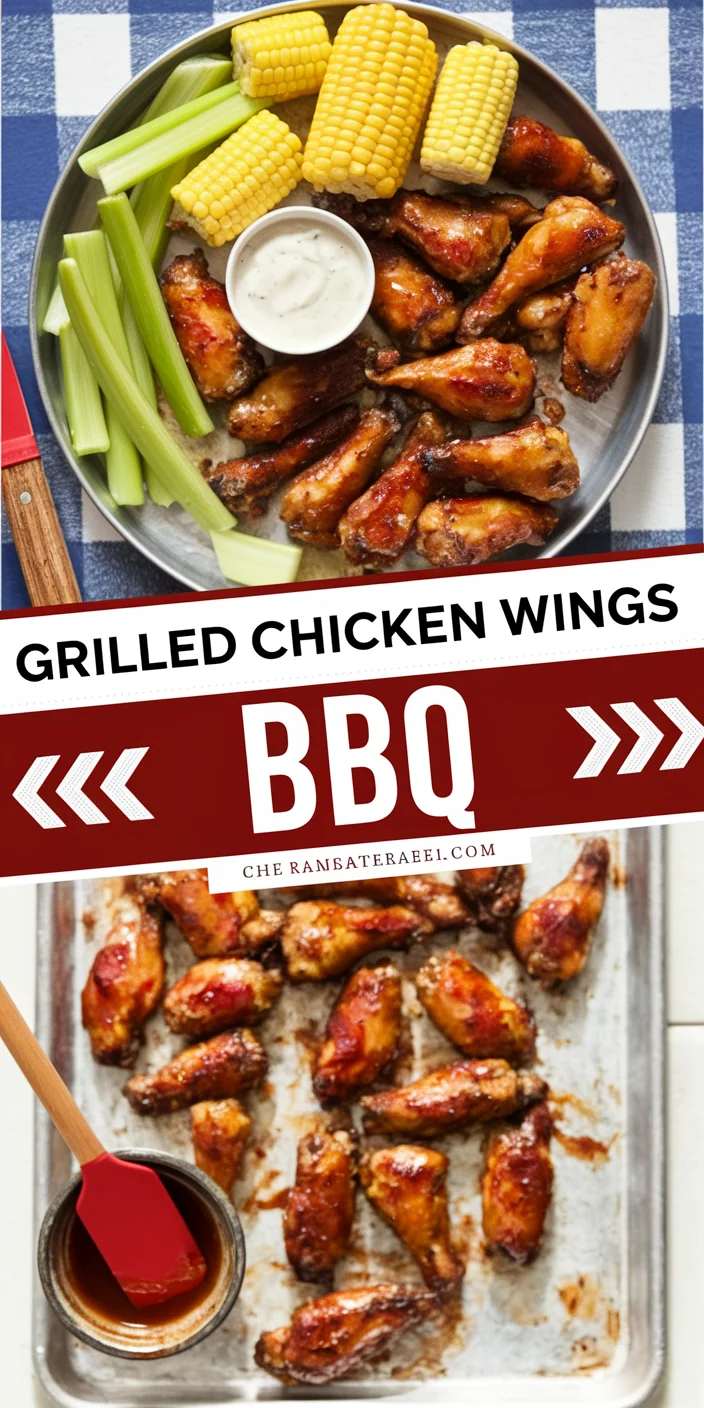
BBQ chicken wings are ubiquitous at summertime parties, and for good reason — they can be eaten with one hand (cold drink in the other) and are satisfying to devour. Instead of baking or frying, these wings are cooked low and slow then tossed on the grill right before serving.
- SERVES: 8 to 10
INGREDIENTS
- 3 pounds chicken wings
- 1 cup barbecue sauce
- 2 tablespoons apple cider vinegar
- 2 tablespoons honey
- 2 teaspoons smoked paprika
- 1/4 cup water
- Vegetable oil, for brushing the grill
INSTRUCTIONS
- If the wings are whole and not yet separated, use a chef’s knife or kitchen shears to cut through the first joint of the wing and remove the wing tip. Discard or freeze for stock. Cut through the second joint to separate the wing into the forearm and upper arm portions. Pat the wings dry with paper towels.
- Combine the barbecue sauce, vinegar, honey, and paprika in a medium bowl. Pour half of the sauce into a 3 1/2- or 4-quart slow cooker, and save the remaining sauce for brushing and serving.
- Add the wings and the water into the slow cookers and stir to coat. Cover and cook until the wings are cooked through and tender, but not falling apart, on HIGH for 2 1/2 to 3 hours or on LOW for 4 to 5 hours. Using tongs, transfer the cooked wings to a large platter or baking sheet and discard the liquid left in the slow cooker.
- Heat an outdoor grill to medium-high heat. Lightly brush the grill with oil. Place the wings on the grill in a single layer. Cook until grill marks form on the bottom, 2 to 3 minutes. Flip the wings and brush with some of the reserved barbecue sauce mixture. Cook until grill marks appear on the other side, 2 to 3 minutes more. Brush with more sauce before serving, or serve with the remaining sauce.
Refreshing Drinks
Hot summer days demand the most cool and refreshing drinks. There’s never been a better time to pull together a big pitcher of lemonade, sweet tea, or perhaps some sangria or a summery prosecco punch.
Strawberry Lemonade

This refreshing pitcher drink, made with juicy strawberries and freshly squeezed lemon juice, is great for lemonade stands and family cookouts alike.
- PREP TIME: 10 to 15 mins
- SERVES: 4 to 6
INGREDIENTS
- 2 cups strawberries (10 to 12 ounces)
- 2 pounds lemons (8 to 10 medium)
- 1 cup plus 2 tablespoons granulated sugar
- 4 cups cold water, plus more as needed
- Ice
EQUIPMENT
- Knife and cutting board
- Measuring cups and spoons
- Citrus juicer
- Blender
- 2-quart or larger pitcher
- Mixing spoon
- Fine-mesh strainer
INSTRUCTIONS
- Prep the strawberries and squeeze the lemons. Hull and quarter 2 cups fresh strawberries. Place in a blender. Juice 2 pounds lemons until you have 1 1/2 cups juice. Add the juice to the blender.
- Make the strawberry mixture and strain. Add 1 cup plus 2 tablespoons granulated sugar and blend on high speed until the strawberries are puréed and the sugar is dissolved, 20 to 25 seconds. Pour the mixture through a fine-mesh strainer into a 2-quart or larger pitcher. Discard the contents of the strainer.
- Add the water and serve over ice. Add 4 cups cold water to the pitcher and stir until thoroughly combined. Taste the strawberry lemonade; if it’s too intense, add more cold water 1/4 cup at a time as needed. Serve the strawberry lemonade over ice.
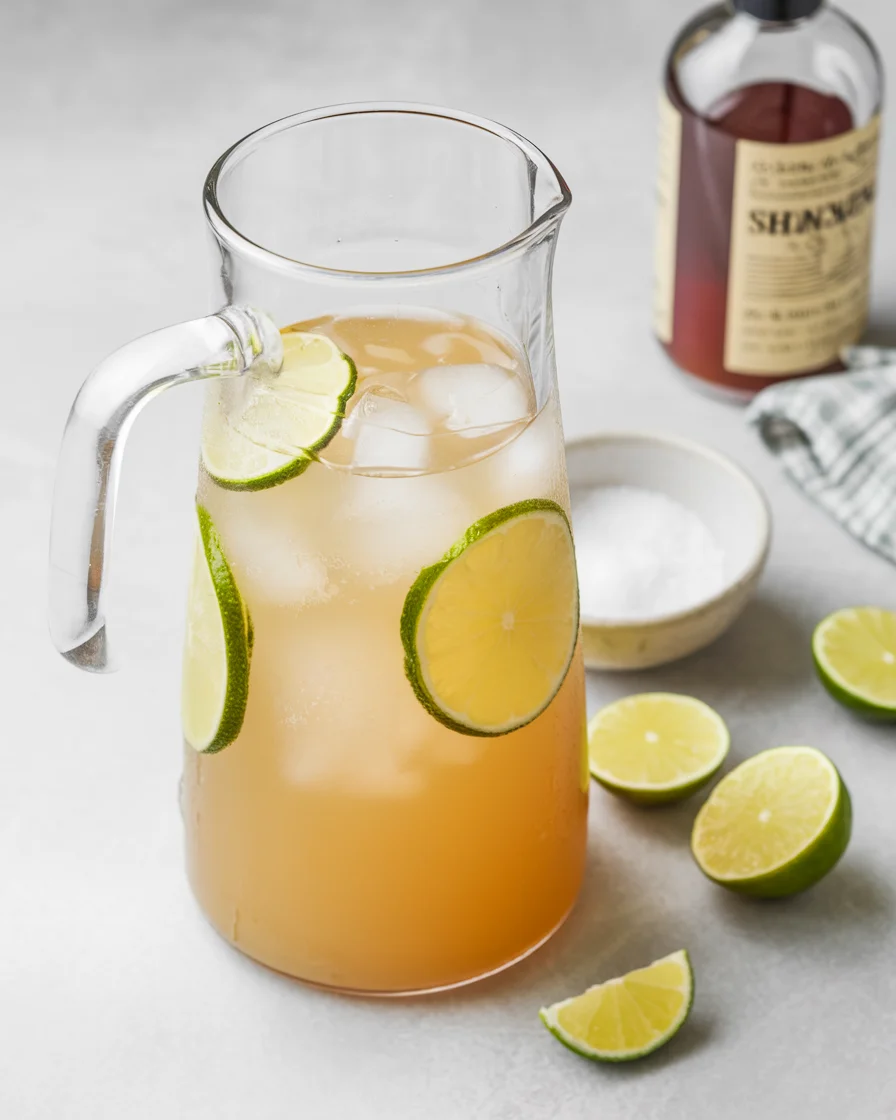
Hibiscus Mezcal Pitcher Cocktail
When the tart, sweet flavor of hibiscus combines with the smokiness of mezcal, you get one irresistible cocktail.
- PREP TIME: 10 minutes
- COOK TIME: 20 minutes
- SERVES: 6 to 7
INGREDIENTS
FOR THE HIBISCUS SYRUP:
- 1 cup water
- 1 cup granulated sugar
- 1 cup dried hibiscus flowers
FOR THE COCKTAILS:
- 3 cups mezcal
- 1 1/2 cups lime juice (from 12 to 14 medium limes or store bought)
- 1 1/2 cups water
- 1/2 cup orange liqueur, such as Cointreau or Triple Sec
- 1 medium lime
- Ice
INSTRUCTIONS
MAKE THE HIBISCUS SIMPLE SYRUP:
- Place 1 cup water, 1 cup granulated sugar, and 1 cup dried hibiscus flowers in a small saucepan. Stir and bring to a boil over medium-high heat. Reduce the heat to low and simmer, stirring occasionally, for 15 minutes.
- Remove the pan from the heat and let sit until completely cooled, about 1 hour. Pour through a fine-mesh strainer set over a small bowl, and press on the solids to release as much liquid as possible. Discard the solids. Refrigerate until ready to use.
MAKE THE COCKTAILS:
- Pour the hibiscus syrup into a pitcher. Add 3 cups tequila or mezcal, 1 1/2 cups lime juice, 1 1/2 cups water, and 1/2 cup orange liqueur, and stir to combine.
- Cut 1 medium lime into wedges or wheels. To serve, fill each glass with ice and garnish with a slice of lime, and then pour in the margarita.
Homemade Lemonade
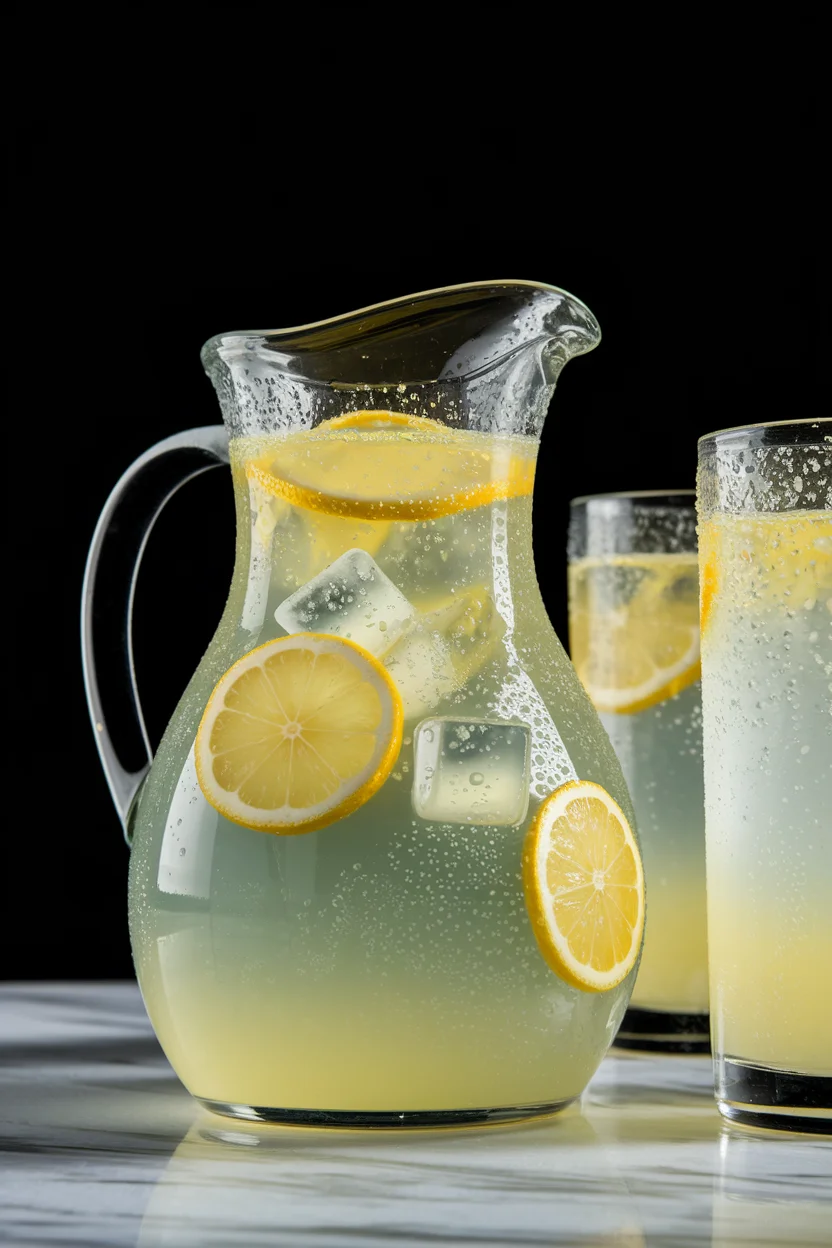
Ditch the simple syrup for the easiest homemade lemonade ever.
Sipping icy-cold sweet lemonade on a blazing-hot summer day is one of life’s finest pleasures, which is why we think making lemonade from scratch should be the easiest drink you make this summer. After all, it is just three ingredients: lemon juice, sugar, and water.
- PREP TIME: 10 to 15 mins
- MAKES: 2 quarts
INGREDIENTS
- 8 to 10 large lemons
- 1 cup granulated sugar
- 1 1/2 quarts water (6 cups)
- Ice
- Lemon slices, for serving (optional)
EQUIPMENT
- Measuring cup or medium bowl
- Knife and cutting board
- Juicer or citrus reamer, or stand mixer with the paddle attachment
- Pitcher
- Fine-mesh strainer
INSTRUCTIONS
- Juice the lemons and strain out the pulp. Halve the lemons, then squeeze the juice from the halves — you can do this manually with your favorite juicer or reamer. My favorite alternative method: Quarter the lemons and use the stand mixer to juice all of the lemons at once. Place the quartered lemons in a stand mixer fitted with the paddle attachment, then beat on low speed for 2 minutes. With either method, strain the juice through a fine-mesh strainer into a large measuring cup or bowl to remove the pulp before making the lemonade. You need 1 cup of strained lemon juice.
- Combine the lemon juice and sugar to make a lemonade base. Add the sugar to the strained lemon juice and whisk until the sugar is completely dissolved.
- Add the water and chill. Transfer the lemonade base to a serving pitcher. Add the water and stir to combine. Chill the lemonade for at least 1 hour before serving.
- Serve with ice and lemon slices. Serve the lemonade over ice with lemon slices if desired.
Sweet Tea
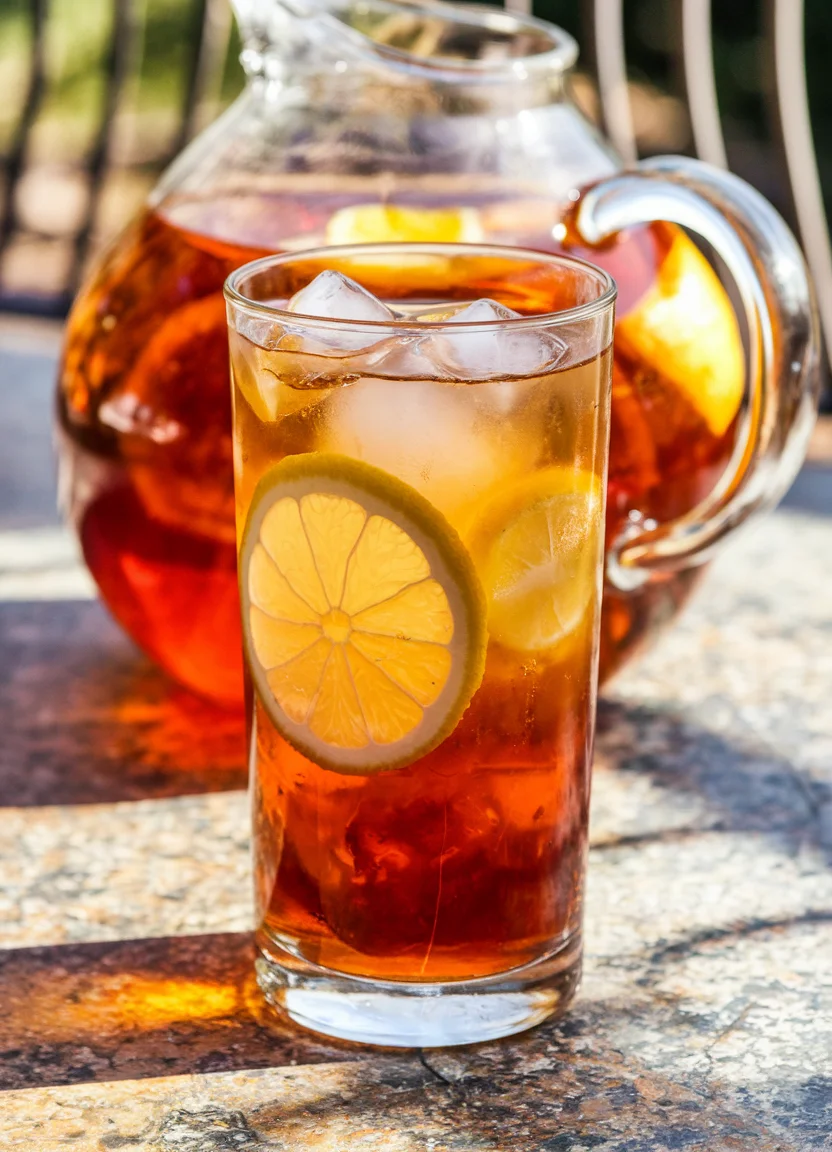
It’s not summer until there’s a pitcher of sweet tea in the fridge. Here’s how to make a batch everyone will enjoy.
- PREP TIME: 10 minutes
- MAKES: 1 gallon
INGREDIENTS
- 3 family-sized black tea bags (or 12 individual tea bags), such as Lipton or Luzianne
- 1 cup granulated sugar
- Ice
- Fresh mint leaves or lemon slices (optional)
INSTRUCTIONS
- Bring 4 cups of the water to a boil in a small saucepan over medium-high heat. Remove from heat.
- Dunk 3 family-sized black tea bags (or 12 individual tea bags) a few times in the water to fully hydrate, then leave submerged with the strings hanging over the side of the pot. After 5 minutes, remove the bags and discard.
- Add 1 cup granulated sugar and stir until completely dissolved.
- Pour the tea base into a 1-gallon pitcher. If using multiple pitchers, divide the tea evenly between them.
- Add 3 more quarts of water to the tea base to make a gallon of sweet tea and stir to combine.
- Refrigerate for at least 4 hours or, ideally, overnight.
- Pour the sweet tea into ice-filled glasses. Add a sprig of mint or a slice of lemon to each, if desired!
4th of July Wine Sparklers
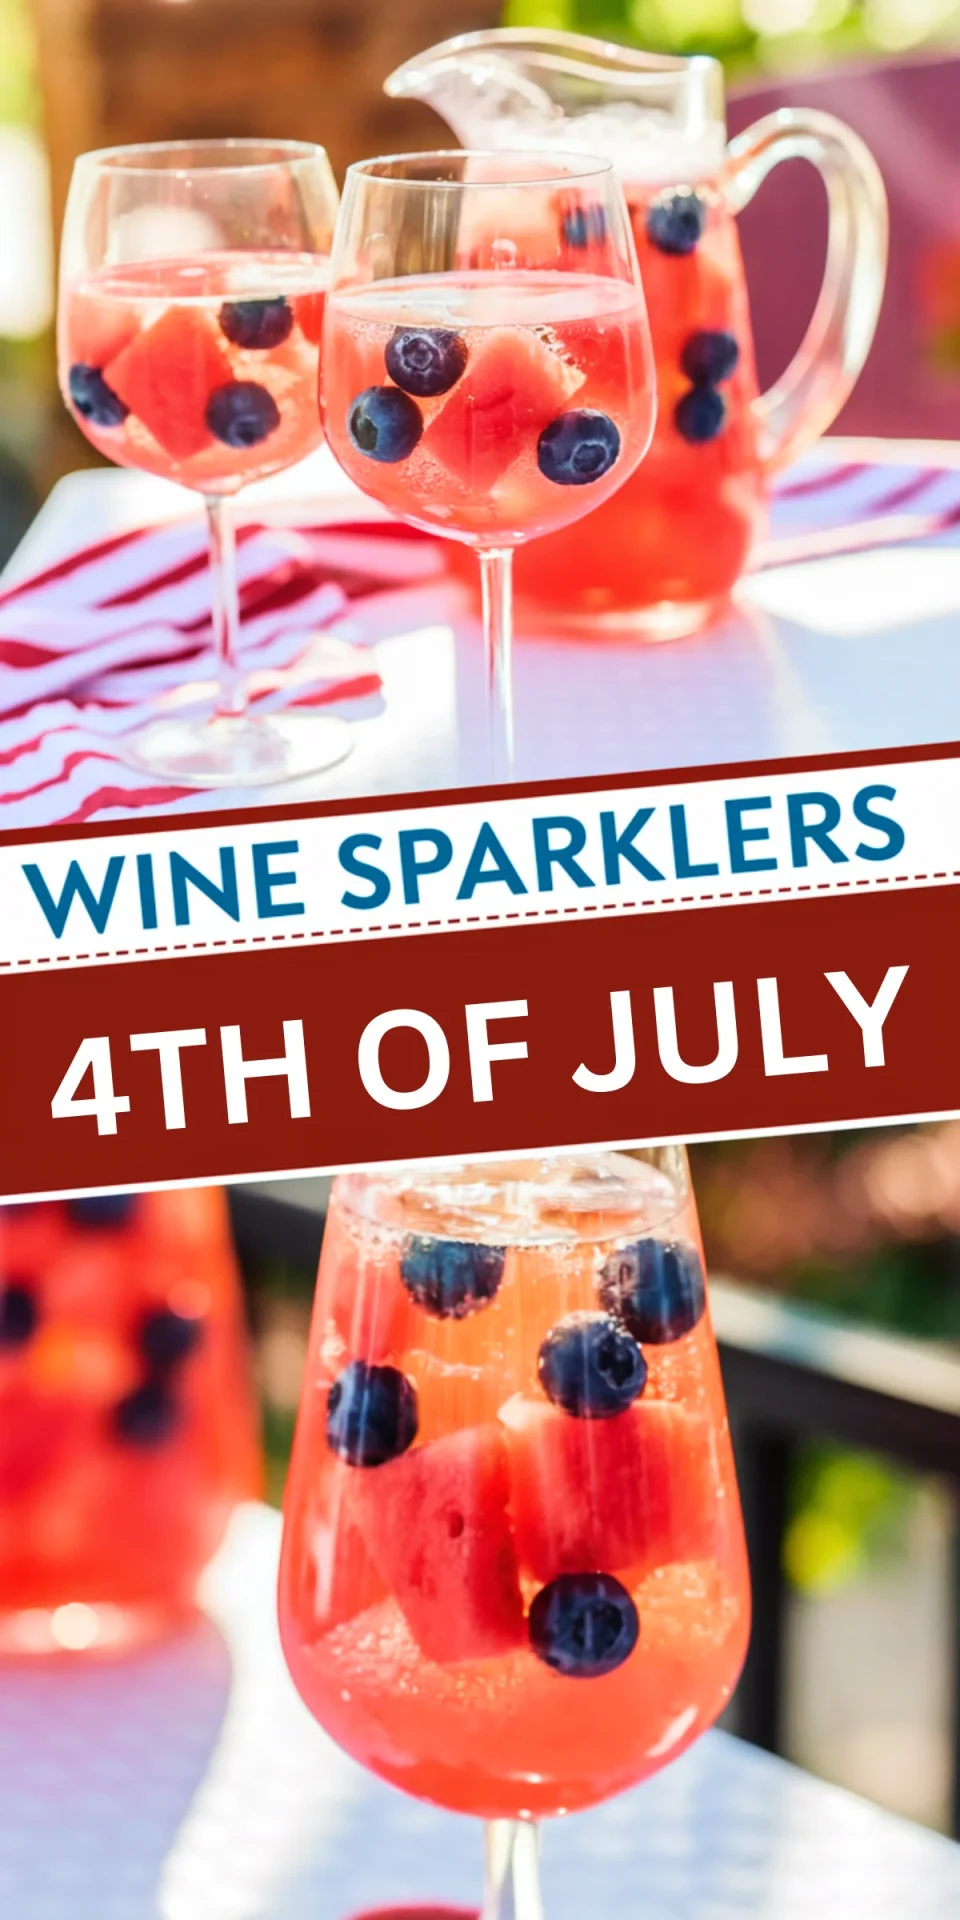
Two ingredients plus a simple fruit garnish make this cool drink easy and festive.
Fourth of July recipes can be so fussy, instructing you to carve watermelon baskets, make precise stripes of fruit on flag-shaped desserts, and whip up elaborate, food coloring-tinted layer cakes. Yeah, definitely not my thing!
- SERVES: 6 to 8
INGREDIENTS
- 2 cups watermelon stars
- 1 cup fresh blueberries
- 1 bottle chilled dry white wine such as Fumé Blanc, Chenin Blanc, or Vinho Verde
- 1 liter chilled lemon lime soda, such as a SodaStream mix, Sprite or 7UP
INSTRUCTIONS
- Place the watermelon stars and blueberries in the bottom of a 1-gallon pitcher. Pour in the white wine and soda, and gently mix to combine. Serve with a few fruit pieces in each cup.
3-2-1 Pitcher Margaritas
A great margarita isn’t complicated, and don’t let anyone tell you otherwise. If you have tequila, orange liqueur (such as Cointreau or Triple Sec), and plenty of limes on hand, you have everything you need.
- PREP TIME: 10 minutes
- SERVES: 8 to 10
INGREDIENTS
- 3 cups blanco tequila
- 2 cups orange liqueur, such as Cointreau or Triple Sec
- 1 cup freshly squeezed lime juice (from about 8 limes)
- Ice
- 3 medium limes, thinly sliced
INSTRUCTIONS
- Place 3 cups blanco tequila, 2 cups orange liqueur, 1 cup freshly squeezed lime juice, and ice in a large pitcher, and stir to combine. Top with the lime slices. Let sit for 5 minutes to allow for some of the ice to melt and mellow the margaritas.
- Pour into glasses, adding more ice from the pitcher to each glass as needed. Scoop a couple of lime slices into each glass when serving.
Watermelon Prosecco Punch

Fresh, juicy cubes of watermelon and cool mint leaves are just the ticket to making bubbly prosecco feel extra summery.
- SERVES: 6
INGREDIENTS
- 2 cups loosely packed fresh mint leaves
- 2 cups cubed watermelon
- 1 (750-milliliter) bottle dry sparkling wine, such as prosecco or cava, chilled
INSTRUCTIONS
- Slap the mint leaves in your hands to release their aromatic oils. Mix the mint, watermelon, and sparkling wine in a pitcher. Serve in ice-filled glasses.
Sparkling Strawberry Cucumber Sangria
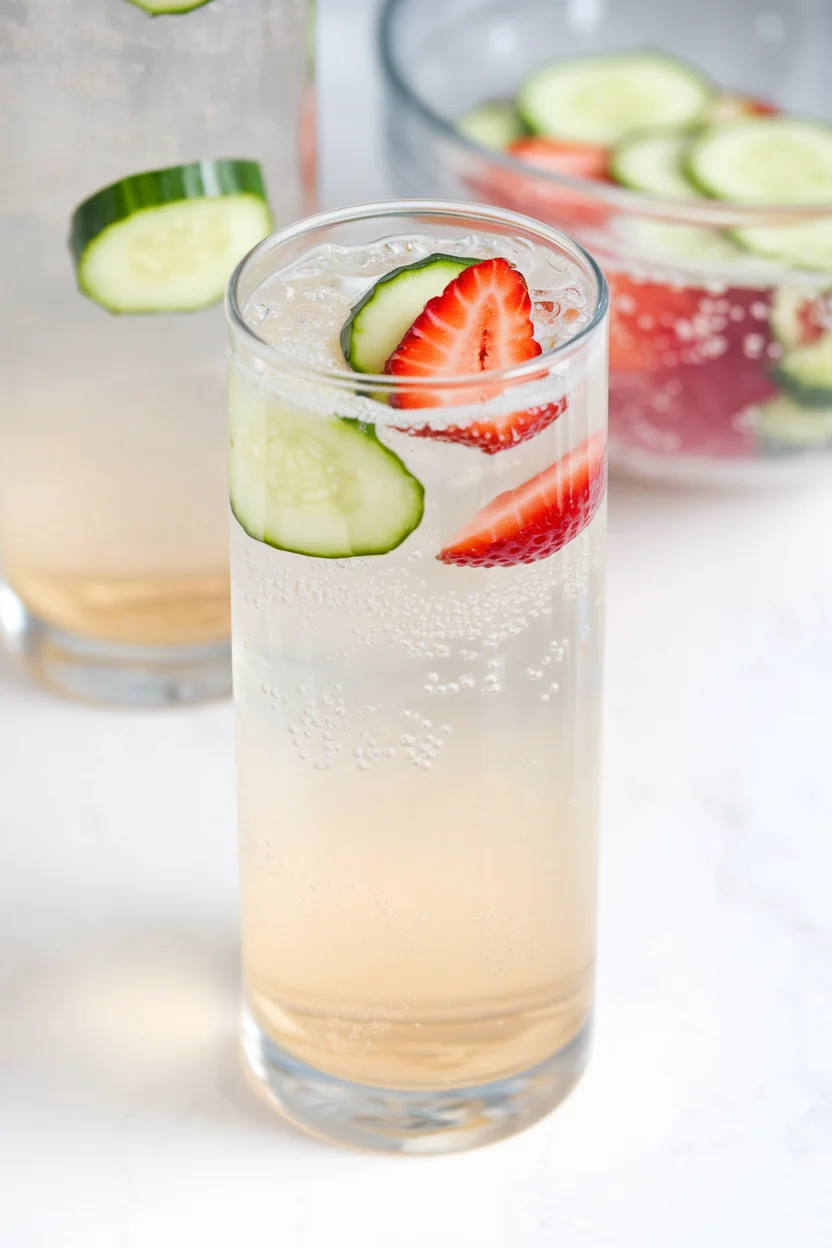
Using prosecco as the base of this sangria instead of still red or white wine automatically makes it fit for any kind of get-together.
- SERVES: 6 to 8
INGREDIENTS
- 2 cups sliced strawberries
- 1 cup thinly sliced cucumber
- 1/2 cup orange liquer, like Cointreau
- 1 (750-milliliter) bottle prosecco, cava, or other dry white sparkling wine, chilled
- 2 cups seltzer or club soda, chilled
- Ice
INSTRUCTIONS
- Combine the strawberries, cucumber, and orange liqueur in a large pitcher. Cover and refrigerate for at least 1 hour or up to overnight.
- When ready to serve, add the prosecco and club soda. Stir gently to combine. Taste and add more seltzer if desired. To serve, fill glasses with ice. Add a few pieces of strawberry and cucumber from the pitcher to each glass before pouring in the sangria.
Sparkling White Peach Sangria

White wine and white peaches keep this simple four-ingredient sangria cool and refreshing.
- PREP TIME: 5 minutes
- SERVES: 4 to 6
INGREDIENTS
- 2 to 3 medium white peaches, sliced, divided
- 3/4 cup peach or apricot brandy
- 1 (750-ml) bottle Moscato wine, such as 7 Daughters, chilled
- 1 liter peach seltzer water, such as Seagram’s Sparkling White Peach, chilled
- Ice
INSTRUCTIONS
- Place 3/4 of the sliced peaches and brandy in a pitcher and gently muddle. Add the Moscato and seltzer water and stir to combine. Pour into ice-filled glasses and top with a couple of fresh peach slices.
Fresh Berry Lemonade
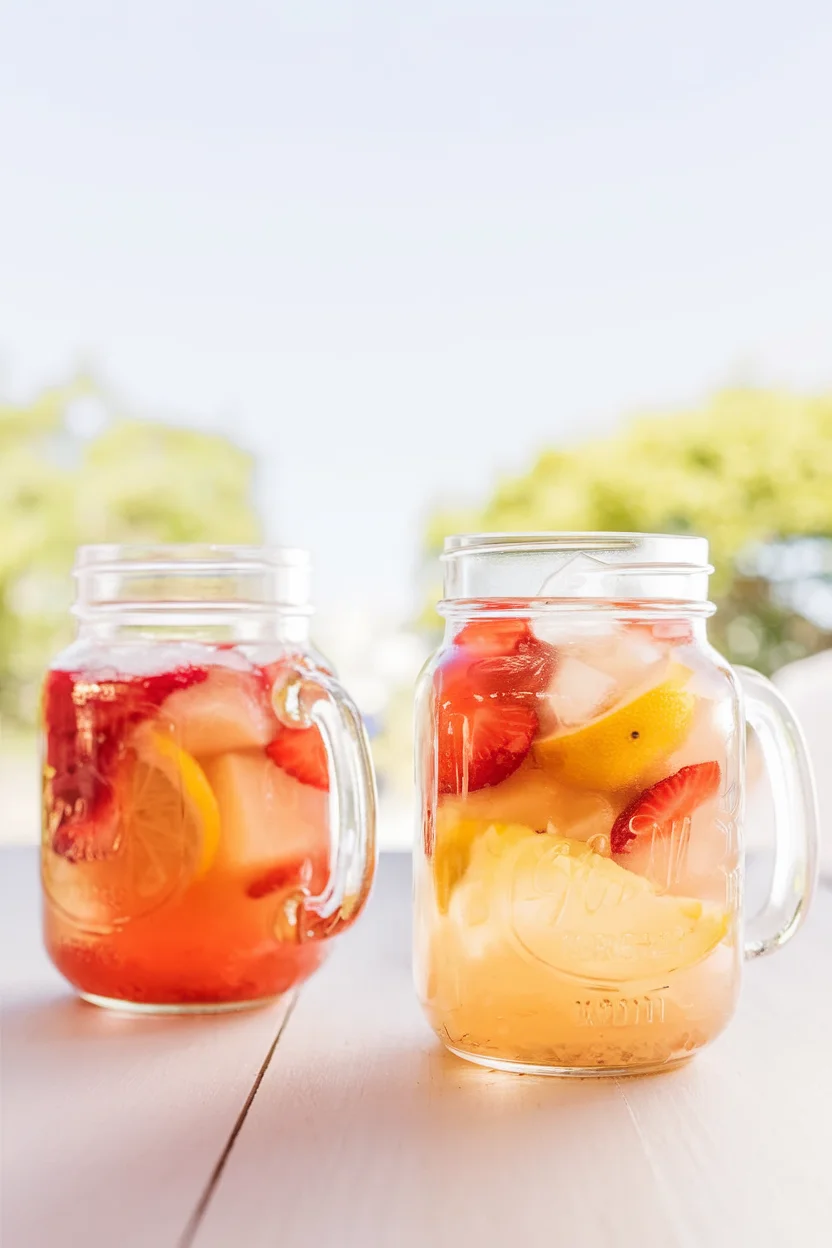
Take standard lemonade up a notch with the addition of fresh berries. It looks and tastes great!
- YIELDS: 4 – 6 serving(s)
- TOTAL TIME: 5 mins
INGREDIENTS
FOR SIMPLE SYRUP
- 1 lb. strawberries
- 1 c. sugar
FOR LEMONADE
- 2 c. Strawberry Simple Syrup
- 1 1/3 c. fresh lemon juice
- Sliced strawberries and lemons, for serving
DIRECTIONS
STRAWBERRY SIMPLE SYRUP
- In large saucepan, combine strawberries, sugar, and 2 cups water. Bring to a boil, stirring to dissolve sugar.
- Reduce heat and simmer until berries turn pale and liquid is red, about 10 minutes. Skim off and discard any foam that has risen to surface.
- Let syrup cool in saucepan 1 hour. Strain through fine-mesh sieve and let cool completely (discard berries or save for another use). Refrigerate in airtight container up to 2 weeks.
FRESH BERRY LEMONADE
- In pitcher, stir together Strawberry Simple Syrup, lemon juice, and 5 cups ice-cold water. Serve over ice with fruit.
Grilled Favorites
Burgers and hotdogs are always a safe bet, but we also love herby shrimp skewers, jalapeño-lime chicken breast, garlic-butter salmon, or a simple foil packet meal.
Grilled Chicken Kebabs
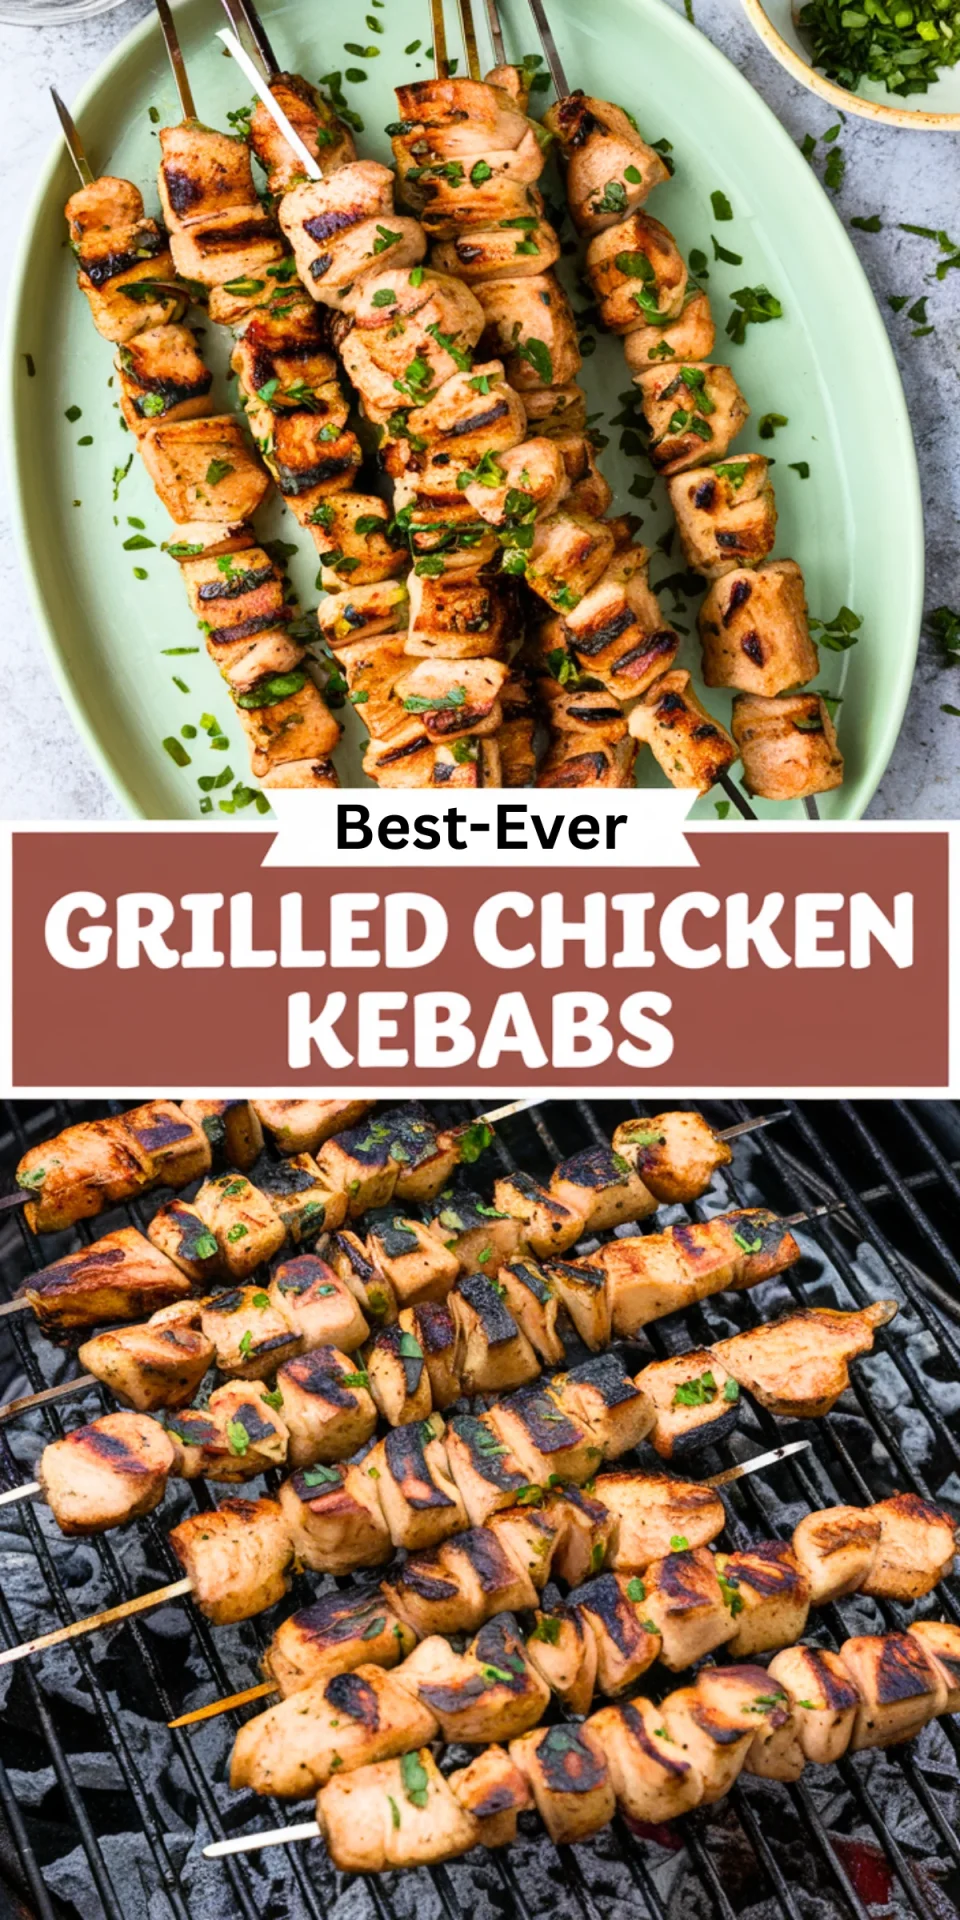
What’s my idea of the perfect summer dinner? Bite-sized pieces of herby yogurt-marinated chicken threaded onto skewers, then grilled to perfection.
- PREP TIME: 30 mins
- COOK TIME: 8 to 10 mins
- SERVES: 4 to 6
INGREDIENTS
- 2 cloves garlic
- 1 medium lemon
- 1/4 cup fresh parsley leaves, plus more for garnish
- 1 cup whole milk plain yogurt
- 2 teaspoons kosher salt
- 1 teaspoon paprika
- 1/4 teaspoon red pepper flakes (optional)
- 2 pounds boneless, skinless chicken breasts or thighs
- Vegetable oil
INSTRUCTIONS
- Prepare the yogurt marinade. Prepare the following, adding each to a gallon-sized zip-top bag as it is completed: Mince 2 garlic cloves. Finely grate the zest of 1 medium lemon, then juice the lemon (about 1 tablespoon). Finely chop 1/4 cup fresh parsley leaves. Add 1 cup whole milk plain yogurt, 2 teaspoons kosher salt, 1 teaspoon paprika, and 1/4 teaspoon red pepper flakes if desired. Seal the bag and massage to combine.
- Cut the chicken into pieces. Cut 2 pounds boneless skinless chicken breasts or thighs into 1-inch pieces.
- Marinate the chicken. Transfer the chicken to the yogurt marinade. Seal the bag, then massage the chicken to coat. Set aside at room temperature for 30 minutes or refrigerate up to overnight.
- Heat the grill. Prepare an outdoor grill for medium-high, direct heat. Meanwhile, soak 8 skewers in water if wooden.
- Thread the chicken onto skewers. Thread the chicken onto 8 skewers, 6 to 8 pieces per skewer, leaving 1/4 to 1/2-inch space between pieces. Place the skewers on a rimmed baking sheet.
- Grill the skewers. Once the grill is hot, scrape the grill grates clean. Oil the grill grates with a paper towel dipped in vegetable oil. Place the skewers on the grill in a single layer. Cover and grill until grill marks form and the chicken easily releases from the grill, 4 to 5 minutes. Flip the skewers and grill until the chicken is cooked through and registers 165°F on an instant read thermometer, 4 to 5 minutes more.
- Serve the skewers. Garnish with more parsley and serve immediately.
Grilled Merguez Sausages and Veggies with Crispy Chickpeas
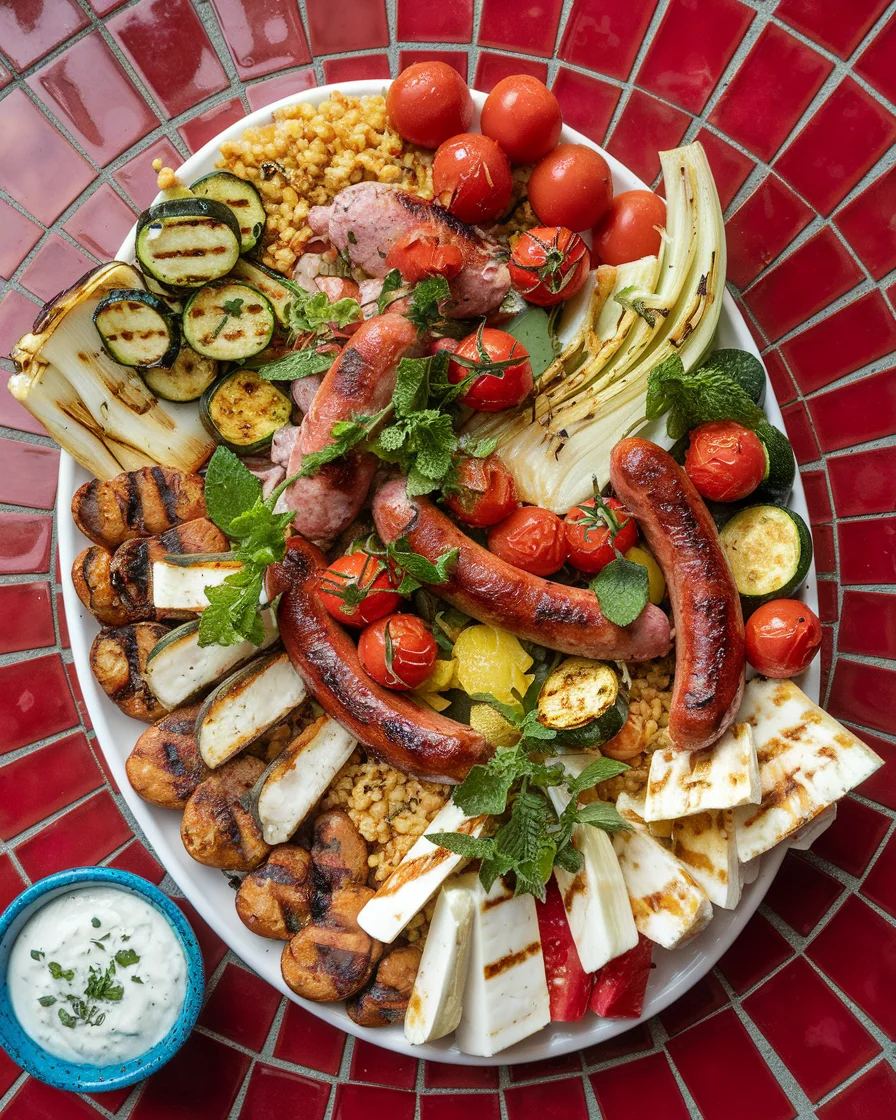
A mixed grill is a fun way to celebrate, and its customizable nature makes it perfect for guests.
- PREP TIME: 1 hour
- COOK TIME: 30 minutes
- SERVES: 8
INGREDIENTS
FOR THE GARLIC MAYONNAISE AND SERVING:
- 2 cloves garlic
- 1 medium lemon
- 1/2 cup mayonnaise
- 1/2 teaspoon kosher salt
- 1/2 cup mixed tender fresh herbs, such as parsley, cilantro, dill, fennel fronds, mint, and chives
FOR THE MIXED GRILL:
- 8 (about 8-inch) skewers
- 1 (about 15-ounce) can garbanzos beans
- 6 (about 6-inch) pita breads
- 1 bunch scallions
- 1 medium zucchini (about 8 ounces)
- 1 medium yellow summer squash (about 8 ounces)
- 1 pint cherry tomatoes (about 12 ounces)
- 2 medium endives
- 1 large fennel bulb (about 1 pound)
- 8 to 9 ounces halloumi cheese
- 1 pound merguez sausage (4 to 5 links)
- 1/4 cup plus 2 tablespoons vegetable oil, divided, plus more for the grill grates
- 2 1/4 teaspoons kosher salt
- 2 tablespoons olive oil
INSTRUCTIONS
- If using wooden skewers, soak 8 skewers in water for 1 hour. Meanwhile, make the garlic mayo and prep the herbs.
MAKE THE GARLIC MAYONNAISE:
- Finely grate 2 garlic cloves into a small bowl. Finely grate the zest of 1/2 medium lemon into the bowl. Halve the lemon and juice one half into the bowl (about 1 1/2 tablespoons); reserve the remaining lemon half. Add 1/2 cup mayonnaise and 1/2 teaspoon kosher salt to the bowl and stir to combine. Refrigerate until ready to serve.
- Pick 1/2 cup mixed fresh herb leaves, tear into bite-sized pieces, and refrigerate.
MAKE THE MIXED GRILL:
- Heat an outdoor grill for direct, medium-high heat. Meanwhile, prepare the mixed grill ingredients.
- Line half a baking sheet with paper towels. Drain and rinse and 1 can garbanzo beans, then place on the paper towels. Prepare the following, placing them on the other half the baking sheet: Halve 6 pita breads. Trim 1 bunch scallions. Halve 1 medium zucchini and 1 medium yellow squash lengthwise.
- Prepare the following and place on a second baking sheet: Skewer 1 pint cherry tomatoes (5 to 6 per skewer). Quarter 2 endives lengthwise through the core. Trim 1 large fennel bulb, then cut through the core into 8 wedges. Cover the endive and fennel with a damp paper towel to keep from oxidizing. Cut 8 to 9 ounces halloumi crosswise into 1/2-inch thick planks and place in a small bowl.
- Place 1 pound merguez sausages on a separate plate. Brush everything on the baking sheets and sausages (brush those last if serving vegetarians) with 1/4 cup of the vegetable oil. Season the vegetables with 2 1/4 teaspoons kosher salt.
- When the grill is ready, scrub the grates clean if needed. Oil the grates with a paper towel dipped in vegetable oil.
- Grill each ingredient uncovered, working in a few batches so that the grill is not crowded. Return each ingredient to the baking sheet as it is ready:
- Heat a cast iron skillet directly on the grill grates until hot. Add 2 tablespoons vegetable oil. When the oil shimmers, add the garbanzo beans and discard the paper towel. Cook until the beans are starting to char and crisp, about 2 minutes. Return the beans to the baking sheet and remove the skillet from the grill (careful, hot!).
- Grill the fennel until crisp-tender and charred in spots, about 3 minutes per side.
- Grill the tomato skewers until charred in spots and starting to burst, about 1 1/2 minutes.
- Grill the zucchini and yellow squash until crisp-tender and grill marks appear, about 2 minutes per side.
- Grill the endive until charred in spots and starting to wilt, about 1 1/2 minutes per side.
- Grill the scallions perpendicular to the grill grates until charred in spots, about 2 minutes.
- Grill the pita until charred in spots, 30 seconds to 1 minute per side.
- Grill the halloumi on only one side until grill marks appear, about 45 seconds, then remove from the grill with a spatula.
- Grill the sausages until charred in spots and cooked through, about 2 1/2 minutes per side. Transfer to to a clean plate if feeding vegetarians.
- Cut the zucchini and squash crosswise into 1-inch pieces. Coarsely chop the scallions. Toss the zucchini and scallions together. Quarter each sausage crosswise on a slight diagonal.
- Decoratively arrange all the grilled foods on a platter, placing the sausages on a separate plate if serving vegetarians. Drizzle 2 tablespoons olive oil and squeeze the reserved half lemon over the vegetables.
- Dollop the garlic mayonnaise over the vegetables, or serve separately in a bowl. Garnish the platter with the reserved herbs.
Grilled Shrimp Skewers with Chimichurri
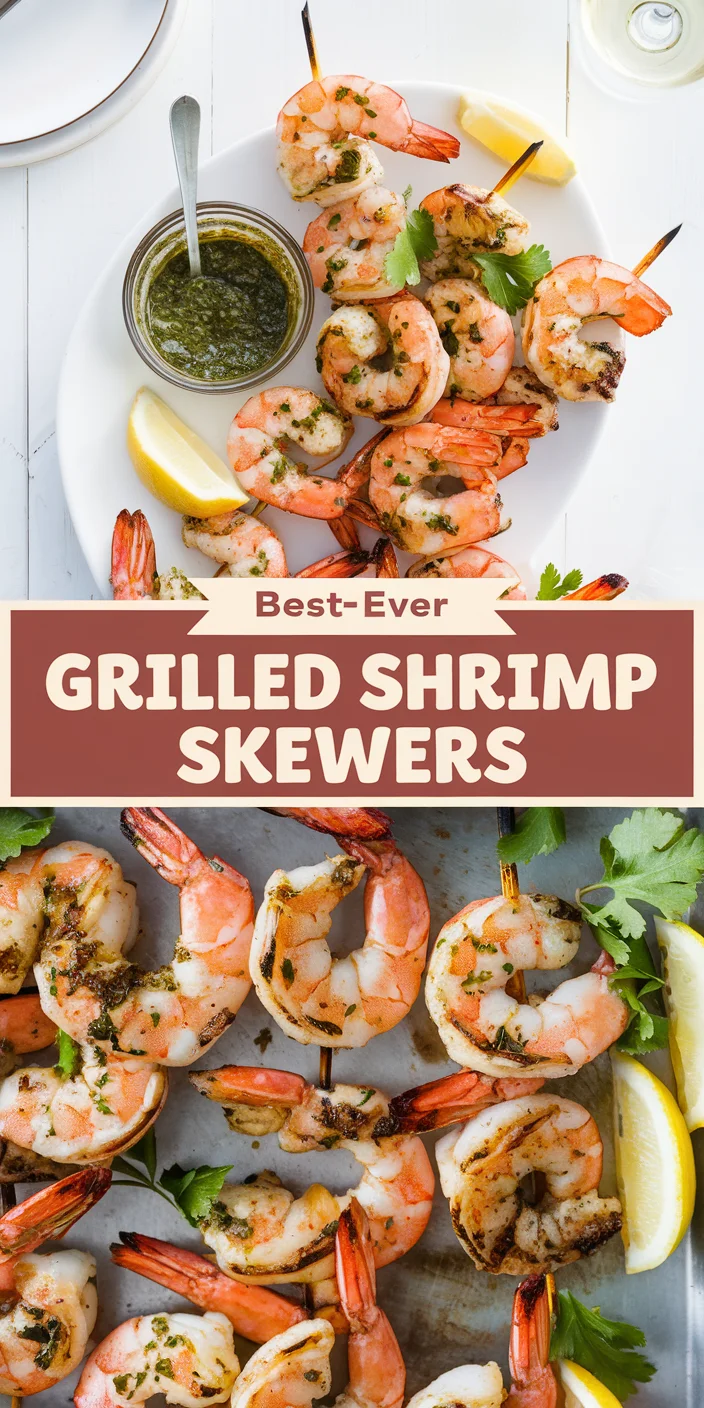
An herby, garlicky chimichurri sauce doubles as both the marinade and a dipping sauce for these easy shrimp skewers. Serve them for dinner on a busy weeknight or as a fast and fancy appetizer at your next grilling party. Don’t be surprised if you come back to this recipe over and over again.
- SERVES: 4
INGREDIENTS
- 1 1/2 cups packed fresh parsley leaves
- 1/2 cup olive oil
- 1/4 cup packed fresh oregano leaves (from about 1 bunch)
- 2 tablespoons freshly squeezed lemon juice
- 1 tablespoon red wine vinegar
- 2 cloves garlic
- 1 teaspoon kosher salt, divided
- 1/4 teaspoon red pepper flakes
- 2 pounds extra-large uncooked shrimp, peeled and cleaned (16 to 20 shrimp per pound)
- 10 (9- to 10-inch) skewers (soak wooden skewers in water for 20 minutes)
- 1 medium lemon, cut into 10 wedges
INSTRUCTIONS
- Place the parsley, oil, oregano, lemon juice, vinegar, garlic, 1/2 teaspoon of the salt, and red pepper flakes in a blender or food processor fitted with the blade attachment. Pulse until it forms a chunky paste. Transfer 3 tablespoons to a large bowl. Transfer the remaining chimichurri to a serving bowl.
- Add the shrimp and remaining 1/2 teaspoon salt to the large bowl and toss to combine. Let sit for 15 minutes. Meanwhile, prepare an outdoor grill to high (450°F to 550°F).
- Thread a lemon wedge through the rind onto a skewer and slide down to about 1/2 inch from the end. Thread about 5 shrimp onto the skewer, skewering each shrimp twice (through the tail and head ends) and spacing them evenly. Place on a baking sheet and repeat with skewering the remaining lemon wedges and shrimp.
- Place the skewers in a single layer on the grill without touching (grill in batches if needed). Cover the grill and cook until grill marks appear on the bottom, about 4 minutes. Flip the skewers, cover, and cook until the shrimp are just firm, about 1 minute more. Transfer the skewers to a serving dish and serve with the reserved chimichurri sauce.
Easy Jalapeño Grilled Chicken
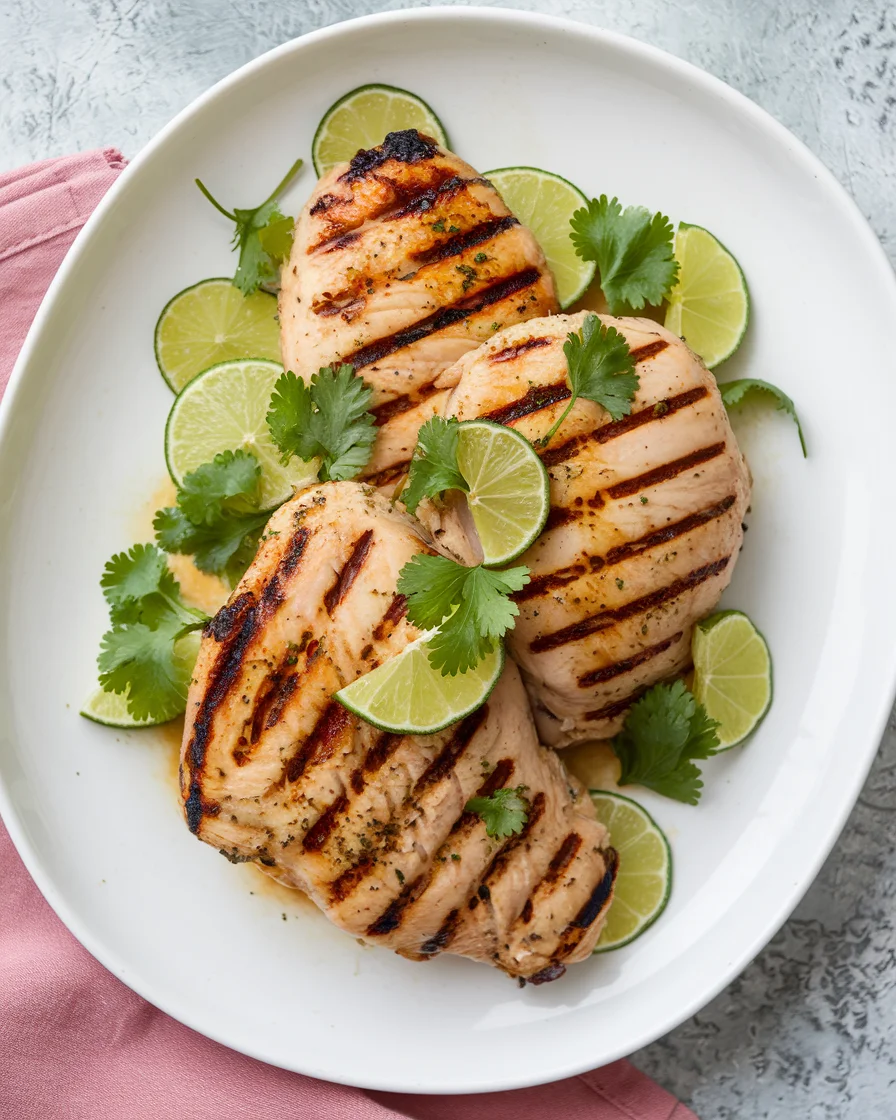
Summertime cooking is stripped down, casual, and always from the grill. These easy grilled chicken breasts are a summer stunner. They’re cooked roaring fast over the flames of the grill and flavored with tart lime and the fiery heat of jalapeños.
- SERVES: 4
INGREDIENTS
- 4 boneless, skinless chicken breasts (about 2 pounds total)
- 4 peeled garlic cloves
- 2 limes, quartered
- 2 medium jalapeños, cut into thirds (seeded, if desired)
- 1/4 cup olive oil
- 1 teaspoon kosher salt
- 1/2 teaspoon ground cumin
FOR SERVING:
- Lettuce
- Cilantro
- Lime wedges
- Diced jalapeños
INSTRUCTIONS
- Working with 2 chicken breasts at a time, place inside a gallon zip-top bag. Use the flat side of a meat mallet or a rolling pin and pound them until they are 1/2-inch thick. Transfer the flattened chicken breasts to a plate and repeat with the remaining breasts. Transfer the second batch of breasts to the plate, and then make sure your zip-top bag does not have any holes in it from pounding the chicken breasts. If it does, replace with a new bag; otherwise build the marinade in the same bag.
- Place the garlic, limes, and jalapeños in the zip-top bag. Seal the bag, removing as much air as possible, then pound until the garlic, limes, and jalapeños are smashed but not pulverized. Open the bag and add the olive oil, salt, cumin, and pounded chicken breasts. Close the bag and massage to coat the chicken. Place the bag on a baking sheet so that the chicken lays in a single layer in the bag. Refrigerate for at least 30 minutes or overnight.
- When ready to cook, remove the chicken from the refrigerator while the preheating the grill. If using a gas grill, heat the grill to high. For a charcoal grill, prepare the grill for both direct and indirect heat. Once the grill grates are hot, scrape any debris from the grates and oil well.
- Remove the chicken breasts from the marinade with tongs. Place the breasts over direct heat, cover, and cook undisturbed until grill marks appear, about 4 minutes. If the meat sticks to the grill, continue to cook for another minute until it releases easily. Flip and cook the second side until grill marks appear, about 5 minutes. Reduce the heat to medium on a gas grill (or transfer to indirect heat on a charcoal grill) and grill until the chicken is cooked through and registers 165°F on an instant-read thermometer.
- Transfer the chicken to a clean cutting board. Let rest for 5 minutes before slicing and serving over a bed of lettuce with more lime, diced jalapeños, and cilantro.
Easy Grilled Steak
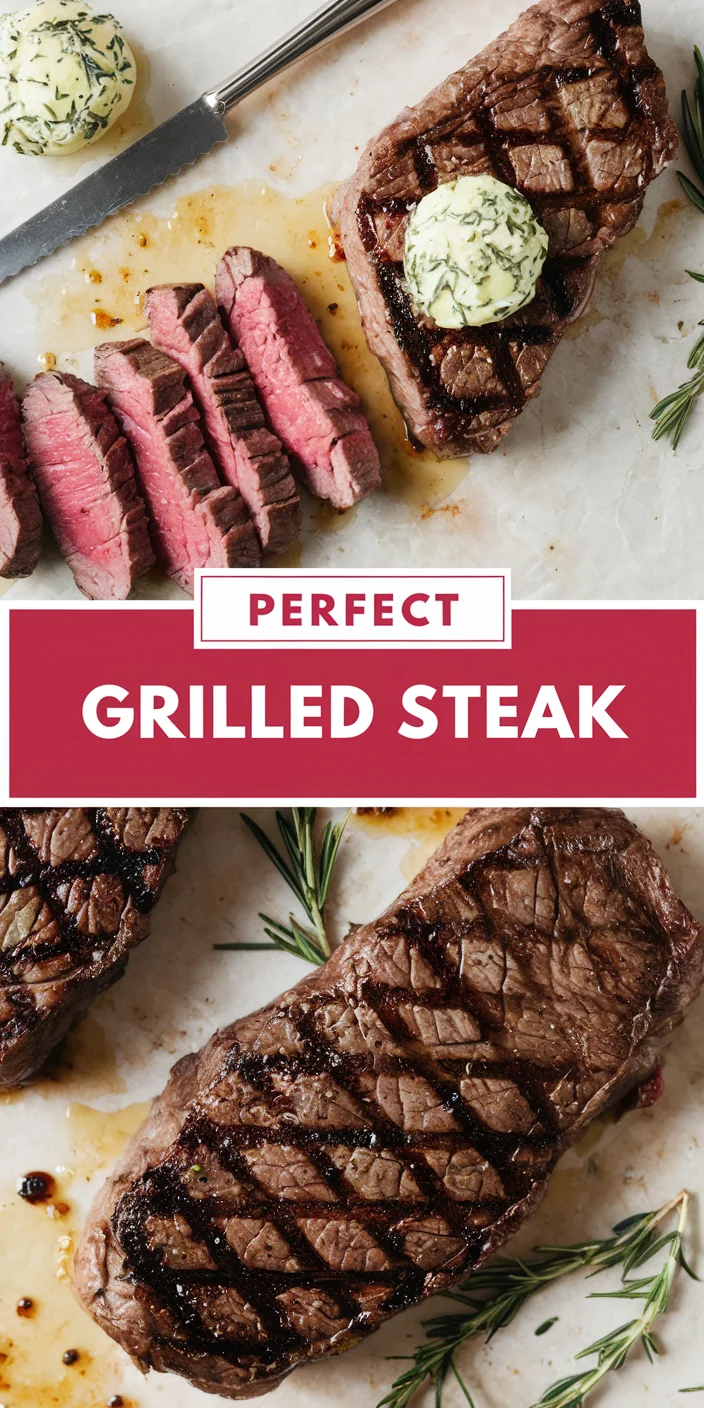
If you’re intimidated by grilling steak this is the recipe for you. It’s smart, it’s easy, and it yields flawlessly grilled steak every single time.
- PREP TIME: 25 minutes to 2 hours
- COOK TIME: 8 to 12 minutes
- SERVES: 2 to 4
INGREDIENTS
- 2 (1 1/4 to 1 1/2-inch thick) New York strip steaks (about 12 ounces each)
- Kosher salt
- 2 teaspoons canola or peanut oil
FOR THE COMPOUND BUTTER: (OPTIONAL)
- 1 stick (8 tablespoons) unsalted butter, at room temperature
- 2 teaspoons chopped fresh thyme leaves
- 2 teaspoons chopped fresh rosemary leaves
- 1/4 teaspoon red pepper flakes
- 1/4 teaspoon kosher salt
INSTRUCTIONS
- Season the steaks in advance. Season the steaks with about 1/2 teaspoon of kosher salt per pound of meat (3/4 teaspoon total for two 12-ounce steaks). Make sure to season the edges as well as the sides. Place on a plate and refrigerate uncovered for at least 2 hours or overnight.
- Make the compound butter. Place all the ingredients in a small bowl and mash with a fork or spatula until combined. Scoop the compound butter onto a piece of plastic wrap or parchment paper, then roll into a log. Twist the ends to seal. Refrigerate until chilled, at least 1 hour.
- Remove the steaks from the fridge 1 hour before cooking. Remove the plate of steaks from the refrigerator and let sit out at room temperature for about an hour before grilling. Coat each steak in about a teaspoon of oil.
- Heat the grill to high. Heat an outdoor grill to high, direct heat.
- Put the steaks on the grill. Scrape the grill grates clean if needed. Place the steaks on the grill, cover, and grill until grill marks form on the bottom, about 3 minutes.
- Sear the other side of the steaks. Flip the steaks, cover, and grill until grill marks form on the second side.
- Grill to desired doneness. Flip the steaks again and continue to grill until desired doneness. If the steaks are browning too quickly, turn a gas grill down to medium or move the steaks to a cooler part of a charcoal grill. Use the an instant-read thermometer to determine when your steaks are cooked to your liking: 125°F for rare, 130 to 135°F for medium-rare, or 140°F for medium. Transfer the steaks to a cutting board.
- Slice the steak. Slice the steak on a diagonal into 1/4-inch thick slices. Top with a slice or two of the compound butter, if desired, just before serving.
Juicy Grilled Burgers

Just one ingredient will make your burgers infinitely juicier this summer, and it’s already in your kitchen: butter!
- PREP TIME: 25 minutes
- COOK TIME: 15 minutes
- SERVES: 8
INGREDIENTS
- 2 sticks (8 ounces) cold unsalted butter
- 3 pounds ground beef, preferably sirloin
- 1 tablespoon kosher salt
- 8 slices cheese, such as American, cheddar, or Swiss (optional)
- For serving: split hamburger buns, lettuce, sliced tomato, thinly sliced red onion
INSTRUCTIONS
- Grate the butter. Using the large holes of a box grater, grate the cold butter into large, thin pieces. (Use the wrapper from the butter to catch the butter shards and make moving them easier.)
- Form the patties. Place the ground beef in a large bowl and sprinkle the butter on top. Using your hands, quickly and gently fold the butter into the beef. Shape the burgers into 8 (6-ounce) patties about 4 inches in diameter and 3/4-inch thick.
- Season the patties. Place the patties on a rimmed baking sheet and season both sides with salt. Be generous, but you might not use all the salt called for. Set aside while you prepare the grill.
- Prepare the grill for medium-high heat. Heat an outdoor grill to direct, medium-high heat. Scrape the grill grates clean if needed.
- Grill for 4 minutes each side. Place the patties on the grill in a single layer. Grill the burgers for 4 minutes — expect a few flare-ups as the butter melts. Using a thin metal spatula, flip the burgers and grill until the burgers are browned and crisp on the outside, about 4 minutes more.
- Serve the burgers. If using cheese, place a slice on each patty during the last minute of grilling. Serve immediately.
Garlic Butter Salmon in Foil
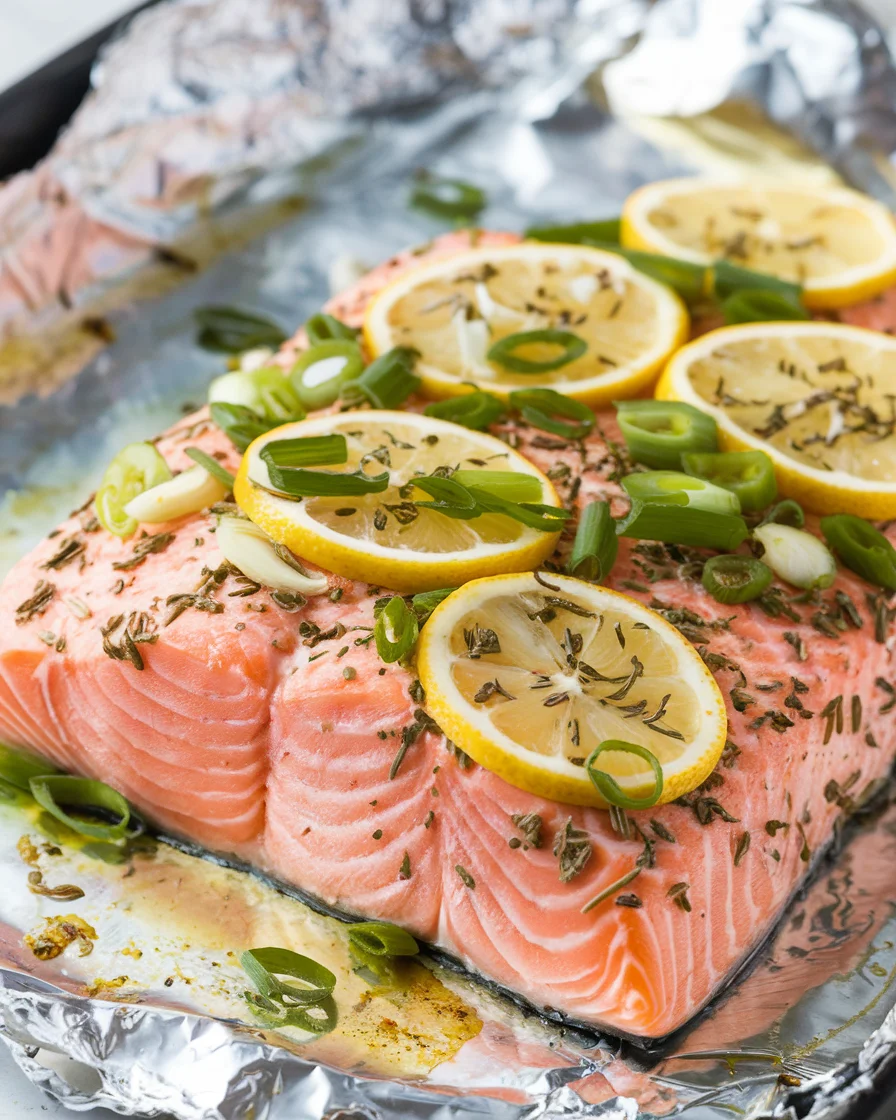
Ready to go beyond grilled chicken, burgers, and hot dogs? Tender, flaky salmon drenched in garlic butter is, hands-down, the best thing to cook on your grill this summer.
- SERVES: 6 to 8
INGREDIENTS
- 2 cups cold water
- 1 tablespoon kosher salt
- 1 (2-pound) side salmon, pin bones and scales removed
- 6 cloves garlic, minced
- 4 medium scallions, thinly sliced
- 2 tablespoons freshly squeezed lemon juice (from 1 lemon)
- 1 medium lemon, thinly sliced
- 4 tablespoons (1/2 stick) unsalted butter, thinly sliced
INSTRUCTIONS
- Soak the salmon in salt water for 1 hour. Place the water and salt in 9×13-inch baking dish and stir to dissolve the salt. Place the salmon skin-side up in the brine. Cover and refrigerate for 1 hour. (This step will reduce the white film that comes from baking salmon in a packet.)
- Season the salmon. Prepare a large piece of aluminum foil (about 18×18 inches). Remove the salmon from the brine and pat dry with paper towels. Place skin-side down on the foil. Sprinkle evenly with the garlic and scallions. Drizzle the lemon juice over the salmon.
- Layer the butter and lemon on the salmon. Place the lemon slices and butter evenly over the salmon. Fold up two opposite sides of the foil over the center, then pinch them shut and roll them tightly to seal. Repeat with the remaining two sides to completely enclose the salmon in a foil packet. Place on a baking sheet for easy transfer to the grill.
- Grill the salmon. Heat an outdoor grill for direct, medium-high heat. Place the salmon packet on the grill, cover, and cook for 15 minutes. Carefully open the packet, cover the grill, and continue to cook until the salmon is pink and registers 135°F, 5 to 8 minutes. Set aside to rest for 5 minutes before serving.
Sausage, Potato & Green Bean Packets
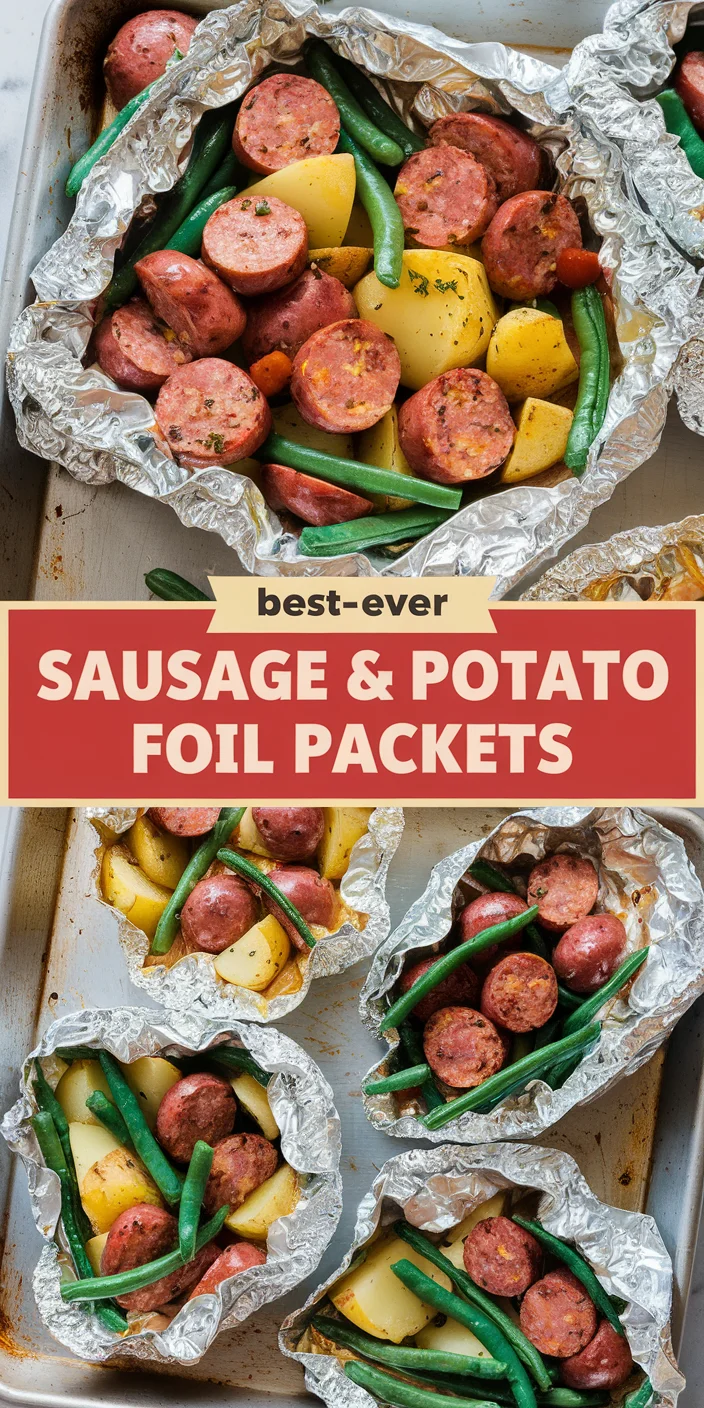
Combine cooked sausage, chopped potatoes, and green beans; add some butter and a dash of Cajun seasoning; and wrap in foil for a no-mess dinner in minutes.
- PREP TIME: 10 minutes
- COOK TIME: 20 to 25 minutes
- SERVES: 4
INGREDIENTS
- 12 ounces smoked sausage, such as andouille or kielbasa, cut into 1-inch pieces
- 1 1/2 pounds baby Yukon gold potatoes, quartered
- 8 ounces green beans, trimmed and halved
- 1 tablespoon Cajun seasoning
- 2 tablespoons unsalted butter, melted and cooled
INSTRUCTIONS
- Heat an outdoor grill to medium-high heat. Prepare 4 (8×8-inch) sheets of heavy-duty aluminum foil and set aside.
- Place the sausages, baby potatoes, and green beans in a large bowl. Add the Cajun seasoning and butter and toss to coat everything in the spicy, buttery goodness.
- Divide the potato and green bean mixture between the 4 pieces of foil. Fold each piece of foil up into a tight packet that is completely sealed — fold 2 opposing sides together and then crimp the edges closed.
- Place the packets on the grill. Cover and grill until the potatoes are tender, about 25 minutes. Use caution when opening the packets, as they are quite steamy.
Pineapple BBQ Chicken Foil Packets
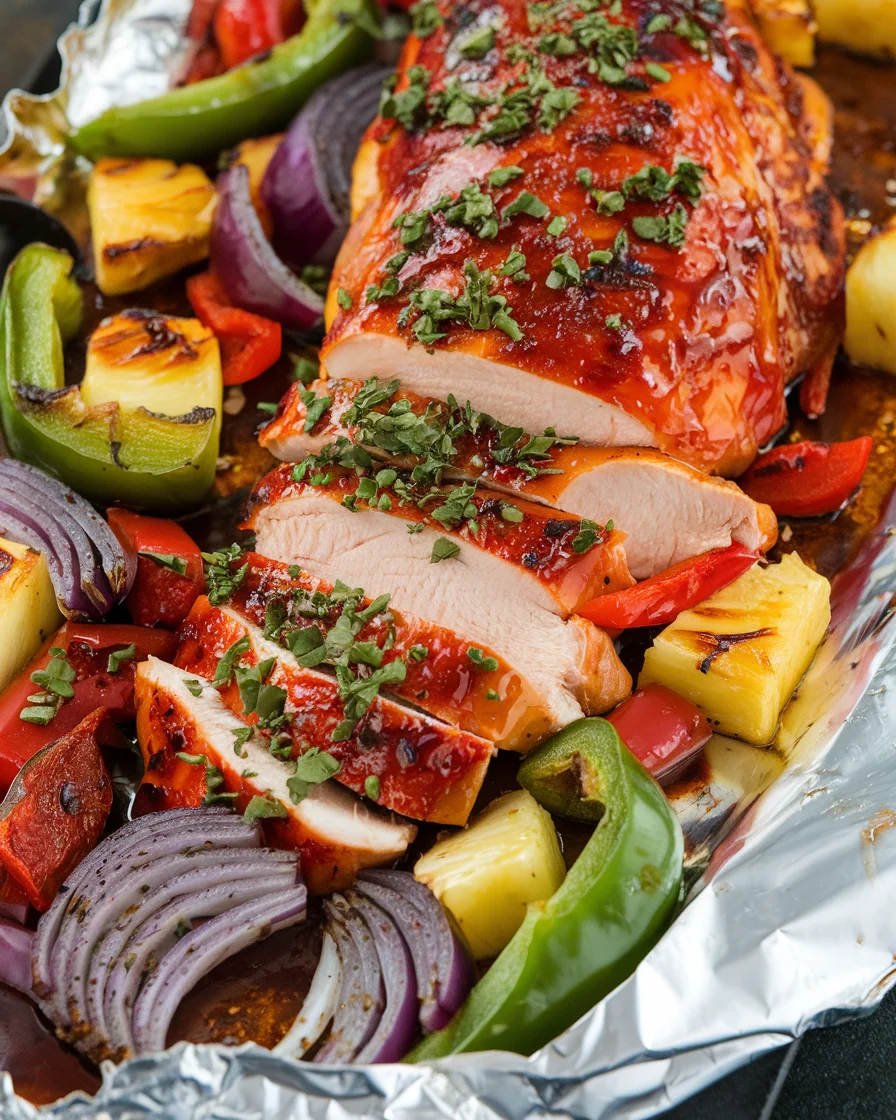
Pineapple and barbecue sauce are the ultimate smoky-sweet duo, and a natural fit for summer grilling.
- PREP TIME: 10 minutes
- COOK TIME: 20 to 25 minutes
- SERVES: 4
INGREDIENTS
- 1 small pineapple
- 1 medium red onion
- 1 medium green bell pepper
- 2 cups barbecue sauce, divided
- 1 teaspoon kosher salt, divided
- 1 teaspoon freshly ground black pepper, divided
- 4 (6-ounce) boneless, skinless chicken breasts
INSTRUCTIONS
- Heat an outdoor grill to medium-high, direct heat. Prepare 4 (10-inch long) sheets of aluminum foil.
- Prepare the following, placing them all in the same large bowl: Peel, core and dice 1 small pineapple to get 2 cups, thinly slice 1 medium red onion, and slice 1 medium green bell pepper. Add 1 cup of the barbecue sauce, 1/2 teaspoon of the kosher salt, and 1/2 teaspoon of the black pepper. Toss to combine.
- Divide the vegetable mixture between the 4 sheets of foil, leaving a 2-inch border on all sides. Season 4 boneless, skinless chicken breasts with the remaining 1/2 teaspoon kosher salt and remaining 1/2 teaspoon black pepper, then place a breast on each vegetable pile. Pour the remaining 1 cup barbecue sauce over the chicken.
- Fold the sides of the foil to meet over the center, then crimp the edges together to create completely sealed packets. Place the packets directly onto the grill grates, cover, and grill until the chicken is cooked through and the vegetables are tender, 20 to 25 minutes. Let cool for 10 minutes before opening the packets and serving.
Meaty Mains
No grill, no problem! There are plenty of meaty, summery mains that are perfect for the day and don’t require a grill. If you’re up for a little bit of a project, go for a batch of saucy ribs in the oven or some fried chicken. Or if you prefer to keep things as easy as can be, dill pickle chicken or slow cooker pulled pork will be right up your alley.
Oven-Cooked Ribs
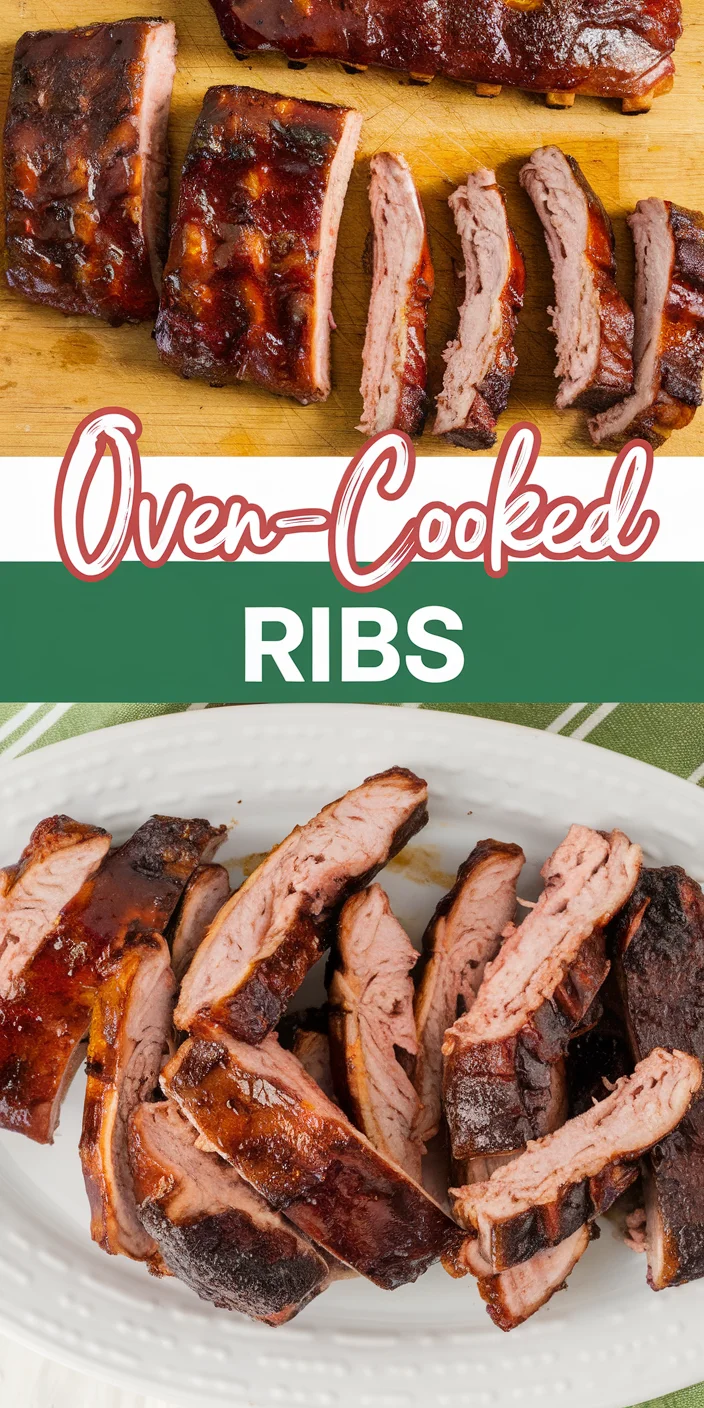
We’ve cracked the code to making perfectly tender and mouth-watering barbecued ribs in the oven.
- PREP TIME: 20 minutes
- COOK TIME: 2 to 3 hours
- SERVES: 6 to 8
INGREDIENTS
- 4 to 5 pounds pork spareribs or baby back ribs
- 1/4 cup Dijon mustard
- 1 to 2 teaspoons liquid smoke (optional)
- 1 cup spice rub
- 1 cup barbecue sauce, plus more for serving
INSTRUCTIONS
- Prepare the baking sheet. Line a rimmed baking sheet with aluminum foil. Fit a wire cooling rack on top. Lay the ribs on top of the rack in a single layer. This arrangement allows for heat circulation on all sides of the ribs.
- Season the ribs. Stir the mustard and the liquid smoke together, if using, and brush the ribs on both sides. Sprinkle the ribs with the dry rub and pat gently to make sure the rub adheres to the rib meat. (Note: This step can be done the day ahead for a deeper flavor. Wrap the seasoned ribs in plastic wrap and refrigerate.)
- Broil the ribs. Arrange an oven rack a few inches below the heating element and heat the broiler. Make sure the meaty side of the ribs is facing up. Broil until the sugar in the dry rub is bubbling and the ribs are evenly browned, about 5 minutes.
- Bake the ribs. Set the oven to 300°F. Move the ribs to an oven rack in the middle of the oven. Bake 2 1/2 to 3 hours for spareribs or 1 1/2 to 2 hours for baby back ribs. Halfway through cooking, cover the ribs with aluminum foil to protect them from drying out.
- Brush with barbecue sauce. About 30 minutes before the end of cooking, brush the ribs with barbecue sauce, re-cover with foil, and continue cooking.
- Rest the ribs and serve. The ribs are done when a knife slides easily into the thickest part of the rib meat. Let them rest, covered, for about 10 minutes, and then cut between the bones to separate the individual ribs. Serve immediately with extra barbecue sauce for dipping.
Brown Butter Lobster Rolls

Inspired by Eventide Oyster Co. in Portland, Maine, big chunks of meat are tossed with rich brown butter. It’s a nutty contrast to the lobster meat that’s balanced by a big squeeze of lemon juice and a smattering of chopped fresh chives.
- SERVES: 4
INGREDIENTS
- 8 tablespoons (1 stick) unsalted butter
- 1 pound cooked Maine lobster meat, cut into bite-sized pieces
- 1 tablespoon freshly squeezed lemon juice
- 1/8 teaspoon flaky sea salt or kosher salt
- 4 brioche hot dog buns
- 2 tablespoons finely chopped fresh chives
INSTRUCTIONS
- Melt the butter in a light-colored, high-sided large frying pan over medium heat. Swirl the pan occasionally to be sure the butter is cooking evenly. As the butter melts, it will begin to foam. The color will progress from lemony-yellow to golden-tan to a toasty-brown. Once you smell that nutty aroma, immediately take the pan off the heat, add the lobster meat, and toss to combine. Add the lemon juice and salt and give the mixture another toss.
- Divide the lobster meat among the buns. Top each with chives and serve immediately.
Crispy, Juicy Fried Chicken (Better than KFC)

Using the recently leaked secret spice blend from KFC and best frying practices, we make finger-licking chicken that tastes better than the Colonel.
- PREP TIME: 45 minutes
- COOK TIME: 45 minutes
- SERVES: 4 to 6
INGREDIENTS
- 8 pieces bone-in chicken, preferably drumsticks and thighs
- 1 tablespoons plus 1 1/2 teaspoons kosher salt, divided
- 1 tablespoon plus 1 1/2 teaspoons smoked paprika
- 1 tablespoon ground white pepper
- 1 1/2 teaspoons garlic powder
- 1 1/2 teaspoons ground ginger
- 1 1/2 teaspoons celery salt
- 1 1/2 teaspoons freshly ground black pepper
- 1 1/2 teaspoons ground mustard
- 1 teaspoon dried thyme
- 1 teaspoon dried basil
- 1/2 teaspoon dried oregano
- 1 1/2 cups all-purpose flour
- 1 tablespoon cornstarch
- 1 cup buttermilk
- 2 large egg whites
- 2 tablespoons vodka or other neutral spirit
- 2 quarts peanut or vegetable oil, for deep frying
INSTRUCTIONS
- Salt the chicken. Place 8 bone-in chicken pieces on a baking sheet and sprinkle all over with 1 tablespoon of the salt. Let sit at room temperature for 30 minutes or cover loosely and refrigerate overnight.
- Make the seasoning blend. Place 1 tablespoon plus 1 1/2 teaspoons smoked paprika, 1 tablespoon ground white pepper, 1 1/2 teaspoons garlic powder, 1 1/2 teaspoons ground ginger, 1 1/2 teaspoons celery salt, 1 1/2 teaspoons freshly ground black pepper, 1 1/2 teaspoons ground mustard, 1 teaspoon dried thyme, 1 teaspoon dried basil, and 1/2 teaspoon dried oregano in a large bowl and stir to combine.
- Season the chicken. Coat the chicken all over with half of the seasoning mixture (about 3 tablespoons).
- Set up a dredging station. Add 1 1/2 cups all-purpose flour, 1 tablespoon cornstarch, and the remaining 1 1/2 teaspoons kosher salt to the remaining spice mixture in the bowl and whisk to combine. Place 1 cup buttermilk, 2 large egg whites, and 2 tablespoons vodka in a medium bowl and whisk to combine. Fit a wire rack over a second rimmed baking sheet.
- Dredge the chicken. Working with 1 piece of chicken at a time, dip in the buttermilk mixture to completely coat, then place in the flour mixture (don’t worry about letting any excess buttermilk drain off the chicken first). Shake the flour bowl as needed to completely coat the chicken, then use your fingers to press the flour coating onto the chicken.
- Set the coating. Place the coated chicken on the rack. Let sit at room temperature for at least 10 minutes and up to 30 minutes while you set up for frying and heat the oil for the coating to set up.
- Set up for frying. Meanwhile, place 2 quarts vegetable or peanut oil in a large Dutch oven and heat on medium-high heat until 350°F. Meanwhile, wash and dry the empty baking sheet the chicken was seasoned on. Line this baking sheet with paper towels and fit with a second wire rack; this will be your cooling station.
- Fry the chicken. Place 3 pieces of the chicken in the oil and fry, using tongs to flip or rotate the pieces every 3 to 4 minutes and adjusting the heat as needed to maintain 325°F, until golden-brown with an internal temperature of 165°F (check by inserting a probe thermometer into the thickest part of the chicken without touching bone), 12 to 15 minutes total.
- Cool the chicken. Transfer the chicken to the rack on the second baking sheet. Make sure the oil comes back up to 350°F before frying the remaining chicken in 2 more batches. Let cool for at least 10 minutes before serving.
Dill Pickle Chicken
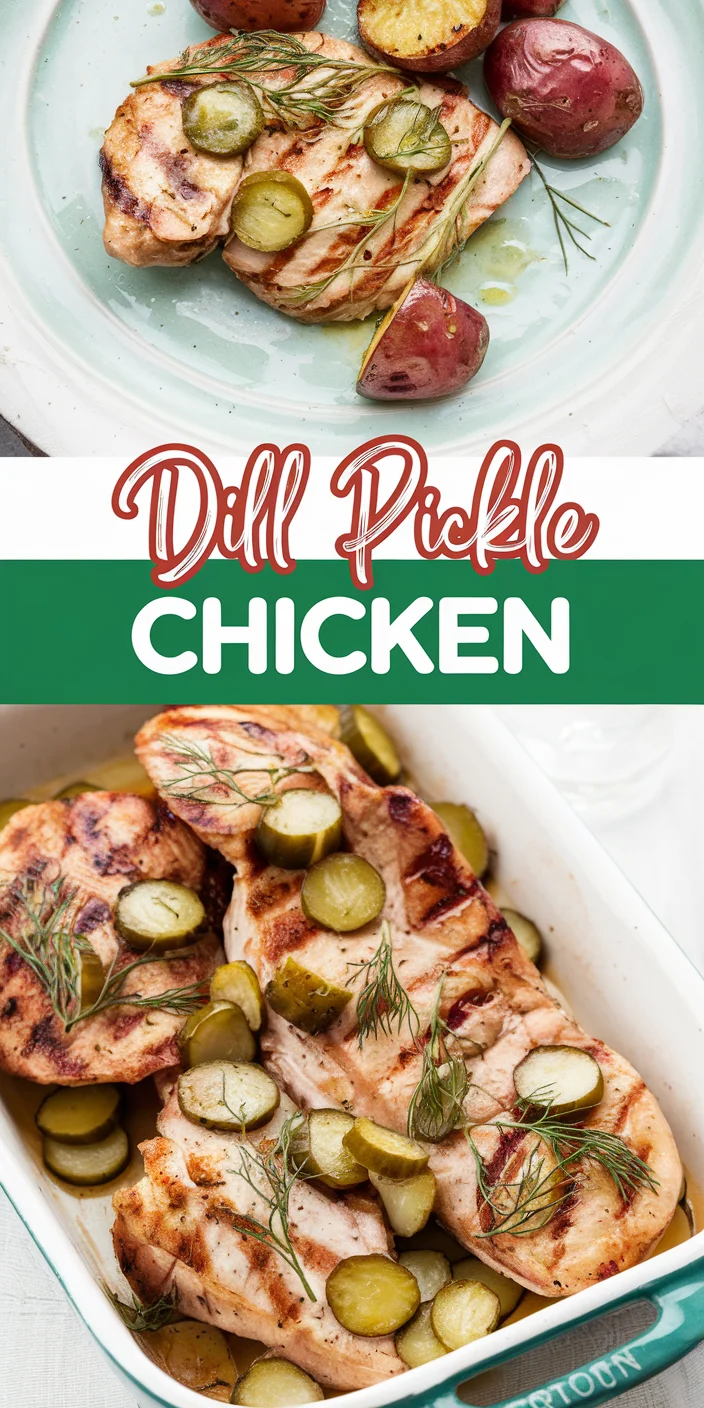
Spicy and tangy pickle juice is the one-ingredient brine that makes the most tender and delicious chicken you will eat all summer.
INGREDIENTS
- 2 pounds boneless, skinless chicken thighs (4 to 6 thighs)
- 2 cups pickle brine (from a 32-ounce jar or larger)
- Kosher salt
- Freshly ground black pepper
- 1/2 cup diced pickles (about 2 pickles, optional)
- 2 tablespoons chopped fresh dill (optional)
INSTRUCTIONS
- Place the chicken in a shallow dish or container and pour the brine over the top. If necessary, rearrange the chicken so each piece is completely submerged. Cover and refrigerate for 2 to 8 hours.
- Arrange a rack in the middle of the oven and heat to 425°F. Drain the chicken and pat dry with paper towels. Liberally season the chicken with salt and pepper on both sides. Place the chicken thighs in a single layer in an 8- or 9-inch square baking dish.
- Roast until the chicken reaches an internal temperature of 165°F, about 20 minutes. Cover with aluminum foil, and let the chicken rest for 10 minutes. Garnish with chopped pickles and fresh dill, and serve warm.
Slow Cooker Maple-Mustard Pulled Pork
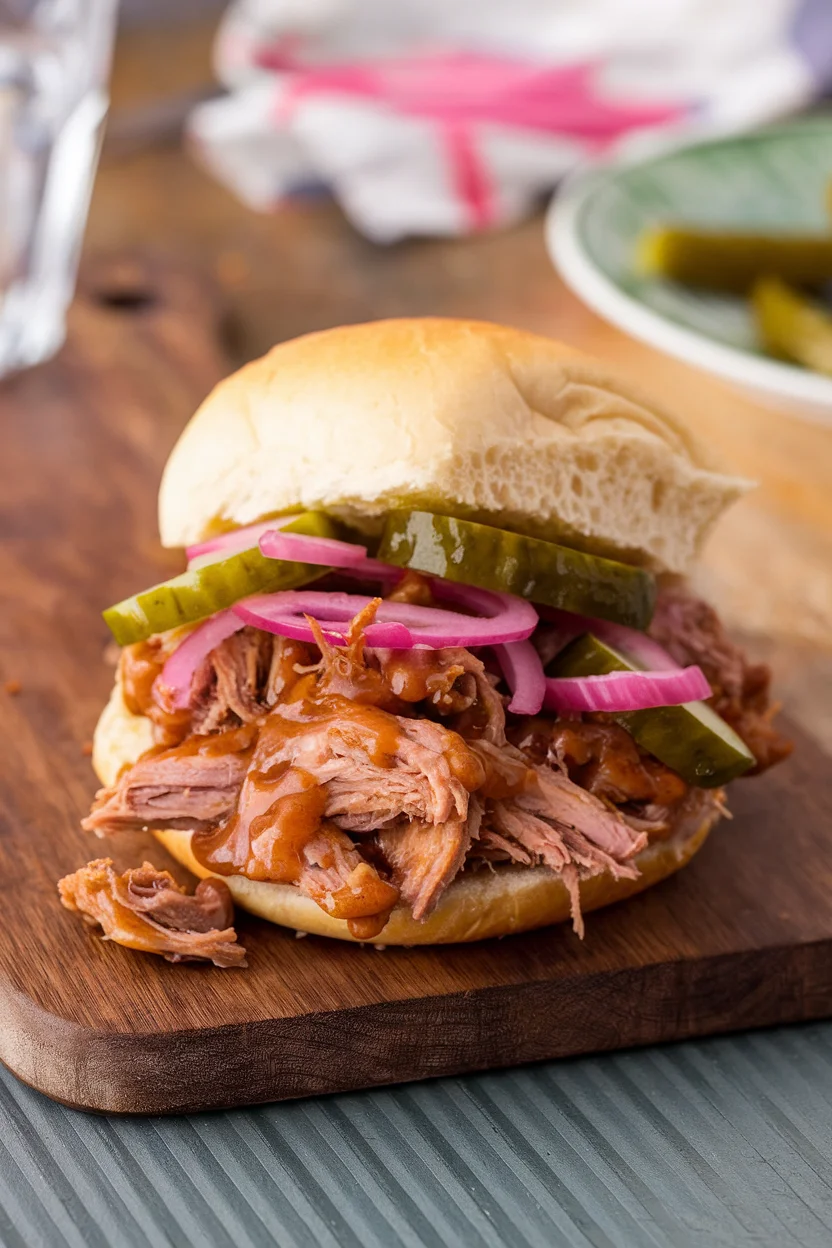
Transform everyday pulled pork with your slow cooker and the sweet and tangy flavors of maple syrup and mustard.
- SERVES: 6 to 8
INGREDIENTS
FOR THE PORK:
- 1 (4- to 5-pound) boneless pork shoulder or pork butt, halved
- 1 tablespoon kosher salt
- 1 teaspoon freshly ground black pepper
- 3/4 teaspoon dried oregano
- 1/2 cup maple syrup
- 3 tablespoons Dijon mustard
- 1/2 cup low-sodium chicken broth or water
- 2 tablespoons tamari or soy sauce
- 1 tablespoon apple cider vinegar
- 1 large yellow or white onion, peeled and cut into 8 wedges
- 4 cloves garlic, peeled and smashed
FOR THE MAPLE-MUSTARD SAUCE:
- 1/2 cup maple syrup
- 1/4 cup Dijon mustard
- 1/2 teaspoon dried oregano
- 1/4 teaspoon kosher salt
- Freshly ground black pepper
FOR SERVING:
- Hamburger or slider buns
- Pickled red onion
INSTRUCTIONS
- Make the pork: Trim off any large pieces of fat from the surface of the pork. Sprinkle the salt, pepper, and oregano evenly over all sides of the pork, then rub the seasonings into the meat. Place in the crock of a 6-quart or larger slow cooker.
- Place the maple syrup and mustard in a small bowl and whisk to combine. Pour over the pork, then turn the pork so that all sides are coated in the mixture. Pour the broth or water, tamari or soy sauce, and vinegar around, but not on top of, the pork. Scatter the onion pieces and garlic cloves around the pork. Cover and refrigerate the pork in the crock overnight.
- Place the crock in the slow cooker and cook on the LOW setting until the meat can be easily shredded, 8 to 10 hours. Transfer the pork to a cutting board. Pour the cooking liquid through a fine-mesh strainer into a measuring cup and discard the solids. Skim the fat from the surface of the cooking liquid.
- When it is cool enough to handle, use 2 forks or your fingers to shred the meat into bite-sized pieces. Discard any large pieces of fat. Transfer the pork back to the slow cooker. Add some of the cooking liquid until moist but not wet and toss to combine. Reserve the rest of the cooking liquid for storing leftovers.
- Make the sauce: Place all of the sauce ingredients in a small bowl and whisk to combine. Pile the pulled pork onto buns, drizzle with some sauce, and top with pickled onions.
Instant Pot Pork Carnitas
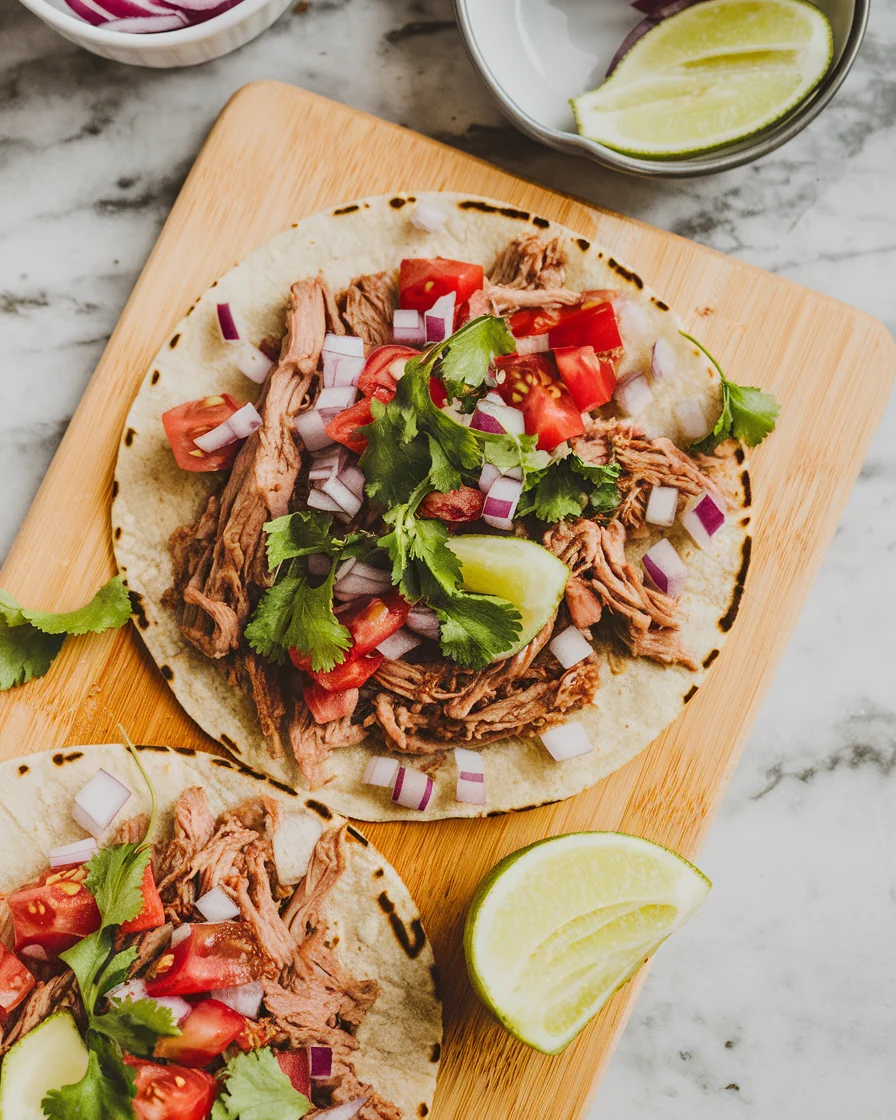
Thanks to the Instant Pot, you can enjoy flavorful, impossibly tender carnitas in a fraction of the time.
- PREP TIME: 20 minutes
- COOK TIME: 1 hour 15 minutes
- SERVES: 6 to 8
INGREDIENTS
- 4 medium limes
- 1 medium navel orange
- 4 cloves garlic
- 1 (3 1/2- to 4-pound) boneless pork shoulder or pork butt
- 1 tablespoon kosher salt
- 2 teaspoons dried oregano
- 1 teaspoon ground cumin
- 1/2 teaspoon freshly ground black pepper
- 1 tablespoon vegetable oil
- Serving options: warm tortillas, chopped onion, fresh cilantro, sliced avocado, lime wedges
INSTRUCTIONS
- Juice 4 limes until you have about 1/2 cup juice. Juice 1 orange (about 2/3 cup juice). Smash 4 garlic cloves. Trim off any large pieces of fat from the surface of a 3 1/2 to 4-pound boneless pork shoulder. Cut the pork into 3 pieces.
- Season the pork with 1 tablespoon kosher salt, 2 teaspoons dried oregano, 1 teaspoon ground cumin, and 1/2 teaspoon black pepper.
- Heat an Instant Pot or electric pressure cooker on the Sauté setting. Add 1 tablespoon vegetable oil. Add 1 piece of pork and sear on all sides, 2 to 3 minutes per side. If the pressure cooker registers a burn warning, remove the pork from the pot, pour in 1/4 cup water, and scrape up any burned bits. Return the pork to the pot and continue cooking until browned. Transfer the pork to a plate, and repeat with the remaining pieces of pork.
- Turn off the pressure cooker. Add the lime and orange juices and use a wooden spoon to scrape up the browned bits from the bottom of the pot. Return the pork to the pot in an even layer. Add the garlic.
- Lock the lid on and make sure the pressure valve is set to seal. Cook on HIGH pressure for 55 minutes. It will take 7 to 10 minutes to come up to pressure.
- Once the cook time is done, let the pressure release naturally for 15 minutes. Meanwhile, arrange a rack in the top third of the oven and heat the broiler to high.
- Quick release any remaining pressure. Transfer the pork to a rimmed baking sheet, and use 2 forks to shred the meat into bite-sized pieces. Discard any large pieces of fat. Spread the carnitas into an even layer. Broil the carnitas until the ends are browned and crisp, 2 to 3 minutes.
- Spoon some of the cooking liquid over the carnitas and serve on warm tortillas with desired toppings.
Slow Cooker Hawaiian Brisket Sandwiches
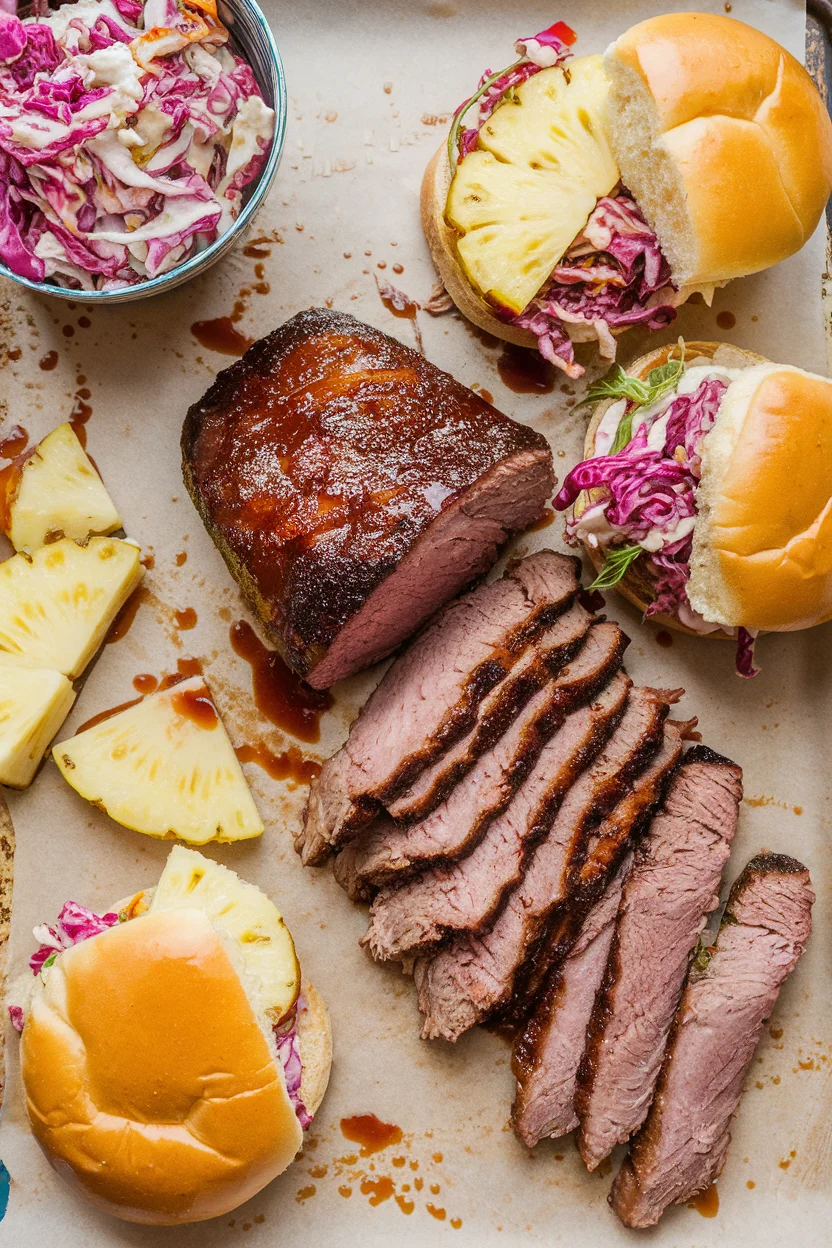
Pillowy-soft Hawaiian rolls piled high with slices of tender beef brisket and sweet pineapple, all topped with a crunchy, refreshing cabbage slaw.
- MAKES: 18-20 sliders
INGREDIENTS
FOR THE BRISKET:
- 3 1/2 pounds beef brisket
- Kosher salt
- 1 tablespoon vegetable oil
- 1 medium yellow onion, thinly sliced
- 1 (20-ounce) can pineapple slices or rings
- 1/4 cup soy sauce
- 1/4 cup packed dark brown sugar
- 2 tablespoons apple cider vinegar
- 2 tablespoons cornstarch
- 1 tablespoon finely chopped peeled fresh ginger
- 2 cloves garlic, finely chopped
- 1/4 teaspoon freshly ground black pepper
FOR THE SANDWICHES:
- 2 tablespoons apple cider vinegar
- 1 tablespoon Asian sesame oil
- 1/2 teaspoon kosher salt
- 12 to 14 ounces cabbage slaw mix
- 18 to 20 Hawaiian sweet dinner rolls
INSTRUCTIONS
- Make the brisket: Pat the brisket dry with paper towels and season generously all over with salt. Cut the brisket in half if needed to fit in a 5-quart or larger slow cooker or to fit in a large frying pan for searing. Heat the oil in a large frying pan over medium-high heat until shimmering. Add the brisket fat-side down (work in 2 batches if needed) and sear until golden-brown, about 4 minutes. Flip and sear the second side, about 4 minutes more. Transfer to the slow cooker and arrange into a single layer as best as you can; the brisket can fit snugly.
- Return the pan to medium heat, add the onion, and cook, stirring occasionally and scraping up any browned bits from the bottom of the pan, until just starting to soften, about 5 minutes. Transfer to the slow cooker. Meanwhile, drain the pineapple slices from the juice but reserve the juice. Cut the pineapple slices in half, transfer to a covered container, and refrigerate. Set the reserved juice aside.
- Place the pan back on the stove over an unheated burner. Add the soy sauce, 1/3 cup of the reserved pineapple juice (refrigerate the remaining juice for the slaw dressing), brown sugar, vinegar, cornstarch, ginger, garlic, and pepper. Whisk until the cornstarch is fully dissolved, then pour over the brisket and onions.
- Cover and cook on the LOW setting until the brisket is fork-tender, 6 to 8 hours. When the brisket is ready, turn the slow cooker off, uncover, and let sit 30 minutes for the meat to rest. At this point, you can proceed with making the sandwiches or, for best results, let cool completely, cover, and refrigerate in the slow cooker overnight.
- If making the sandwiches immediately: Transfer the brisket to a cutting board. Spoon off as much fat from the surface of the sauce as you can. Trim any fat from the top of the brisket if desired. Slice the brisket across the grain and return the slices to the sauce.
- If refrigerated overnight: Spoon off the white hardened layer of fat from the surface. Transfer the brisket to a cutting board and trim any fat from the top of the brisket if desired. Slice the brisket across the grain and return the slices to the sauce. Spoon some of the sauce over the slices to completely coat. Reheat until warmed through and the sauce is bubbling around the edges, 1 hour uncovered in a 300°F oven, or 1 1/2 hours covered on the LOW setting in the slow cooker.
- Assemble the sandwiches: Whisk the vinegar, 2 tablespoons of the reserved pineapple juice, sesame oil, and salt in a large bowl. Add the slaw and toss to combine. Serve the brisket slices on split Hawaiian rolls (about 2 ounces of brisket per sandwich), each topped with a piece of reserved pineapple and some slaw.
Vegetarian Mains
If you’d prefer to skip the meat, there are so many options for great summertime vegetarian mains. Grilled pizza is one of our favorites, although fs you want to load up on veggies, spinach and goat cheese-stuffed portobellos, cauliflower steaks, and veggie kebabs are all wins.
Portobello Mushroom Burger
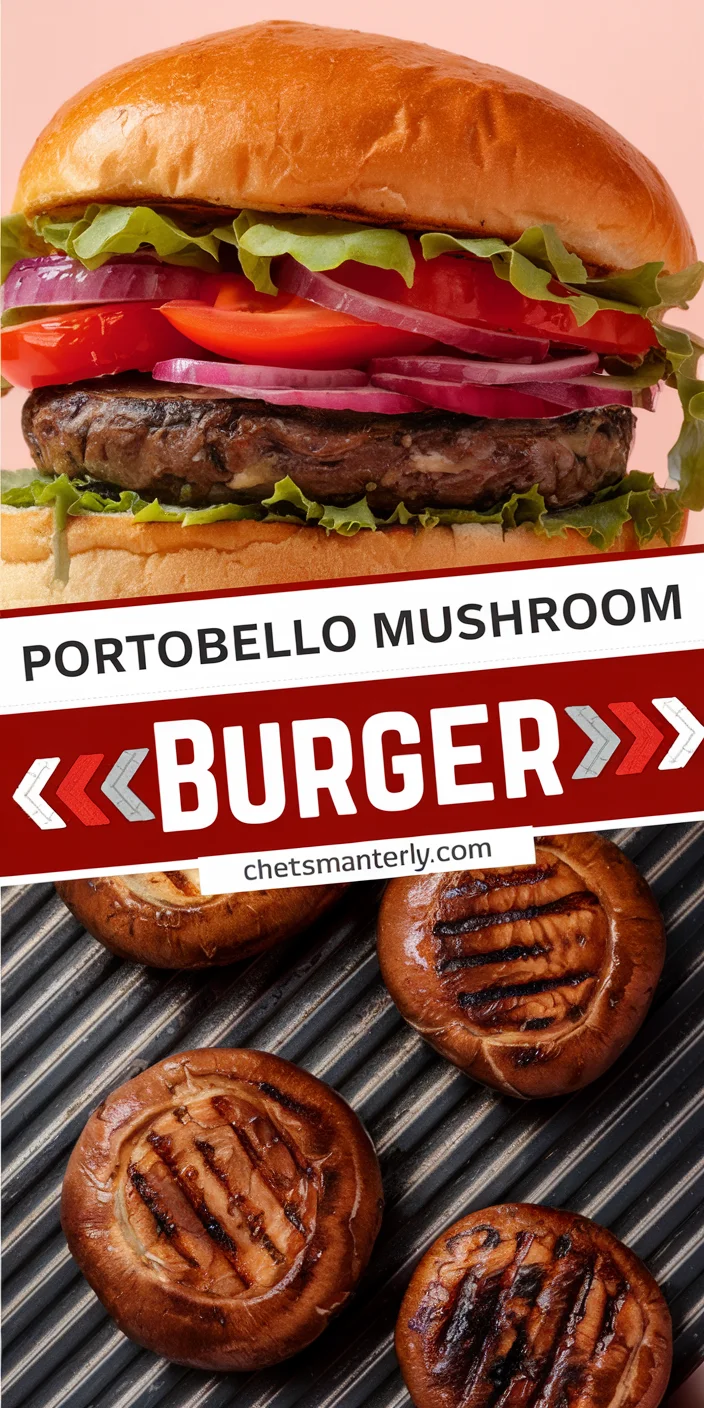
Not only are they seriously satisfying and packed with flavor, but the mix of color and texture will keep you coming back for more.
- PREP TIME: 10 minutes
- COOK TIME: 8 to 23 minutes
- SERVES: 4
INGREDIENTS
- 2 cloves garlic
- 4 large portobello mushrooms (about 3 ounces each and 4 inches wide)
- 2 tablespoons balsamic vinegar
- 1 tablespoon low-sodium tamari or soy sauce
- 1 tablespoon olive oil
- 1/2 teaspoon kosher salt
- 1/4 teaspoon freshly ground black pepper
- 1 small red onion
- 4 ounces roasted red peppers (about 3/4 cup)
- Vegetable oil
- 4 hamburger buns
- 1/2 cup vegan or regular pesto sauce
- 1 cup packed baby arugula (about 1 ounce)
INSTRUCTIONS
- Mince 2 garlic cloves. If needed, remove the stems from 4 large portobello mushrooms.
- Place the garlic, 2 tablespoons balsamic vinegar, 1 tablespoon low-sodium soy sauce, 1 tablespoon olive oil, 1/2 teaspoon kosher salt, and 1/4 teaspoon black pepper in a large resealable bag or large shallow container and stir to combine. Add 4 large portobello mushrooms and toss to coat. Marinate at room temperature for 30 minutes. Meanwhile, prepare the toppings.
- Slice 1 small red onion into 1/4-inch thick rounds. Tear 4 ounces roasted red peppers (about 3/4 cup) into large pieces.
OPTION 1: GRILL PAN
- Heat a grill pan over medium-high heat for 5 minutes. Brush the pan with vegetable oil. Place the onions in the pan in a single layer and cook until grill marks form on the bottom, 2 to 3 minutes. Flip the onions and cook until tender, about 2 minutes more. Transfer to a plate or baking sheet. Meanwhile, remove the mushrooms from the marinade.
- Brush the pan again with vegetable oil. Working in batches if needed, place 2 of the mushrooms in the pan in a single layer, stem-side up. Cook until marks form on the bottom, about 4 minutes. Flip and cook until tender, about 4 minutes more. Transfer to a plate or baking sheet and tent with aluminum foil to keep warm. Brush the pan with more oil before cooking the remaining mushrooms.
- If desired, split 4 hamburger buns and grill until toasted and lightly browned, 30 seconds to 1 minute per side.
OPTION 2: OUTDOOR GRILL
- Prepare an outdoor grill for medium-high, direct heat. Scrape the grill grates clean if needed. Oil the grill grates with a paper towel dipped in vegetable oil.
- Place the onions on the grill in a single layer. Cover and grill until grill marks form on the bottom, 2 to 3 minutes. Flip the onions and grill until tender, about 2 minutes more. Transfer to a plate or baking sheet. Meanwhile, remove the mushrooms from the marinade.
- Place the mushrooms on the grill in a single layer stem-side up. Cover and grill until grill marks form on the bottom, about 4 minutes. Flip the mushrooms, cover, and grill until the mushrooms are tender, 3 to 4 minutes more.
- If desired, split 4 hamburger buns and grill until toasted and lightly browned, about 30 seconds per side.
- Spread 1/2 cup pesto evenly on the cut sides of the buns(about 1 tablespoon per bun half). Place a grilled mushroom, stem-side up, on each bottom bun. Top the mushrooms with the grilled onion, roasted red pepper, 1 packed cup baby arugula, and close with the top bun.
Veggie Burger Recipe
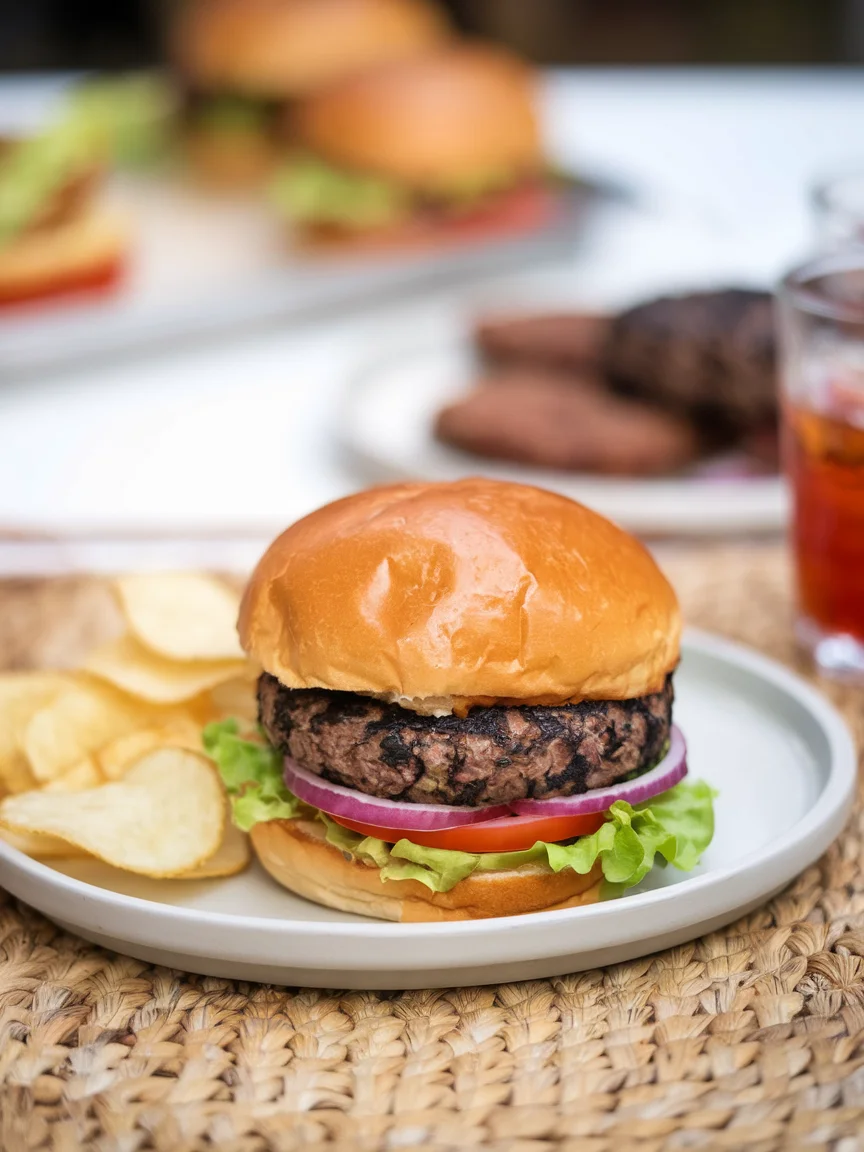
This is the recipe all vegetarians have been searching for. It’s a simple vegetable and bean burger recipe that’s sturdy enough to hold up on the grill.
- PREP TIME: 10 to 15 minutes
- COOK TIME: 6 to 16 minutes
- SERVES: 6
INGREDIENTS
- 3/4 cup old-fashioned rolled oats
- 1/2 cup walnuts, toasted
- 3 medium scallions, coarsely chopped (about 1/4 cup)
- 2 (15-ounce) cans black beans, drained and rinsed (about 3 1/3 cups)
- 1/2 cup shredded carrot (from 1 medium, unpeeled carrot)
- 1/4 cup white miso paste
- 1 tablespoon chili powder
- 3 tablespoons olive or canola oil
- For serving: 6 split hamburger buns, ketchup or mustard, lettuce, sliced tomato, thinly sliced red onion
INSTRUCTIONS
- Place the oats, walnuts, and scallions in the bowl of a food processor fitted with the blade attachment. Pulse until a coarse meal forms, about 20 pulses. Add the beans, carrots, miso, and chili powder. Process, scraping down the sides as needed, until the mixture comes together and is chunky but isn’t a complete paste, 15 to 20 seconds.
- Shape the mixture into 6 (3-inch-wide) patties (about 1/2 cup each). Let rest for 5 minutes, or refrigerate, loosely covered, for up to 3 hours.
TO GRILL:
- Heat an outdoor grill to direct, medium-high heat. Scrape the grill grates clean if needed.
- Brush the patties well on both sides with the oil and place on the grill in a single layer. Cover and grill until grill marks appear on the bottom, 3 to 4 minutes. Using a thin metal spatula, flip the burgers. Cover and grill until heated through and grill marks appear on the other side, 3 to 4 minutes more. Serve the burgers on buns with desired toppings.
TO COOK IN A SKILLET:
- Heat 2 tablespoons of the oil in a large skillet over medium-high heat until shimmering. Add 3 of the patties and cook until well-browned and crisp, 3 to 4 minutes per side. Transfer to a serving plate.
- Add remaining 1 tablespoon oil to the skillet and repeat with cooking the remaining 3 patties. Serve the burgers on buns with desired toppings.
Grilled Open-Faced Cauliflower Banh Mi
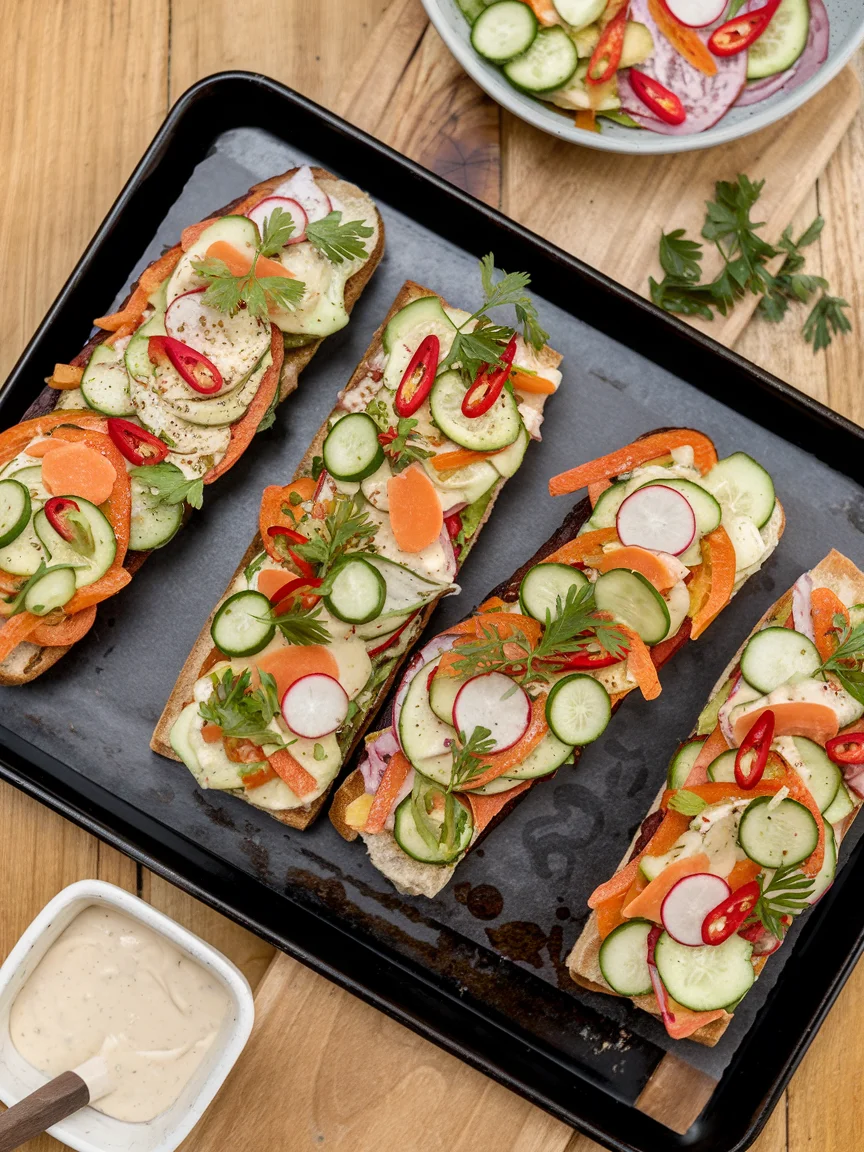
Layered with spicy mayo, marinated grilled cauliflower florets, pickled vegetables, and cilantro, this loaded sandwich is a surefire win.
- PREP TIME: 25 minutes
- COOK TIME: 10 minutes
- SERVES: 4
INGREDIENTS
FOR THE PICKLED VEGGIES (MAKES 4 CUPS):
- 1 medium carrot, peeled and shaved into ribbons with a Y-shaped peeler
- 2 medium Persian or mini cucumbers (6 ounces), thinly sliced
- 4 medium radishes, thinly sliced
- 1 medium red Fresno chile, thinly sliced (optional)
- 1/2 cup rice vinegar
- 2 tablespoons granulated sugar
- 1 teaspoon kosher salt
FOR THE CAULIFLOWER:
- 2 tablespoons olive oil
- 2 tablespoons tamari or low-sodium soy sauce
- 1 tablespoon rice vinegar
- 1 tablespoon Sriracha sauce
- 1 medium head cauliflower (about 2 pounds), cut into bite-size florets (4 cups florets)
FOR THE SANDWICHES:
- 1 baguette, split in half lengthwise, then cut in half crosswise
- 1/4 cup olive oil
- 1/4 cup mayonnaise
- 1 teaspoon Sriracha sauce
- Fresh cilantro leaves and tender stems
INSTRUCTIONS
- Pickle the veggies: Toss the carrot, cucumber, radishes, chili if desired, rice vinegar, sugar, and salt together in a medium bowl; set aside.
- Prepare the cauliflower: Whisk the olive oil, tamari, rice vinegar, and Sriracha together in a large bowl. Add the cauliflower and toss to coat.
- Heat an outdoor grill for medium-high, direct heat (400°F to 450°F). Meanwhile, brush the cut side of the baguette with the olive oil. Stir the mayonnaise and Sriracha together in a small bowl and set aside.
- Place the cauliflower florets in a single layer in a grill basket or perforated grill pan, then place on the grill. Place baguette cut-side down directly on the grill grates. Cover and grill, tossing the florets and flipping the bread once, until the cauliflower is tender and charred in spots and bread is lightly charred, 2 to 3 minutes per side for the bread and 8 to 10 minutes total grilling time for the cauliflower.
- Drain the pickled veggies. Spread the Sriracha mayonnaise onto the grilled baguette halves. Top with the grilled cauliflower, pickled veg, and fresh cilantro.
Grilled Eggplant Burgers with Halloumi Cheese
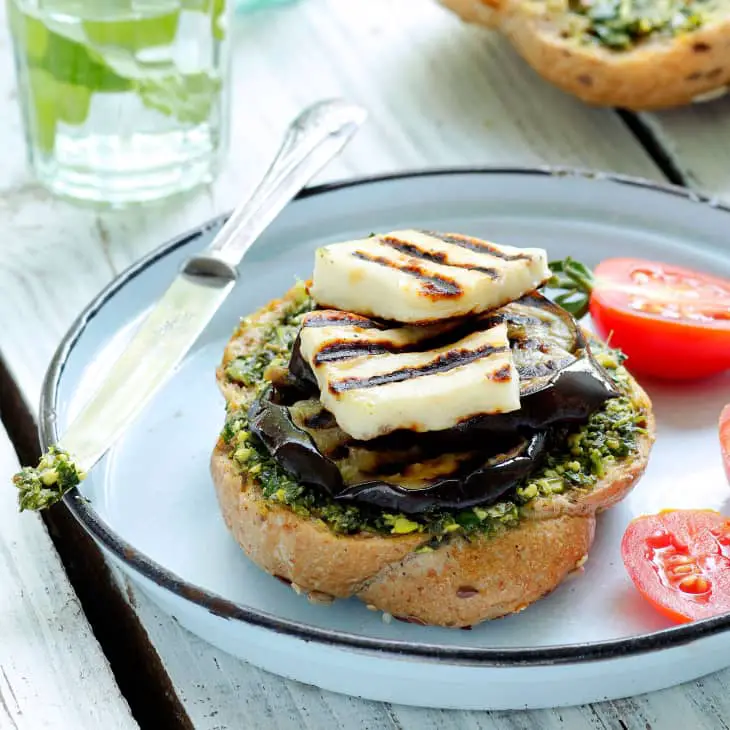
These “burgers” come with a recipe for homemade herb pesto, but you can certainly stick with a store-bought option to keep things simple.
- SERVES: 6
INGREDIENTS
FOR THE PESTO:
- 1 cup cilantro leaves, tightly packed
- 1 cup parsley leaves, tightly packed
- 1/2 cup mint leaves, tightly packed
- 3 tablespoons shelled pistachios, toasted
- 2 cloves garlic
- 1 shallot
- 1/4 cup olive oil
- 1 lemon, juiced and zested
- 1 teaspoon white wine vinegar
- 1 teaspoon chili flakes
- Salt and pepper, for seasoning
FOR THE BURGERS:
- Olive oil spray
- 1 large eggplant, sliced crosswise 1/2 inch thick
- 6 ounces halloumi cheese, sliced 1/2 inch thick
- 6 burger buns
INSTRUCTIONS
- In the bowl of your food processor, blend together the cilantro, parsley, mint leaves, pistachios, garlic cloves, shallot, olive oil, lemon juice and zest, white wine vinegar, chili flakes and salt and pepper until pesto comes together. Set aside the prepared pesto until you are ready to assemble the burgers.
- Season the eggplant rounds with salt and freshly ground black pepper. Generously grease a grill pan with olive oil spray and heat over your largest flame. Once the grill pan is hot, add a layer of the seasoned eggplant slices and cook for 5 to 6 minutes on each side or until dark grill marks appear. Add more olive oil spray as needed to prevent sticking. Transfer the cooked eggplant to a serving plate.
- Spray the pan with more olive oil and add the halloumi slices in a single layer. Cook for 1 to 2 minutes on each side, until grilled.
- Once the eggplant and the halloumi slices are grilled, assemble the burgers. Generously spread the pesto on the inside of the buns and layer on the eggplant rounds and halloumi slices. (In the pictures above, I halved the halloumi slices into square pieces). Serve warm with your favorite toppings.
Stuffed Portobello Mushrooms
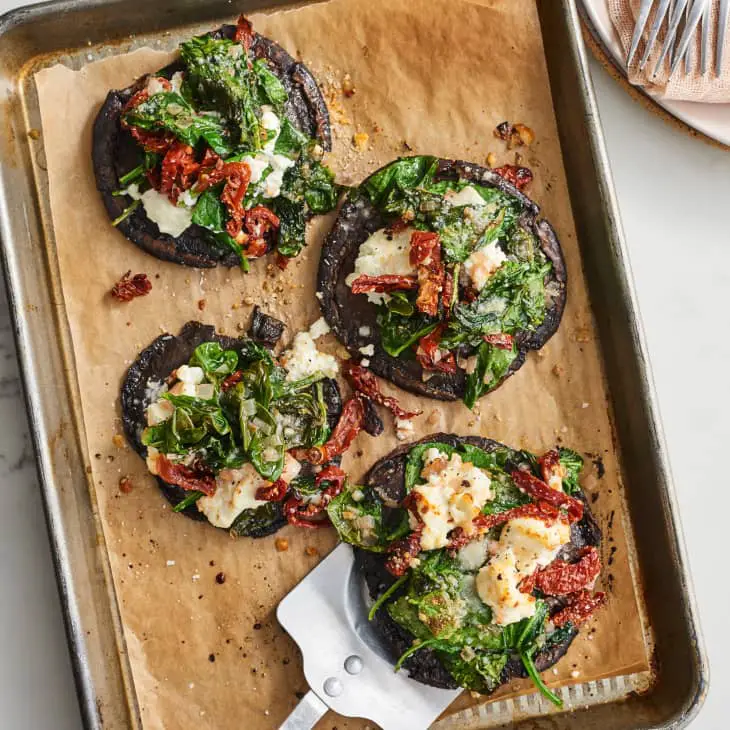
Packed with goat cheese, sun-dried tomatoes, and sautéed spinach, these loaded mushrooms are more filling than you might expect. Roasted red peppers also make a nice stand-in for the tomatoes.
- PREP TIME: 10 minutes
- COOK TIME: 22 minutes
- SERVES: 4
INGREDIENTS
- 1 (4-ounce) package fresh goat cheese
- 1 (7-ounce) jar oil-packed sun-dried tomatoes
- 1/2 ounce Parmesan cheese, finely grated (about 1/4 cup)
- 1 medium shallot
- 4 large portobello mushrooms
- 3 tablespoons olive oil, divided
- 1/2 teaspoon kosher salt
- 1/4 teaspoon freshly ground black pepper
- 5 ounces baby spinach (5 packed cups)
INSTRUCTIONS
- Arrange a rack in the top third of the oven and heat the oven to 400°F. Remove 1 (4-ounce) package goat cheese from the refrigerator and let it warm up on the counter while you prepare the mushrooms and filling.
- Drain 1 (7-ounce) jar oil-packed sun-dried tomatoes well, pat dry with towels, and thinly slice if needed. Finely grate 1/2 ounce Parmesan cheese (about 1/4 cup).
- Finely chop 1 medium shallot. Remove the stems from 4 large portobello mushrooms and discard. Use a spoon to gently scrape out and discard the gills to make room for the filling.
- Brush the mushrooms on both sides with 2 tablespoons of the olive oil and season with 1/2 teaspoon kosher salt and 1/4 teaspoon black pepper. Place the mushrooms on a rimmed baking sheet stem-side down and roast until just beginning to soften, about 10 minutes. Meanwhile, make the filling.
- Heat the remaining 1 tablespoon olive oil in a large skillet over medium heat until shimmering. Add the shallot and sauté until softened and translucent, 1 to 2 minutes. Add 5 ounces baby spinach (5 packed cups) and toss until just wilted, about 1 minute. Remove the pan from the heat. Crumble the goat cheese into the pan and stir until it just melts and coats the spinach. Stir in the sun-dried tomatoes.
- Remove the baking sheet from the oven and flip the mushrooms over with a flat spatula. Divide the spinach mixture evenly among the mushroom caps, then sprinkle with the Parmesan cheese.
- Roast until the mushrooms are tender and the cheese just starts to melts, about 10 minutes. Switch the broiler on and broil until the cheese browns, 2 to 3 minutes more.
Grilled Yogurt Flatbreads with Israeli Salad

A simple, no-rise flatbread dough is grilled until crispy, then topped with hummus and a fresh cucumber-tomato salad for a light and fresh summer main.
- PREP TIME: 30 minutes
- COOK TIME: 5 minutes
- SERVES: 4
INGREDIENTS
FOR THE FLATBREADS:
- 1 1/2 cups all-purpose flour, plus more for work surface
- 1 tablespoon baking powder
- 1 teaspoon kosher salt
- 1 1/2 cups full-fat plain Greek yogurt
- 1 tablespoon za’atar
FOR THE SALAD:
- 1 pound multi-colored cherry tomatoes, halved (about 3 cups)
- 3 Persian or mini cucumbers, diced
- 1 medium red bell pepper, seeded and diced
- 1/2 medium red onion, diced
- 2 tablespoons finely chopped fresh flat-leaf parsley leaves
- 2 tablespoons finely chopped fresh mint leaves
- 2 tablespoons freshly squeezed lemon juice (from 1 lemon)
- 1 1/2 teaspoons ground sumac
- 2 tablespoons olive oil, plus more for the grill
- Kosher salt
- Freshly ground black pepper
FOR ASSEMBLY:
- 3/4 cup hummus
- Crumbled feta cheese and pitted kalamata olives, for serving (optional)
INSTRUCTIONS
MAKE THE FLATBREAD DOUGH:
- Combine the flour, baking powder, and salt in a medium bowl and stir with a fork to combine. Add the yogurt and stir until a moist, shaggy dough forms.
- Transfer the dough to a lightly floured work surface and knead until smooth, 10 to 15 turns. Divide into 6 balls and flatten them slightly with the palm of your hand. Cover loosely with plastic wrap. Set aside while you make the salad.
MAKE THE ISRAELI SALAD:
- Heat the grill to medium-high, direct heat (400 to 450°F).
- Toss the tomatoes, cucumbers, bell pepper, onion, parsley, and mint together in a large bowl. Add the lemon juice, sumac, and 2 tablespoons of the olive oil, and toss to coat.
- Season to taste with salt and pepper; set aside.
GRILL THE FLATBREADS:
- Uncover the flatbreads and roll each into a 6-inch round. Transfer to a rimmed baking sheet. Brush with the olive oil and place oil-side down on the grill. Brush the tops with more oil.
- Cover and grill until the bread begins to puff up and the undersides are crisp, 2 to 4 minutes.
- Flip and grill until the second side is browned, 2 to 4 minutes more. Remove from the grill and sprinkle each flatbread with a pinch of za’atar.
ASSEMBLE:
- Divide the hummus evenly among flatbreads, followed by Israeli salad. Top with feta, olives, and another drizzle of olive oil, if desired.
Grilled Chipotle Lime Cauliflower Steaks
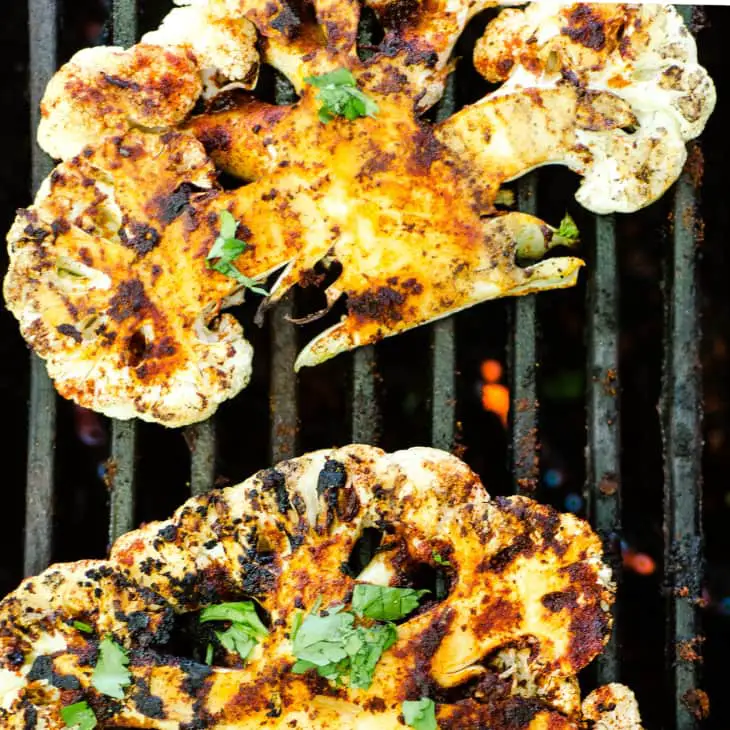
With a generous squeeze of zippy lime juice, a dusting of chili powder, and smoky char from the grill, cauliflower steaks are a main we can all get behind.
- SERVES: 4 to 6
INGREDIENTS
- 2 large heads cauliflower
- 1/4 cup olive oil
- 2 limes, zested and juiced
- 2 cloves garlic, finely grated
- 1 teaspoon honey or agave syrup
- 2 tablespoons paprika
- 1 tablespoon chipotle powder
- 1 teaspoon salt
- 1/4 cup finely chopped cilantro leaves
- Lime wedges, to serve
INSTRUCTIONS
- Remove the leaves on each cauliflower head and trim the stem end until you can set the cauliflower flat on the cutting board. Use a large, sharp knife to trim off the sides, then cut the cauliflower into 3 to 4 thick “steaks.” Reserve the florets that fall away for another recipe (see Recipe Notes).
- Whisk the olive oil with the lime juice in a small bowl. Whisk in the grated garlic and honey or agave syrup. In a separate bowl, mix the lime zest, paprika, chipotle, and salt.
- Heat a gas or charcoal grill to medium. Brush one side of each cauliflower steak with the olive oil mixture and sprinkle generously with the chipotle powder mixture. Place the seasoned side down on the hot grill. Brush the tops with the olive oil mixture and season with the chipotle mix.
- Cover the grill and cook for 5 to 6 minutes. Remove the lid and carefully flip the cauliflower. Cook covered for an additional 5 minutes or until done to your desired texture.
- Sprinkle with chopped cilantro and serve immediately with lime wedges on the side.
Balsamic Glazed Veggie Kebabs
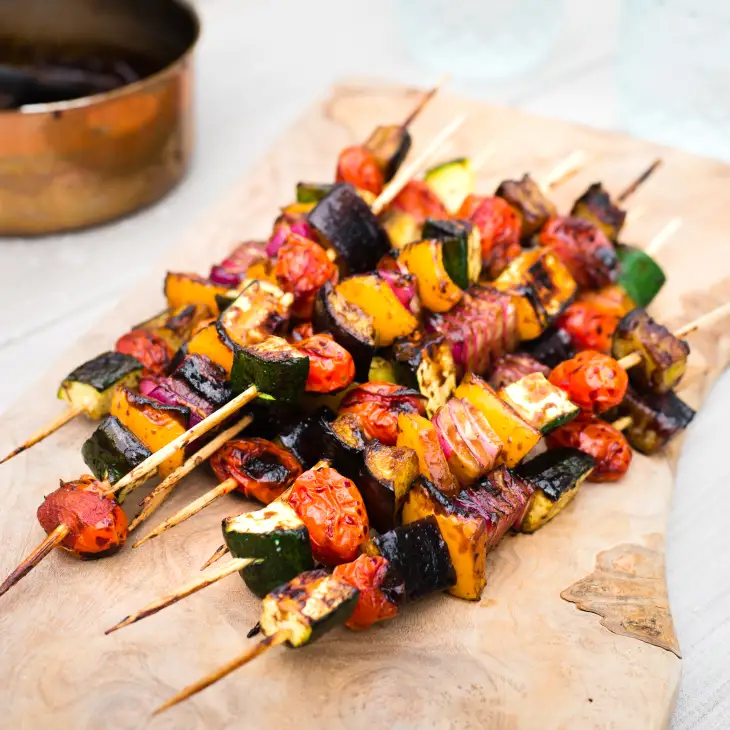
Any vegetable wins when it’s soaked in a sweet, tangy, and garlic-packed balsamic glaze and grilled on skewers until caramelized and tender.
INGREDIENTS
- 1/2 cup balsamic vinegar
- 2 tablespoons Dijon mustard
- 2 cloves garlic, minced
- 1/8 teaspoon kosher salt, plus more for seasoning
- Freshly ground black pepper
- 2 pounds mixed vegetables (such as eggplant, bell peppers, zucchini, red onion, tomatoes), cut into 1-inch chunks
- 2 tablespoons olive oil
- 16 (9- to 10-inch) skewers, soaked in water if wooden
INSTRUCTIONS
- Place the vinegar, mustard, garlic, 1/8 teaspoon kosher salt, and a few grinds of pepper in a small saucepan and bring to a simmer over medium heat. Simmer, stirring occasionally, until thickened and reduced slightly, about 5 minutes. Remove from the heat.
- Heat an outdoor grill for direct, medium-high heat cooking. Meanwhile, place the vegetables and oil in a large bowl, season with salt and pepper, and toss to combine. Thread the vegetables onto the skewers.
- Put the kebabs on the grill and cook undisturbed until grill marks appear on the vegetables, about 2 minutes. Using tongs, flip the skewers, and grill 2 minutes more.
- Brush the vegetables with the balsamic glaze. Reduce the heat to medium (or move the vegetables to a cooler part of the grill). Flip the skewers every minute or so, brushing the vegetables with the glaze each time you flip them. Grill until the vegetables are cooked through and lightly charred, 10 to 15 minutes total. Brush the vegetables once more with glaze before serving.
Grilled Pizza
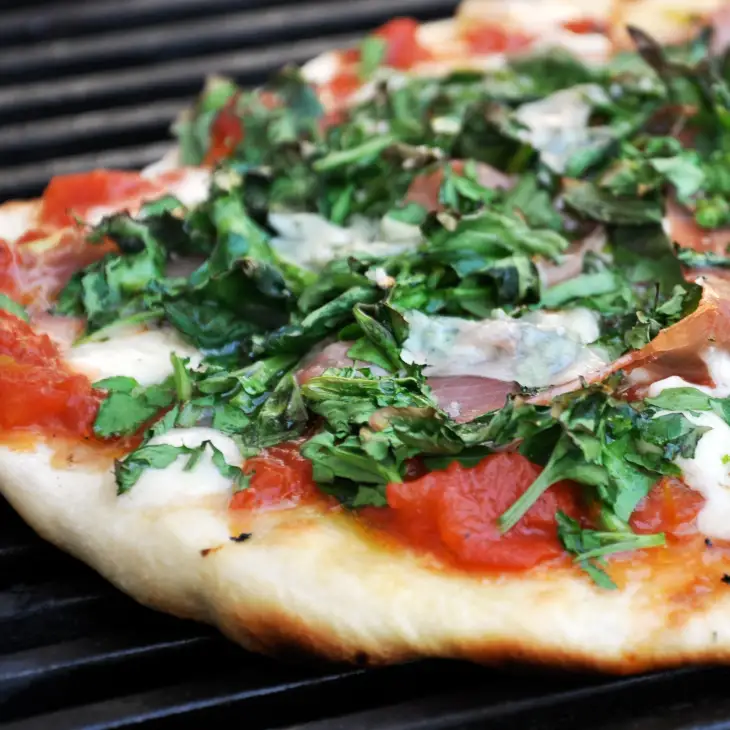
This method is not hard, once you get the hang of it, and thanks to the extra-high heat of the grill, it makes some of the best pizza you’ll ever eat!
INGREDIENTS
- 1 ball pizza dough (about 1 pound)
- 1/2 to 1 cup tomato sauce
- Cheese such as torn mozzarella, grated Asiago or Swiss, and grated Parmesan
- Toppings such as herbs, thinly sliced vegetables, pepperoni and salami, prosciutto, chopped greens such as kale, or diced tomatoes
- Olive oil
INSTRUCTIONS
- Heat the grill: You should heat it quite hot; my grill was about 600°F with the lid on while baking this particular pizza. Aim for at least 550°F. If you have a choice on your grill between direct and indirect heat, set it up so the pizza is over direct heat.
- Gather your ingredients and toppings: Set up a table or bench near the grill so you have easy access to everything. Good grilled pizza is as much about the organization and logistics as it is about actual cooking!
- Also have your tools close to hand: You will want a pair of long metal tongs. A spatula may be helpful, although not absolutely necessary. You may want a hot pad or oven mitt if your grill lid gets hot.
- Prep your dough: It should be stretched or rolled out into a thin circle. (Circle-ish — as you can see, my pizzas usually resemble continents more than they do the moon!)
- Brush the dough with olive oil: Brush one side of the dough with oil; this is the side you’ll lay down on the grill.
- Grill one side of the pizza: Take the lid off the grill. Lay the dough round on the grill with the olive-oil side down. Brush the top of the dough with a thin layer of olive oil, too. Let the dough cook for about 3 minutes, with the lid off, or 1 to 2 minutes with the lid on. Use the tongs to lift up the dough from time to time, checking on how it is doing. You want grill marks on it, but you don’t want the dough to get crispy; it should be just set.
- Top the pizza: Flip the dough over with the tongs or spatula. The dough should come up easily and flip without tearing. Now is where your organization comes in! You need to top the pizza quickly. Spread on a thin layer of sauce, some cheese, and toppings. It shouldn’t be too heavily loaded, or the pizza won’t cook well.
- Cook the pizza: Put the lid on and cook for 3 to 5 minutes. Use your sense of smell; if the pizza smells like it’s scorching, take the lid off and move the pizza to a cooler part of the grill or turn the heat down.
- Remove the finished pizza: Remove the lid and check the pizza. The edges should be crisp and well-done, and the cheese should all be melted. Drag the pizza off with the spatula or tongs. Let cool for 3 minutes, then cut into pieces and eat!
Fresh Summer Salads and Slaws
No 4th of July meal is complete without some kind of summery salad. If you’re going for a classic cookout vibe, creamy potato salad or tomato salad is a good bet. If you’ve already got the grill fired up for your meal, our grilled zucchini salad is a great side dish choice. And if your goal is to keep it simple, cucumber salad or a crunchy salad are what you need.
The Ultimate Grilled Zucchini Salad
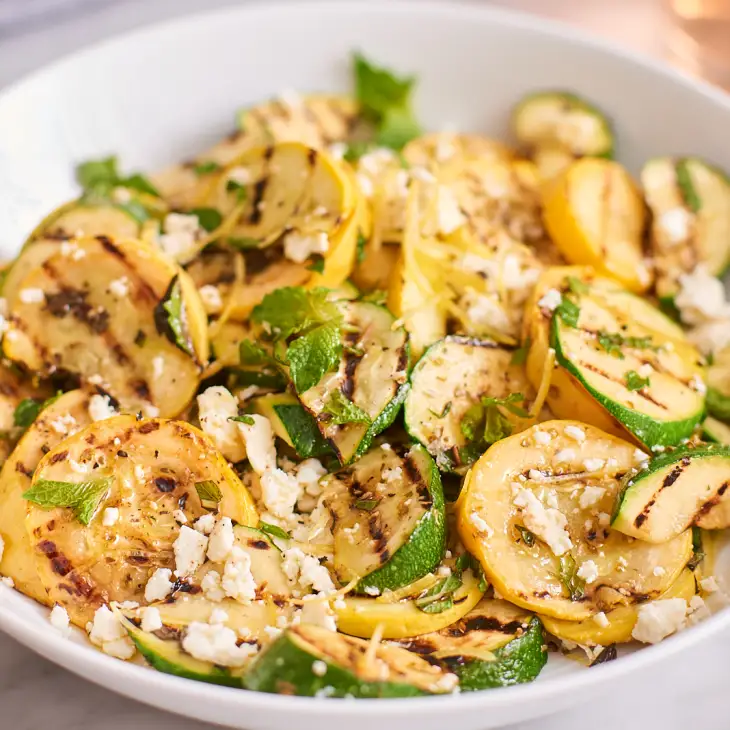
Zucchini is grilled until smoky, then tossed with a lemon vinaigrette, feta, and mint for a fresh salad you’ll want to eat on repeat all summer.
- PREP TIME: 10 minutes
- COOK TIME: 8 minutes
- SERVES: 6
INGREDIENTS
- 3 pounds medium green zucchini or yellow summer squash
- 5 tablespoons olive oil, divided
- Finely grated zest of 1 medium lemon
- 2 tablespoons freshly squeezed lemon juice
- 1/4 teaspoon dried oregano
- 1 1/4 teaspoons kosher salt, divided
- Freshly ground black pepper
- 1 cup crumbled feta cheese (about 4 1/2 ounces)
- 1 tablespoon coarsely chopped fresh mint leaves
INSTRUCTIONS
- Heat a grill pan or outdoor grill to high (450°F to 550°F). Meanwhile, prepare the zucchini and dressing.
- Cut the zucchini using the roll cut technique: Trim the ends off 1 of the zucchini. Make a diagonal cut about 1 1/2 inches from one end. Roll the squash a half turn and make another diagonal cut (in the same direction as the first cut) about 1 1/2 inches from the cut end of the squash. Repeat with the rolling and cutting until you reach the end of the squash. Repeat with the remaining squash, place in a large bowl, and set aside.
- Place 3 tablespoons of the oil, lemon zest, lemon juice, oregano, and 1/4 teaspoon of the salt in a small bowl. Season with pepper and whisk to combine; set aside.
- When the grill is ready, drizzle the zucchini with the remaining 2 tablespoons of oil, sprinkle with the remaining 1 teaspoon of salt and pepper, and toss to combine. Place in a single layer on the grill (reserve the bowl; no need to wash). Cover and grill, turning occasionally, until charred in spots and crisp-tender, about 8 minutes total.
- Transfer the squash back to the reserved bowl, drizzle with the dressing, and toss to combine. Set aside to cool to just warm or room temperature, at least 15 minutes. Add the feta and mint and gently toss to combine.
Broccoli Slaw

As a salad base, julienned broccoli stems and other crunchy vegetables stand up to creamy dressings like a dream and stay firm for days.
- PREP TIME: 5 minutes
- MAKES about 4 cups slaw
- SERVES: 6
INGREDIENTS
- 1 (1-pound) bag or 2 (9-ounce) bags broccoli slaw mix
- 1 teaspoon kosher salt
- 1/4 cup buttermilk
- 3 tablespoons mayonnaise
- 1 tablespoon Dijon mustard
- 2 teaspoons granulated sugar
- 2 teaspoons apple cider vinegar
- Freshly ground black pepper
INSTRUCTIONS
- Place 1 pound to 18 ounces broccoli slaw mix and 1 teaspoon kosher salt in a large bowl and toss to combine.
- Place 1/4 cup buttermilk, 3 tablespoons mayonnaise, 1 tablespoon Dijon mustard, 2 teaspoons granulated sugar, and 2 teaspoons apple cider vinegar in a small bowl or liquid measuring cup and whisk to combine.
- Pour over the slaw mix and season generously with freshly ground black pepper. Toss to combine and serve immediately, or cover and refrigerate for up to 3 days.
Classic Potato Salad
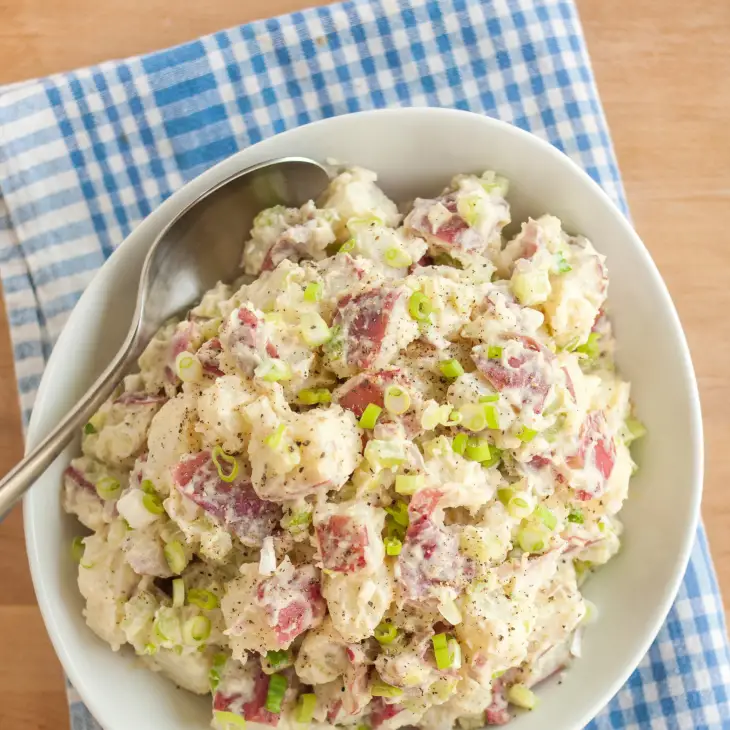
If you’re looking for the most classic, old-fashioned potato salad around, here’s the recipe for you.
- PREP TIME: 15 minutes
- COOK TIME: 10 minutes
- SERVES: 6 to 8
INGREDIENTS
- 2 pounds waxy potatoes, such as red-skinned potatoes
- 1 teaspoon kosher salt, plus more as needed
- 1/2 cup mayonnaise
- 1 tablespoon Dijon mustard
- 2 medium stalks celery
- 1 large shallot or 1/4 small onion
- 1/4 cup chopped scallions, fresh parsley, tarragon, or dill, plus more for garnish
- 3 hard-boiled large eggs (optional)
- Freshly ground black pepper
INSTRUCTIONS
- Cut the potatoes. Cut 2 pounds waxy potatoes into large, bite-sized chunks. (Alternatively, boil the potatoes whole, then peel, if desired, and dice them after cooking.)
- Prepare for cooking. Place the potatoes and 1 teaspoon kosher salt in a large saucepan, and add enough cold water to cover them by about 1-inch.
- Cook the potatoes. Bring to a simmer over medium-high heat. Reduce the heat to maintain a gentle simmer, and cook until the potatoes are tender all the way through when pierced with a fork, 8 to 12 minutes depending on the size and type of potatoes.
- Prepare the other ingredients. Meanwhile, dice 2 medium celery stalks (about 3/4 cup), mince 1 large shallot or 1/4 small red onion (about 1/4 cup), and chop 1/4 cup scallions, fresh parsley, tarragon, or dill. Peel and dice 3 hard-boiled large eggs, if using.
- Drain and cool the potatoes. Drain the potatoes in a colander and rinse under cool water. Drain well again, then transfer the potatoes to a large bowl.
- Add the dressing. Add 1/2 cup mayonnaise and 1 tablespoon Dijon mustard to the potatoes, and fold to combine.
- Mix in the remaining ingredients. Add the celery, shallots, scallions (or herbs), and eggs, if using, and stir until thoroughly combined. Taste and season with more kosher salt or black pepper.
- Serve the potato salad. Serve the salad while still warm, or cover and refrigerate for up to 1 day before serving.
Tomato Salad with Red Onion, Dill and Feta
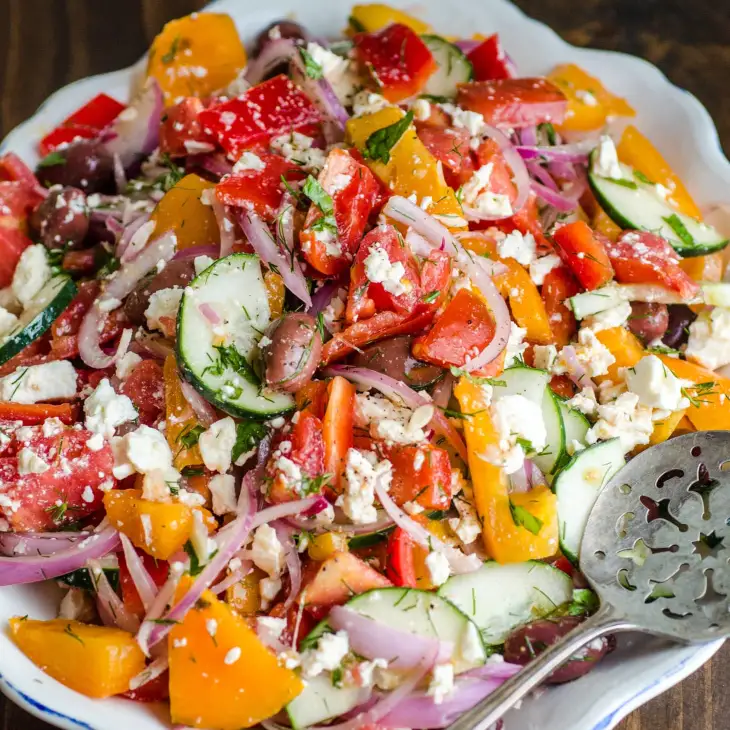
This is the full-on maximalist tomato salad: tossed gloriously with red pepper, feta, dill, cucumber, and olives.
- PREP TIME: 15 minutes
- SERVES: 4 to 6
INGREDIENTS
- 1/2 medium red onion, thinly sliced
- 1 pound tomatoes, preferably with a combination of colors
- 2 tablespoons red wine vinegar
- 1 clove garlic, minced
- Flaky sea salt, such as Maldon
- 1/4 cup extra-virgin olive oil
- 1 medium red bell pepper, seeded and cut into 1-inch pieces
- 1/3 medium English cucumber, thinly sliced
- 1 cup kalamata olives, pitted
- 1/4 cup coarsely chopped fresh dill fronds and tender stems
- 1/4 cup fresh mint leaves, coarsely chopped
- 1 cup crumbled feta cheese
- Freshly ground black pepper
INSTRUCTIONS
- Place the onion in a bowl of cold water and set aside 10 to 15 minutes. Meanwhile, cut the tomatoes into bite-sized chunks and place in a medium bowl; set aside. Place the vinegar, garlic, and a pinch of salt in a large bowl. While whisking constantly, drizzle in the olive oil and whisk until combined.
- Drain the onion and pat dry with paper towels. Add the red onion, bell pepper, cucumber, olives, dill, and mint to the dressing and toss to combine. Set aside to marinate for 10 minutes. Add the tomatoes and feta and toss gently to combine. Taste and season with more salt and pepper as needed.
- Using a slotted spoon, transfer the salad to a serving platter, leaving the juices behind. Serve immediately.
Tri-Color Slaw with Lime Dressing
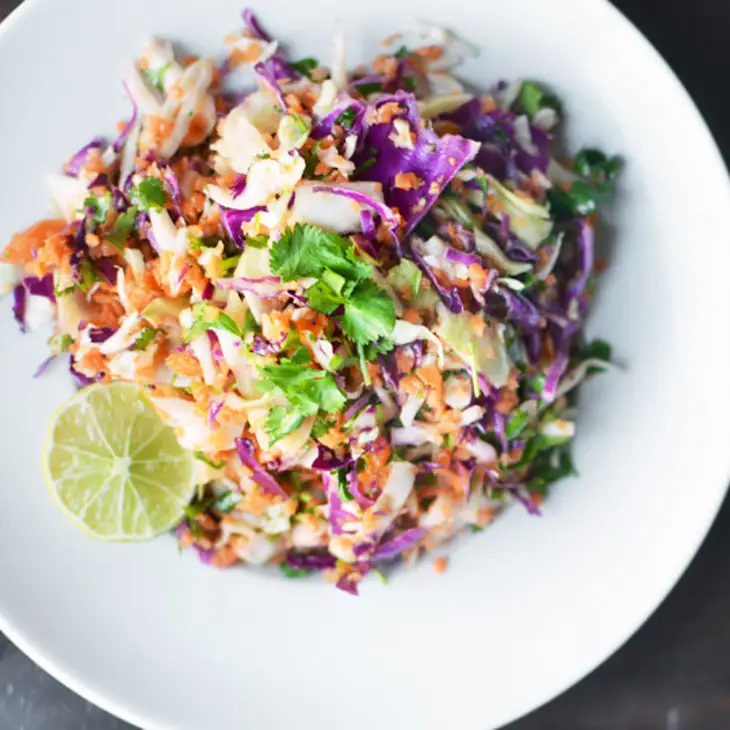
A tangy lime vinaigrette keeps this crunchy slaw feeling light, fresh, and summery.
- SERVES: 8
INGREDIENTS
- 1/2 head green cabbage, cored
- 1/2 head red cabbage, cored
- 1 pound carrots, peeled and shredded
- 1 large bunch cilantro, leaves roughly chopped
- 3 limes, juiced (about 1/3 cup)
- 2/3 cup neutral oil, such as peanut or safflower
- 1 to 2 teaspoon sugar
- Kosher salt and freshly ground pepper
INSTRUCTIONS
- Shred the cabbage finely in using a chef’s knife, a mandoline, or a food processor’s shredding blad. In a very large bowl, toss together the shredded cabbage with the shredded carrots and chopped cilantro.
- Whisk the lime juice and oil together in a bowl or measuring cup, and whisk in the sugar. Toss with the slaw, and season generously with salt and pepper (it may need more than you think it will at first, and this salad definitely needs its salt!).
- Best served within a day or two, cold from the fridge, but you can refrigerate it for up to 3 days or until it loses its crispness.
Sesame Ginger Slaw
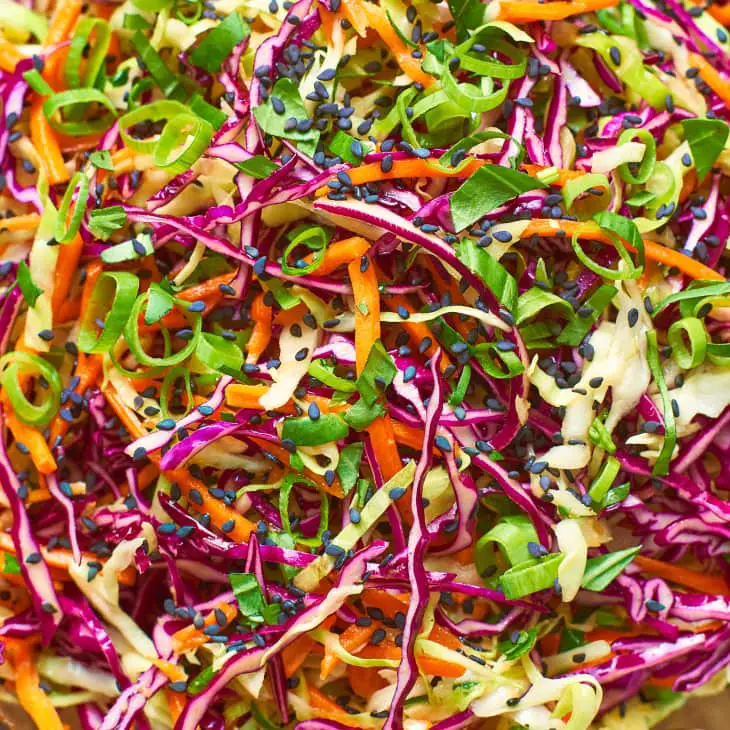
If you want a potluck dish that’s a total crowd-pleaser, there is no better choice than this sesame ginger slaw.
- SERVES: 6
INGREDIENTS
FOR THE DRESSING:
- 1/3 cup rice vinegar
- 1 tablespoon honey
- 1 tablespoon tamari or soy sauce
- 1 tablespoon toasted sesame oil
- 1 tablespoon finely grated peeled fresh ginger
- 1 clove garlic, minced
- 1/2 teaspoon kosher salt
- 1/4 teaspoon freshly ground black pepper
FOR THE SLAW:
- 3 cups finely shredded red cabbage
- 3 cups finely shredded green cabbage
- 1 cup shredded carrots
- 4 medium scallions, green parts only, thinly sliced
- 1/2 cup chopped fresh basil leaves, plus more for garnish
- 2 tablespoons black sesame seeds, plus more for garnish
INSTRUCTIONS
- Make the dressing: Place all the ingredients in a large bowl and whisk to combine.
- Make the slaw: Add the 2 cabbages, carrots, scallions, basil, and sesame seeds to the bowl of dressing and toss to combine. Taste and season with salt and pepper as needed. Cover and refrigerate for at least 30 minutes or overnight to allow the flavors to meld. Garinsh with the more basil and sesame seeds.
Easiest Summer Fruit Salad
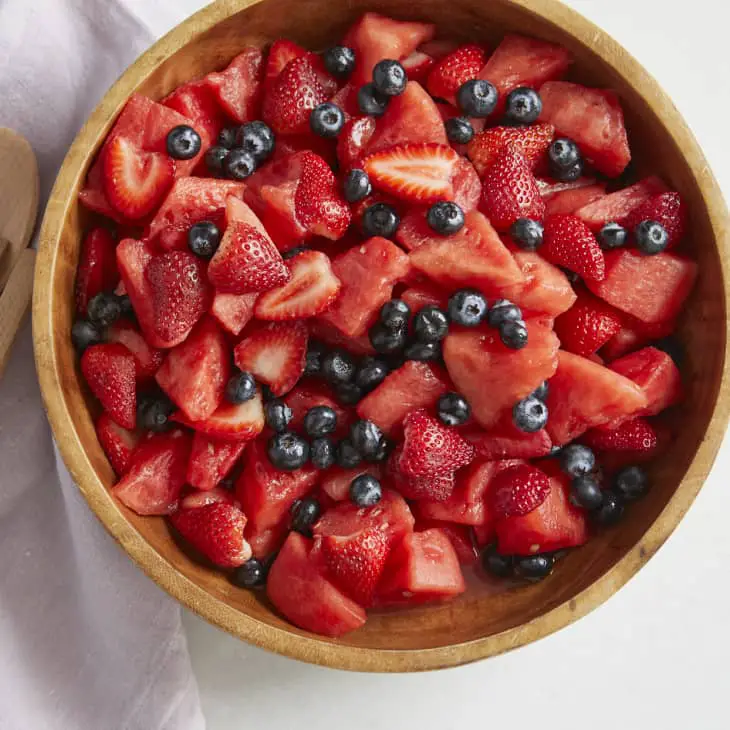
A simple honey-lemon dressing spiked with cinnamon gives this basic fruit salad a fun twist.
- SERVES: 8 to 10
INGREDIENTS
- 1/4 cup honey
- 1/4 cup freshly squeezed lemon juice (from 1 medium lemon)
- 1/2 teaspoon ground cinnamon
- 4 cups large-dice seedless watermelon
- 4 cups sliced strawberries
- 2 cups fresh blueberries
INSTRUCTIONS
Whisk the honey, lemon juice, and cinnamon together in a large bowl until combined. Add the watermelon, strawberries, and blueberries. Toss gently until fruit is evenly coated and serve immediately.
Summer Side Dish Favorites
It doesn’t matter whether you go for buttery corn on the cob, a loaded pasta salad, or baked beans, these side dishes are summertime essentials.
Grilled Corn on the Cob

This simple method for grilling corn on the cob leaves you with juicy, smoky cobs you can happily serve on a weeknight or for a big summer bash.
- PREP TIME: 5 minutes
- COOK TIME: 20 minutes
- SERVES: 4
INGREDIENTS
- 4 or more ears corn, in their husks
- Butter and salt, for serving (optional)
INSTRUCTIONS
- Heat the grill. Prepare an indoor or outdoor grill for high, direct heat.
- Prepare the corn. Trim the silk from the top of each ear to prevent it from catching fire and burning. Peel away the first layer of husks and remove the stalk end using a serrated knife to expose the bottom of the ear. This will make it easier to slide the ear of the husk, post grilling. (Optional: Peel back a 1-inch section to expose the kernels and char some of the corn.)
- Grill the corn for 15 to 20 minutes. Place the corn on the grill, cover, and cook for 5 minutes. Uncover, turn the corn, and cook 5 minutes more. Repeat, turning at 5-minute intervals, until the husks are have grill marks on all sides and the exposed kernels are charred, 15 to 20 minutes of total grilling.
- Cool the corn. Remove the ears from the grill and cool for 5 minutes. Then you should be able to easily pull back the husks and silk. Serve with butter and salt.
Instant Pot Corn on the Cob
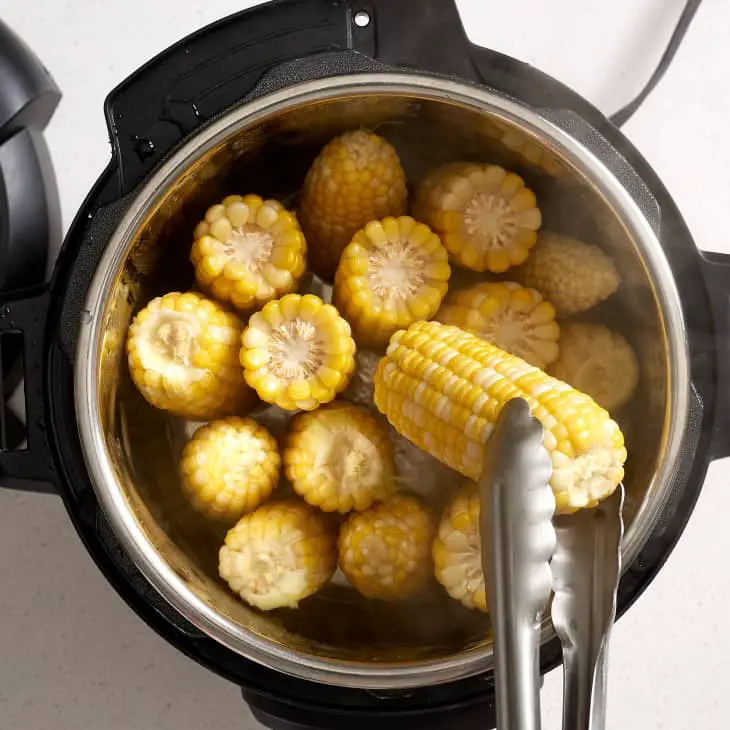
This method for making corn on the cob in the Instant Pot cooks 8 cobs in under 20 minutes. Plus there’s a tip for melting butter in the same pot!
- SERVES: 8
INGREDIENTS
- 8 ears corn
- 1 cup water
- 8 tablespoons (1 stick) unsalted butter
- Salt, as needed
INSTRUCTIONS
- Preparing the corn for the Instant Pot. Remove the corns husks and silks. Cut or break each ear in half. Place a heatproof trivet or small wire rack in a 6-quart or larger Instant Pot. Add the corn, standing them up side-by-side on the trivet.
- Add 1 cup of water and cook for 5 minutes under HIGH pressure. Add the water. Close the pressure cooker, make sure the valve is sealed, and set to 5 minutes of HIGH manual pressure.
- Quick release the pressure. When the 5 minutes is up, quick release the pressure. Using tongs, transfer the corn to a serving platter. Pour out any remaining water in the cooker.
- Use the warm insert to melt the butter. Return the insert to the pressure cooker. Add the butter and use the residual heat to melt the butter.
- Pour the butter over the steamed corn and serve immediately. Pour the melted butter over the corn and serve immediately with salt.
Easy Pasta Salad
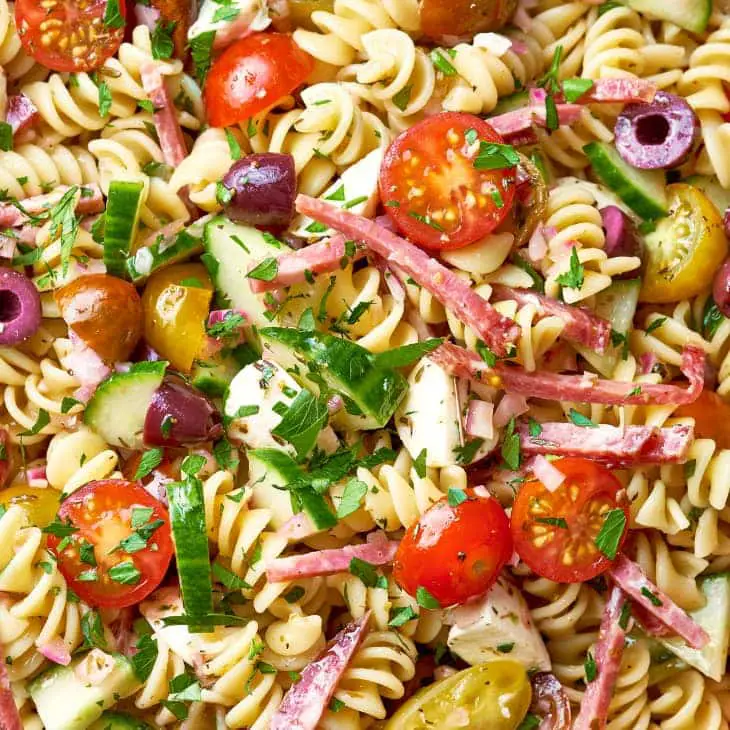
This mayo-free pasta salad is based on a formula that you can easily adapt to your favorite mix-ins.
- PREP TIME: 15 minutes
- COOK TIME: 8 minutes
- SERVES: 6 to 8
INGREDIENTS
For the dressing:
- 1/2 cup olive oil
- 1/4 cup red wine vinegar
- 2 teaspoons dried Italian seasoning
- 1/2 teaspoon granulated sugar
- 1 clove garlic, minced
- 1/2 teaspoon kosher salt
- 1/4 teaspoon freshly ground black pepper
For the pasta salad:
- 1/2 medium red onion, finely chopped
- 8 ounces dried short pasta, such as rotini
- 8 ounces cherry tomatoes, halved or quartered
- 1 small English cucumber, quartered lengthwise, then thinly sliced crosswise
- 4 ounces mini mozzarella balls, drained and halved
- 4 ounces salami slices, cut into 1/2-inch-wide strips
- 1/2 cup pitted kalamata olives, halved
- 1/4 cup coarsely chopped fresh parsley leaves
INSTRUCTIONS
- Place 1/2 cup olive oil, 1/4 cup red wine vinegar, 2 teaspoons dried Italian seasoning, 1/2 teaspoon sugar, 1 clove minced garlic, 1/2 teaspoon kosher salt and 1/4 teaspoon freshly ground black pepper in a small bowl and whisk to combine.
- Add 1/2 a finely chopped red onion and stir to combine. Set aside to soften while you prepare the rest of the salad.
- Bring 2 quarts of salted water to a boil in a large pot over medium-high heat. Add 8 ounces pasta and cook until al dente, about 8 minutes or according to package directions. Meanwhile, prepare an ice bath in a large bowl.
- Drain the pasta in a colander and run under cold water. Dunk the colander in the ice bath and set aside to cool for 5 minutes.
- Drain the pasta well. Transfer to a large bowl. Add 8 ounces tomatoes, 1 English cucumber, quartered and thinnly sliced, 4 ounces of mini mozzarella balls, 4 ounces salami cut into 1/2-inch wide strips, 1/2 cup pitted and halved kalamata olives, and 1/4 cup chopped fresh parsley. Add the dressing, including the onions, to the pasta and toss until evenly combined.
- Refrigerate the pasta salad for at least 30 minutes for the flavors to meld before serving.
Pesto Pasta Salad
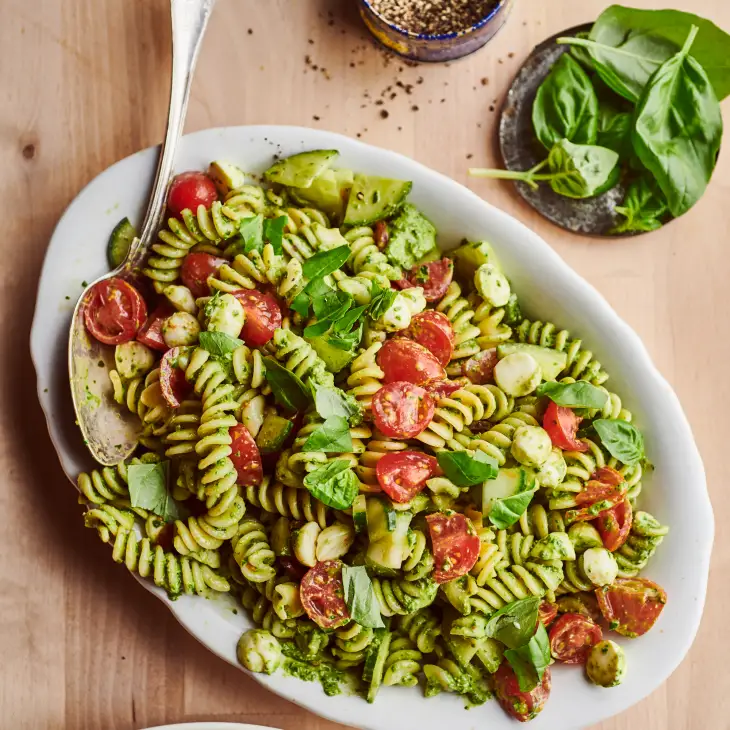
Nothing says summer like tendrils of pasta, fresh mozzarella pearls, juicy tomatoes, and crunchy cucumber dressed in a basil pesto sauce.
- PREP TIME: 25 minutes
- COOK TIME: 8 minutes
- SERVES: 8
INGREDIENTS
- 1/2 medium lemon
- 5 ounces baby spinach (about 5 cups)
- 1/2 cup basil pesto
- 1/4 cup mayonnaise
- 1/2 teaspoon kosher salt, plus more for cooking pasta
- 1/4 teaspoon freshly ground black pepper
- 1 pound dried short pasta, such as fusilli, rotini, or cavatappi
- 1/2 medium English cucumber
- 1 pint cherry or grape tomatoes (10 ounces)
- 8 ounces mini mozzarella cheese balls
- Torn fresh basil leaves, for serving
INSTRUCTIONS
- Bring 2 quarts heavily salted water to a boil in a large pot over medium-high heat. Meanwhile, juice 1/2 medium lemon until you get 1 tablespoon juice, and add the juice to a food processor fitted with the blade attachment. Add 5 ounces baby spinach (about 5 cups), 1/2 cup basil pesto, 1/4 cup mayonnaise, 1/2 teaspoon kosher salt, and 1/4 teaspoon black pepper. Process until smooth, about 20 seconds.
- When the water is boiling, add 1 pound dry short pasta and cook until al dente — soft with just a bit of chew — about 8 minutes or according to package directions. Meanwhile, prepare an ice bath in a large bowl.
- Drain the pasta in a colander and run under cold water until no longer steaming. Dunk the colander in the ice bath and set aside to cool for 5 minutes. Meanwhile, quarter 1/2 English cucumber lengthwise, then thinly slice crosswise (1 cup). Halve (or quarter if large) 1 pint cherry or grape tomatoes. Drain and halve 8 ounces mini mozzarella cheese balls.
- Drain the pasta well and transfer to a large bowl. Add the spinach pesto and toss to coat. Stir in the cucumber, tomatoes, and mozzarella. Garnish with torn basil leaves.
Broccoli and Feta Pasta Salad
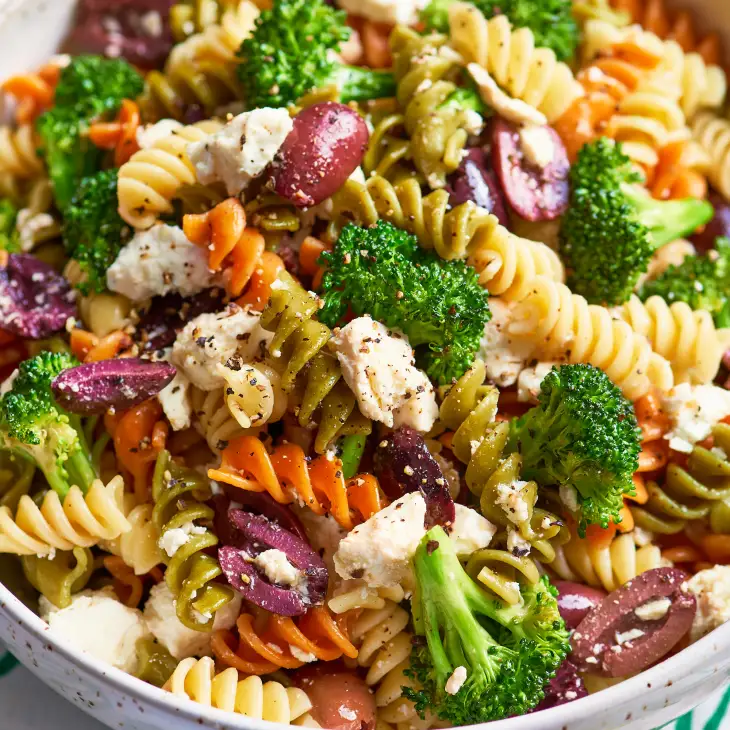
This is a simple pasta salad that’s easy to love. Broccoli adds wholesome crunch, olives lend a briny bite, and crumbled feta contributes plenty of salty goodness.
- PREP TIME: 10 minutes
- COOK TIME: 18 minutes
- SERVES: 8 to 10
INGREDIENTS
- 1 pound dried rotini or short pasta, tri-color preferred
- 4 tablespoons extra-virgin olive oil, divided
- 1 medium head broccoli, cut into 1/2-inch florets
- 2 tablespoons red wine vinegar
- Freshly ground black pepper
- 8 ounces feta cheese
- 1 cup pitted Kalamata olives, coarsely chopped
- Kosher salt
INSTRUCTIONS
- Bring a large pot of salted water to a boil. Add the pasta and cook according to package directions until al dente. Meanwhile, place 3 tablespoons of the oil, vinegar, and a few grinds of pepper in a small bowl and whisk to combine; set aside.
- Drain the pasta and run briefly under cool water to cool it down. Drain well again. Place in a large bowl and set aside.
- Heat the remaining 1 tablespoon oil in a large, deep sauté pan over medium heat until shimmering. Add the broccoli and cook until crisp-tender, 5 to 7 minutes. Transfer to the bowl with the pasta.
- Crumble the feta cheese into the pasta, add the olives, and gently stir to combine. Add the dressing and toss to combine; Taste and season with salt and pepper as needed. Refrigerate until serving or overnight.
Succotash
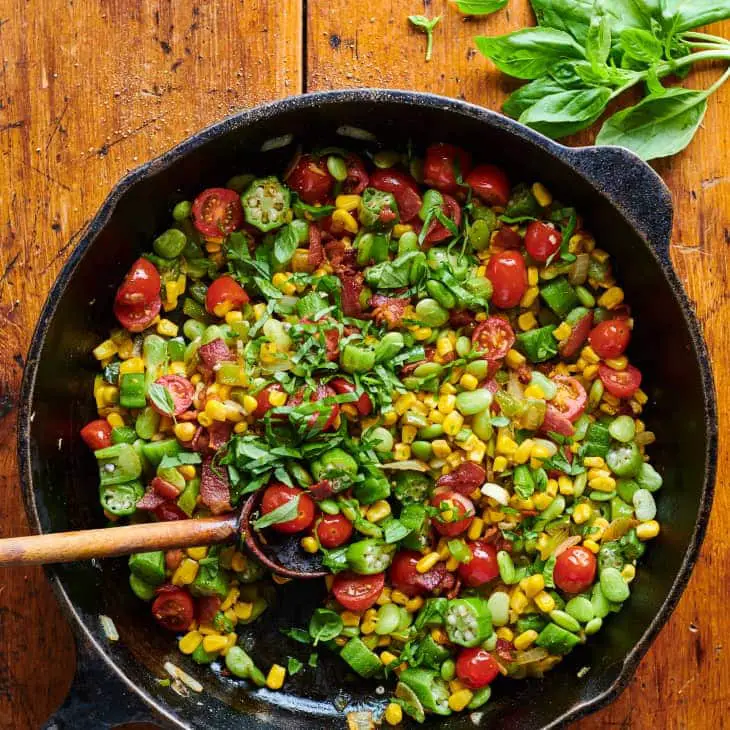
A big platter of succotash is a celebration of all the vibrant vegetables coming into season: sweet corn, baby lima beans, ripe red tomatoes, and tender okra. Here’s how to make it throughout the spring and summer months.
- PREP TIME: 22 minutes
- COOK TIME: 20 minutes
- SERVES: 4 to 6
INGREDIENTS
- 1 cup frozen baby lima beans
- 1 medium green bell pepper
- 1/2 medium sweet onion
- 2 cloves garlic
- 1 pint grape or cherry tomatoes
- 4 ounces fresh or frozen okra (about 1 cup)
- 1/4 cup loosely packed fresh basil leaves
- 2 cups fresh or frozen corn kernels (from about 2 ears fresh)
- 4 slices bacon (about 4 ounces)
- 1 1/2 teaspoons kosher salt
- 1 tablespoon apple cider vinegar
- 1/4 teaspoon freshly ground black pepper
INSTRUCTIONS
- Thaw the frozen vegetables. Place 1 cup frozen lima beans in a shallow bowl at room temperature to thaw. If using frozen corn or okra, add 4 ounces frozen okra and 2 cups frozen corn kernels to the bowl to thaw also.
- Prepare the vegetables. Dice 1 medium bell pepper and 1/2 medium sweet onion (about 1 cup onion), and finely chop 2 garlic cloves. Halve 1 pint grape tomatoes. Trim and slice 4 ounces okra 1/4-inch thick (about 1 cup). Thinly slice 1/4 cup fresh basil leaves. If using fresh corn, remove the husks and cut the kernels from the cob (about 2 cups).
- Chop the bacon. Chop 4 slices bacon into 1/2-inch pieces.
- Cook the bacon until crisp. Cook the bacon in a large cast iron or stainless steel skillet over medium-high heat until the bacon crisps and the fat renders, 8 to 10 minutes. Transfer the bacon with a slotted spoon to a paper towel-lined plate.
- Cook the onion and pepper until soft. Add the onion, bell pepper, and 1 1/2 teaspoons kosher salt to the bacon fat in the skillet and cook over medium heat until softened, about 5 minutes.
- Cook the garlic until fragrant. Add the garlic and cook until fragrant, about 1 minute.
- Add the remaining vegetables. Stir in the tomatoes, corn, okra, and lima beans, and cook, stirring occasionally, until the vegetables are heated through and tender, 6 to 7 minutes.
- Season the succotash. Stir in 1 tablespoon apple cider vinegar and 1/4 teaspoon black pepper.
- Serve the succotash. Top with the crisped bacon and basil leaves, and serve warm.
Instant Pot Baked Beans
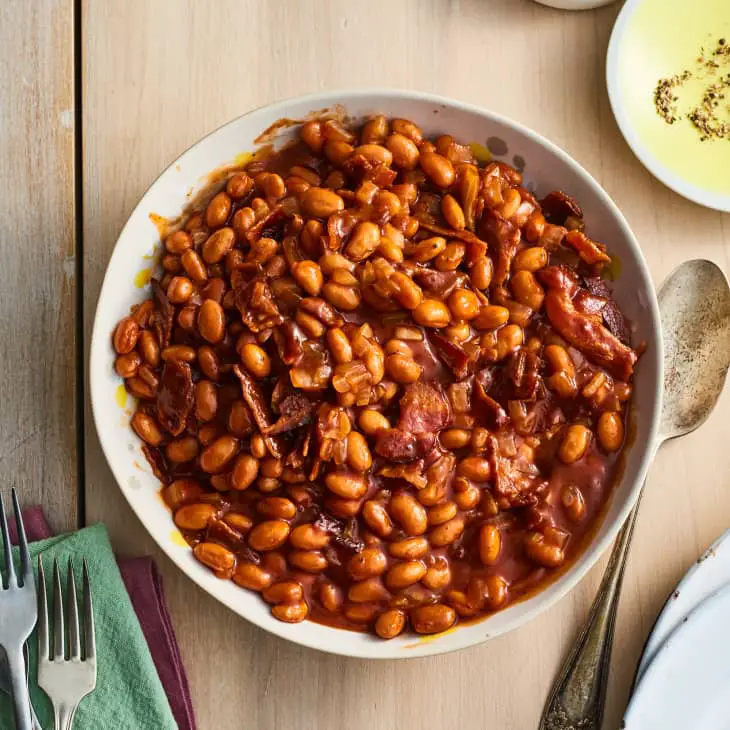
These 5-ingredient Instant Pot baked beans are just the thing you need to have for summer potlucks and backyard barbecues.
- PREP TIME: 10 minutes
- COOK TIME: 55 minutes
- SERVES: 4 to 6
INGREDIENTS
- 6 slices bacon, chopped
- 1 small white onion, diced
- 1 pound dried pinto beans, rinsed and sorted through to remove any stones
- 3 cups water
- 1 cup barbecue sauce
- 3 tablespoons ketchup
INSTRUCTIONS
- Place the bacon in an Instant Pot or electric pressure cooker. Turn on the sauté function and cook until the bacon is crips. Add the onion and cook until softened, 3 to 4 minutes. Add the beans and sauté for 2 minutes. Add water, barbecue sauce, and ketchup, and stir to combine.
- Lock the lid in place and make sure the valve is set to seal. Set for HIGH pressure for 20 minutes. Natural release for 35 minutes. Quick release any remaining pressure, stir to combine, and serve.
4th of July Desserts
Every 4th of July meal needs something sweet to round it out. If you’re game to turn on the oven, cherry pie bars are well worth it. And for something cool and nostalgic, a Friendly’s-inspired watermelon roll is guaranteed to be a surefire hit.
Red White and Blue Popsicles
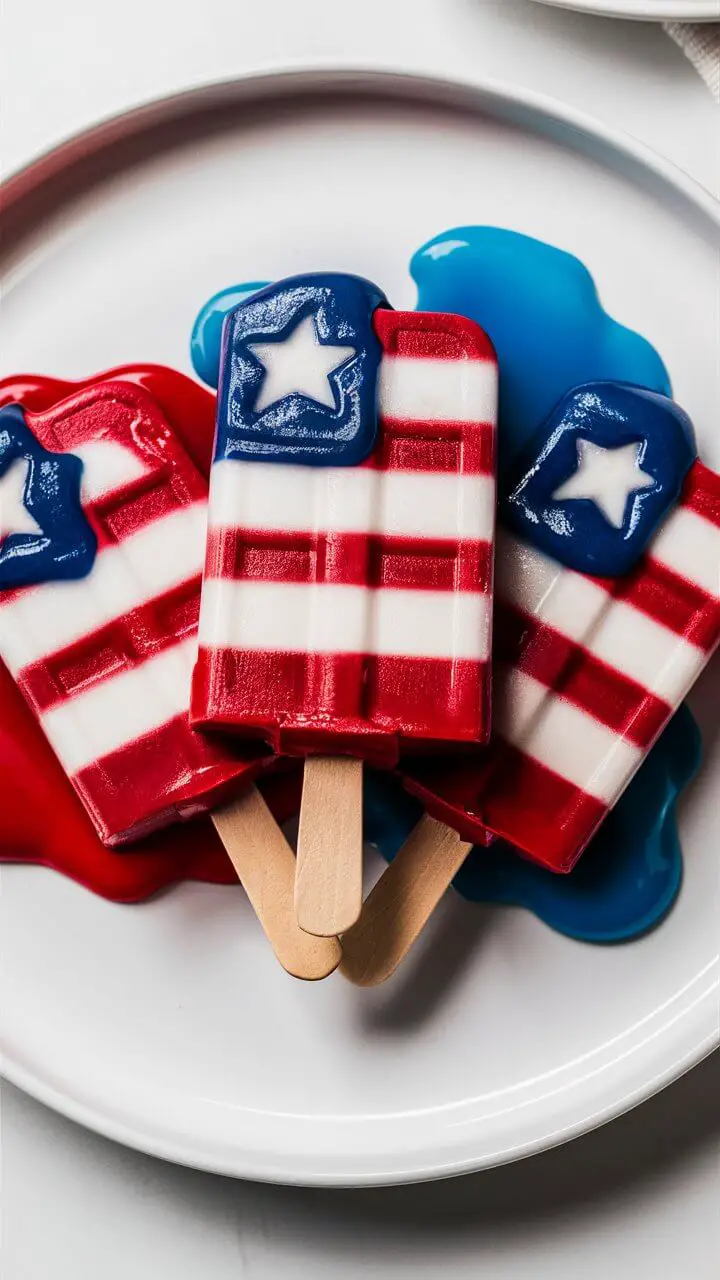
Rather than food coloring, these popsicles rely on fresh fruit to achieve their colorful layers.
- PREP TIME: 35 minutes
- COOK TIME: 10 minutes
- MAKES: 6 (3-ounce) popsicles
INGREDIENTS
FOR THE RED LAYER:
- 5 ounces strawberries (about 6 medium)
- 2 tablespoons granulated sugar
- 1 tablespoon lime juice (from 1/2 medium lime)
- 1 ounce ice cubes (about 3)
FOR THE WHITE LAYER:
- 3 tablespoons lime juice (from 2 medium limes)
- 2 tablespoons granulated sugar
- About 1/2 cup cold water
FOR THE BLUE LAYER:
- 6 ounces blueberries (about 1 1/4 cups)
- 3 tablespoons granulated sugar
- 2 tablespoons water
- 1 tablespoon lime juice (from 1/2 medium lime)
INSTRUCTIONS
MAKE THE RED LAYER:
- Trim and coarsely chop 5 ounces strawberries (about 1 cup). Place in a small saucepan and add 2 tablespoons granulated sugar and 2 tablespoons water. Bring to a boil over medium-high heat. Reduce to medium-low heat and simmer for 5 minutes. Carefully pour into a liquid measuring cup and use an immersion blender to blend until smooth (or transfer to a stand blender for blending). Add 1 tablespoon lime juice and 1 ounce ice cubes, Stir to melt the ice and cool the mixture. You should have about 3/4 cup.
- Divide the strawberry purée between 6 (3-ounce) popsicle molds (about 2 tablespoons each). Tap the molds on the counter to remove any air bubbles. If desired, use a small rubber spatula to clean up any drips on the interior of the molds for the cleanest layers. Freeze until completely solid, at least 1 hour. Meanwhile, make the white and blue layers.
MAKE THE WHITE LAYER:
- Place 3 tablespoons lime juice and 2 tablespoons granulated sugar in a liquid measuring cup and stir until the sugar is completely dissolved. Add enough cold water to make 3/4 cup lime mixture.
MAKE THE BLUE LAYER:
- Place 6 ounces blueberries, 3 tablespoons granulated sugar, and 2 tablespoons water in a small saucepan. Bring to a boil over medium-high heat. Reduce the heat to medium-low and simmer for 5 minutes. Carefully pour into a liquid measuring cup and use an immersion blender to blend until smooth (or transfer to a clean stand blender for blending). Add 1 tablespoon lime juice and stir to combine. You should have about 3/4 cup. Refrigerate until ready to use.
- When the strawberry layer is completely solid, divide the lime mixture evenly among the molds. Freeze until mostly frozen, about 45 minutes. Insert the popsicle sticks and freeze until completely solid, about 30 minutes more.
- Divide the blueberry mixture evenly among the molds. Freeze until completely solid, at least 2 hours. When ready to serve, run lukewarm water over the outside of the molds so they release easily.
Red, White, and Blue Cheesecake Bars
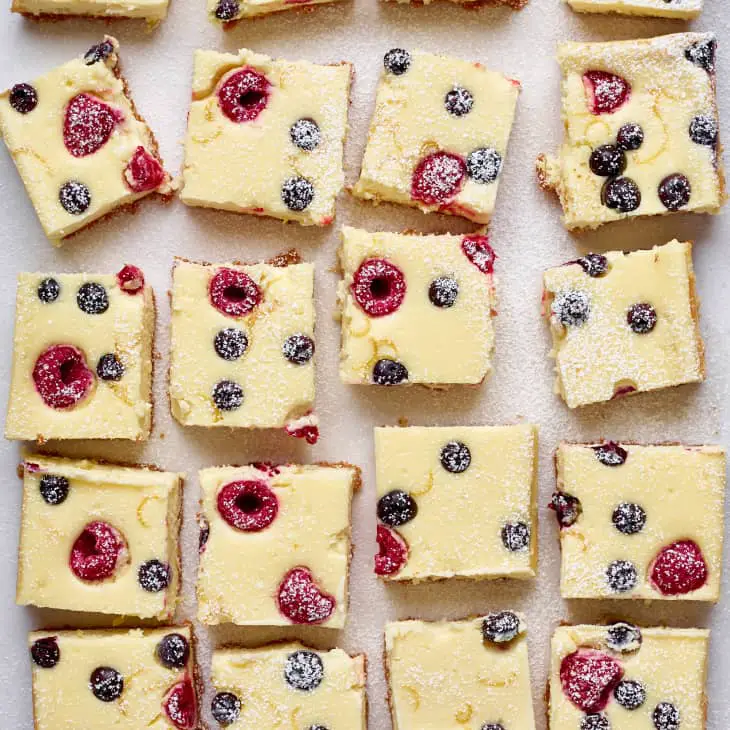
Rich and creamy cheesecake bars kissed with lemon and studded with sweet, juicy berries are the answer to what to serve to your favorite people this 4th of July.
- PREP TIME: 15 minutes
- COOK TIME: 45 minutes
- MAKES: 24 bars
INGREDIENTS
FOR THE CRUST:
- Cooking spray or butter, for coating the baking dish
- 14 whole graham crackers, broken into 1-inch pieces, or 1 3/4 cups graham cracker crumbs (about 7 1/2 ounces)
- 8 tablespoons (1 stick) unsalted butter, melted and cooled
FOR THE CHEESECAKE:
- 4 (8-ounce) packages cream cheese, at room temperature
- 1 cup granulated sugar
- 1/2 teaspoon kosher salt
- 4 large eggs
- 1/2 teaspoon finely grated lemon zest
- 1 teaspoon freshly squeezed lemon juice
- 1 cup fresh blueberries
- 1 cup fresh raspberries
- Powdered sugar, for dusting
INSTRUCTIONS
MAKE THE CRUST:
- Arrange a rack in the middle of the oven and heat to 325°F. Line a 9×13-inch baking dish with aluminum foil or parchment paper so that it hangs over the two long sides, then coat with butter or cooking spray; set aside.
- Place the graham cracker pieces in the bowl of a food processor fitted with the blade attachment. Process into fine crumbs, about 30 seconds. Slowly add the butter and pulse to combine. (If using graham cracker crumbs, just mix together with the butter in a bowl.) Transfer the mixture to the baking dish and press into an even layer with the bottom of a measuring cup.
- Bake until fragrant and beginning to brown, 12 to 15 minutes. Place on a wire rack to cool while you make the filling.
MAKE THE FILLING:
- Place the cream cheese in the bowl of a stand mixer fitted with the paddle attachment. (Alternatively, use an electric hand mixer and large bowl.) Beat on medium speed until very smooth, about 2 minutes. Gradually beat in the sugar and salt until incorporated, about 1 minute more. Stop the mixer and scrape down the sides of the bowl.
- With the mixer on medium speed, beat in the eggs 1 at a time, waiting until each egg is fully incorporated before adding the next. Add the lemon zest and juice and beat until just combined.
- Dollop the mixture onto the crust and spread into an even layer. Scatter the berries evenly over top.
- Bake until the edges are set but the center still jiggles slightly, 30 to 40 minutes. Place the baking dish on a wire rack and cool completely, 2 to 3 hours. Cover with aluminum foil and refrigerate until completely chilled, at least 3 hours or overnight.
- Uncover the dish and dust with powdered sugar. Using the foil or parchment overhang, remove the cheesecake from the baking dish and place on a cutting board. Cut into 24 pieces and serve.
Very Berry 4th of July Cupcakes
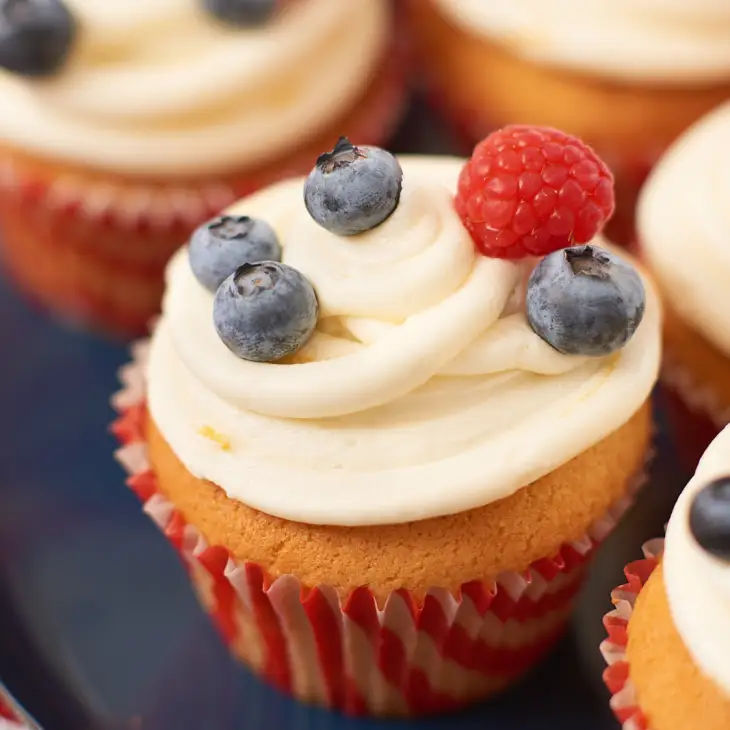
These cupcakes are as celebratory as ever: Red raspberries, white cake and buttercream, and blueberries ensure the color scheme is taken care of.
- MAKES: 12 cupcakes
INGREDIENTS
FOR THE CUPCAKES:
- 8 tablespoons (1 stick) unsalted butter, at room temperature
- 2/3 cup granulated sugar
- 2 large eggs
- 1 1/2 cups all-purpose flour
- 1 1/2 teaspoons baking powder
- 1/2 teaspoon fine salt
- 1/2 cup whole milk
- 1 teaspoon finely grated lemon zest
- 1/2 cup fresh blueberries
- 1/2 cup fresh raspberries
FOR THE BUTTERCREAM AND DECORATING:
- 2 ounces cream cheese, softened at room temperature for 1 hour
- 8 tablespoons (1 stick) unsalted butter, softened at room temperature for 1 hour
- Pinch of salt
- 4 to 5 cups powdered sugar
- 1 to 2 tablespoons whole milk
- 1/2 teaspoon finely grated lemon zest
- 1/2 teaspoon freshly squeezed lemon juice
- Fresh blueberries and raspberries, for garnish
INSTRUCTIONS
- Make the cupcakes: Arrange a rack in the middle of the oven and heat to 350°F. Line a standard 12-well cupcake pan with paper liners; set aside.
- Place the butter and sugar in the bowl of a stand mixer fitted with the paddle attachment. (Alternatively, use an electric hand mixer and large bowl.) Beat on medium speed until fluffy and light, about 3 minutes. Add the eggs and beat until fully incorporated and the mixture looks creamy and very pale yellow, about 2 minutes.
- Beat in the flour, baking powder, and salt at low speed, followed by the milk and lemon zest. Beat everything together on low for 30 seconds, and then on high for 3 minutes. Scrape down the sides of the bowl as needed. Gently fold in the raspberries and blueberries with a rubber spatula until just combined.
- Divide the batter evenly between the cupcake wells. Bake for 10 minutes. Rotate the pan from front to back. Bake until the tops are light golden-brown and a cake tester inserted in the center comes out clean, about 10 minutes more.
- Cool the cupcakes in the pan for 5 minutes. Remove them from the pan to a wire rack and cool completely before frosting.
- Make the buttercream: Place the cream cheese and butter in the clean bowl of a stand mixer fitted with the paddle attachment. (Alternatively, use an electric hand mixer and large bowl.) Beat on medium speed until lightened in color and fluffy, about 3 minutes.
- With the mixer on medium speed, add the salt, then 1 cup of powdered sugar at a time, scraping down the bowl between additions, until the buttercream reaches soft peaks and is spreadable. Add the milk a tablespoon at a time until you reach the desired consistency. Beat in the lemon zest and juice, then continue beating on high speed until whipped and creamy, 3 to 5 minutes.
- Frost the cupcakes with the buttercream, place a couple of berries in the center of each cupcake, then serve.
Firecracker Rice Krispies Treats
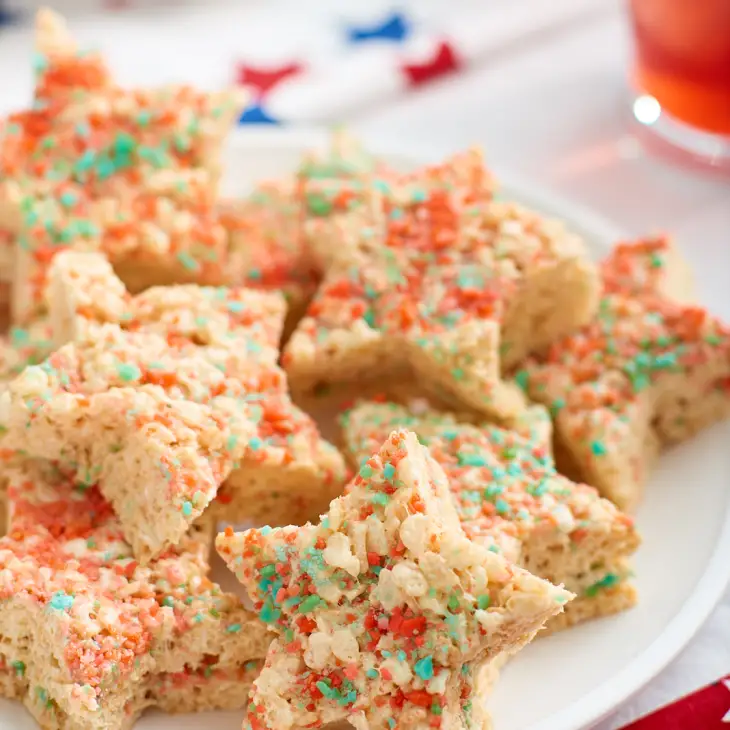
Red and blue Pop Rocks not only make these Rice Krispies treats look festive, but they also make these treats seriously fun to eat.
- MAKES: 24 (2-inch) squares
INGREDIENTS
- 9 cups toasted rice crisp cereal (about 8 1/2 ounces), such as Rice Krispies
- 1 stick (8 tablespoons) unsalted butter, cut into 8 pieces
- 1/2 teaspoon kosher salt
- 1/2 teaspoon vanilla extract
- 1 (16-ounce) package mini marshmallows (about 9 cups)
- 1/2 cup red and blue Pop Rocks candy (about 8 packets), divided
- Cooking spray
INSTRUCTIONS
- Heat a large pot or deep-sided skillet over medium heat. Once hot, add the cereal and cook, stirring occasionally, until lightly toasted and fragrant, 5 to 7 minutes. Remove from the heat and set aside.
- Melt the butter in another large pot over low heat, gently stirring with a rubber spatula so all the butter melts evenly. Once the butter begins to foam, watch carefully, as it will quickly begin to brown and emit a nutty aroma. When browned, turn off the heat. Stir in the salt and vanilla.
- Working quickly, add half the marshmallows and stir until thoroughly melted. Add the remaining marshmallows and stir until melted. The residual heat from the butter should be enough to melt them off the heat, but you can return the pot to low heat for a few seconds if the marshmallows aren’t melting easily.
- Once the marshmallows are completely melted, add the toasted cereal and gently fold it in until the cereal is completely coated with the marshmallow mixture.
- Transfer half of the mixture to a 9×13-inch baking dish. Using a rubber spatula lightly sprayed with cooking spray, gently press into an even layer. Sprinkle half the Pop Rocks evenly over the layer. Transfer the remaining cereal and marshmallow mixture to the dish and press it into an even layer to cover the Pop Rocks. Sprinkle the remaining Pop Rocks over the top.
- Let the treats stand at room temperature until set, about 1 hour. Cut into 2-inch squares and serve.
Flag Cake
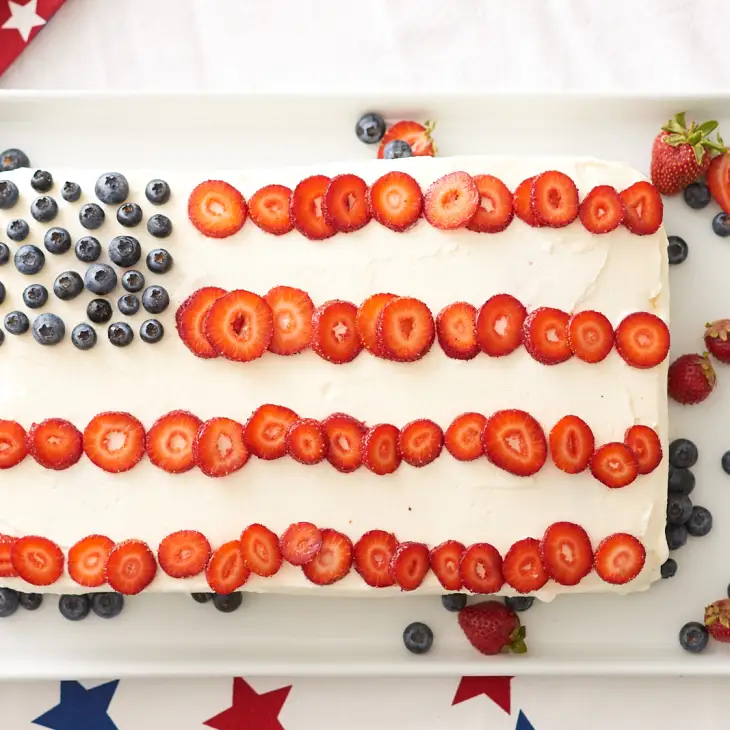
This stately, whipped cream-gilded cake has a colorful surprise inside that makes this vanilla-cake-meets-berry-shortcake recipe stand out from the rest.
- PREP TIME: 30 minutes
- COOK TIME: 25 minutes
- SERVES: 16
INGREDIENTS
FOR THE CAKE:
- Cooking spray
- 3 cups all-purpose flour
- 1 1/2 cups granulated sugar
- 1 1/2 teaspoons baking powder
- 3/4 teaspoon salt
- 3 large eggs
- 3/4 cup canola oil, or melted and cooled unsalted butter
- 1 cup whole milk
- 1 tablespoon vanilla extract
- Red food coloring
- Blue food coloring
FOR THE WHIPPED TOPPING:
- 2 cups cold heavy cream
- 3/4 cup granulated sugar
- 1 teaspoon vanilla extract
- 4 cups fresh strawberries, stemmed and sliced
- 1 1/2 cups fresh blueberries
INSTRUCTIONS
MAKE THE CAKE:
- Arrange a rack in the middle of the oven and heat the oven to 350°F. Coat a 9×13-inch baking pan with cooking spray; set aside.
- Whisk the flour, sugar, baking powder, and salt in together a large bowl. Add the eggs, oil or butter, milk, and vanilla and mix with an electric hand mixer on medium speed until smooth, about 1 minute.
- Pour 1/2 of the batter into the prepared baking pan. Divide the remaining batter between two bowls. Dye one red with 3 to 4 drops of red food coloring, and dye the other blue with 4 to 5 drops of blue food coloring. Dollop the red and blue batter onto the white cake batter. You can do a pattern or random placement.
- Bake until the cake is lightly browned and springs back when tapped gingerly, 25 to 30 minutes. Cool on a wire rack for 30 minutes. Remove the cake from the pan and cool completely on the rack.
MAKE THE WHIPPED TOPPING:
- Place the cream, sugar, and vanilla in a large bowl. Beat with an electric hand mixer on medium-high speed until stiff peaks form.
- Cover the entire cake with the whipped cream frosting. Arrange the berries in a flag shape by making a square of blueberries in the top lefthand corner and then making stripes with the sliced strawberries. You can use a small offset spatula to mark lines for the stripes, if needed.
- Refrigerate the cake for up to 4 hours before serving or serve immediately.
Red, White, and Blue Trifle
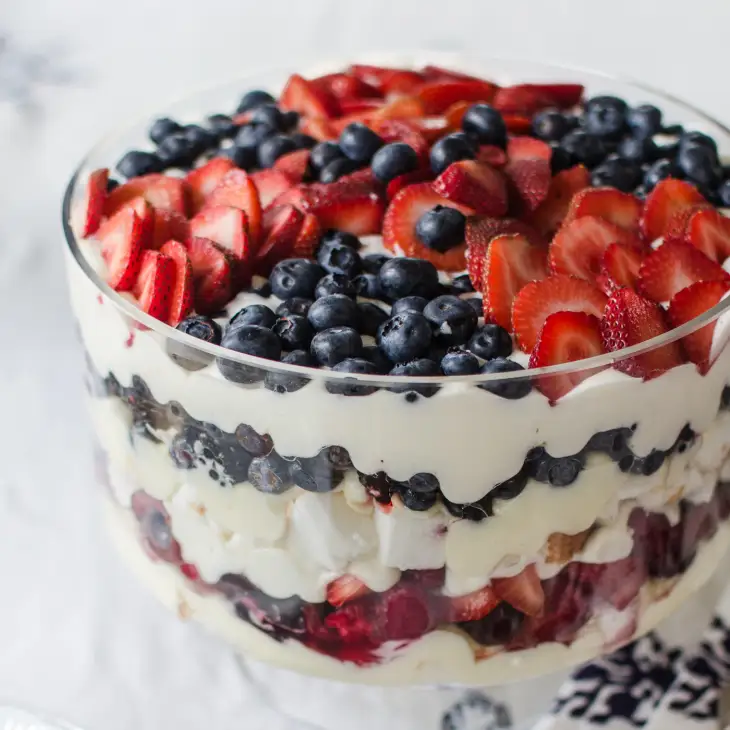
This celebratory dessert is packed with a medley of red and blue fruits and fit for a crowd.
- SERVES: 12
INGREDIENTS
FOR THE VANILLA PUDDING (MAKES 7 TO 8 CUPS):
- 1/2 cup cornstarch
- 1/2 teaspoon salt
- 2 cups light or heavy cream
- 4 large egg yolks
- 4 cups 2% milk
- 1/2 cup granulated sugar
- 2 teaspoons vanilla extract
FOR THE TRIFLE:
- 18 ounces angel food cake, cut into 1 1/2-inch cubes (about 8 cups)
- 2 pounds strawberries, divided
- 10 ounces cherries (2 cups), pitted and halved
- 6 ounces raspberries (2 cups)
- 3 pounds blueberries (4 pints), divided
- 6 ounces blackberries (2 cups), cut in half lengthwise
- 16 ounces cream cheese, at room temperature
- 2 cups cold heavy cream
- 1/4 cup powdered sugar
- Finely grated zest of 1 medium lemon
INSTRUCTIONS
- Make the vanilla pudding: Whisk the cornstarch and salt together in a 1-quart mixing bowl. Slowly whisk in the cream, making sure there are no lumps. Whisk in the egg yolks. It is important that this mix be very smooth.
- Warm the milk with the sugar over medium heat in a 3-quart saucepan until bubbles form around the edge of the milk and the entire surface of the milk begins to vibrate. Turn off the heat.
- Pour 1 cup of the hot milk mixture into the bowl with the cornstarch and egg yolks. Whisk vigorously to combine. They should come together smoothly, with no lumps. If you see any lumps, add a little more liquid and whisk them out. Pour the combined mixture back into the pot slowly, whisking constantly. Turn the heat back on to medium and bring to a simmer, whisking constantly. The custard will come to a boil with large bubbles that slowly pop up to the surface. Boil, whisking constantly, for 2 minutes. Turn off the heat. Stir in the vanilla extract. Use this pudding immediately to make the trifle.
- Begin assembling the trifle: Pack half of the angel food cake into the bottom of a large glass bowl. The bowl should hold 20 to 24 cups (160 to 192 fluid ounces). Immediately pour half of the warm pudding over the cake. Press plastic wrap or buttered wax paper onto the surface and refrigerate for at least 1 hour or until chilled.
- Pour the remaining pudding into a shallow dish and press plastic wrap or buttered wax paper onto its surface. Refrigerate for at least 1 hour, or until firm enough to be spooned out of the dish.
- While the first layer of trifle and the pudding are chilling, prepare the fruit.
- For the red fruit: Hull and quarter 1 pound of the strawberries and mix with the cherries and raspberries. Refrigerate. Reserve remaining strawberries for topping the trifle.
- For the blue fruit: Lightly mash 2 cups of the blueberries just until they release their juices. Stir in 2 more cups of blueberries and the blackberries. Refrigerate. Reserve remaining blueberries for topping the trifle.
- Whip the cream cheese with beaters or in the bowl of a stand mixer until light and fluffy. Gradually add the cold cream, whipping until smooth, and continue whipping until it forms soft peaks. Whip in the powdered sugar and lemon zest.
- Finish assembling the trifle: Drain off any juices that have collected in the bottom of the fruit bowls. Remove the plastic wrap from the trifle and spread the red fruit over the base layer of cake and pudding. Top gently with half of the whipped cream, then with the remaining cake cubes.
- Whip the remaining vanilla pudding until creamy, and spread over the cake cubes. Top with the blue fruit mixture, then with a final layer of the whipped cream.
- Hull and slice the remaining 1 pound strawberries. Arrange the strawberries and remaining blueberries on top of the trifle. Refrigerate uncovered for at least 2 hours or up to 24 hours before serving.
Red, White, and Blue Jello Mold
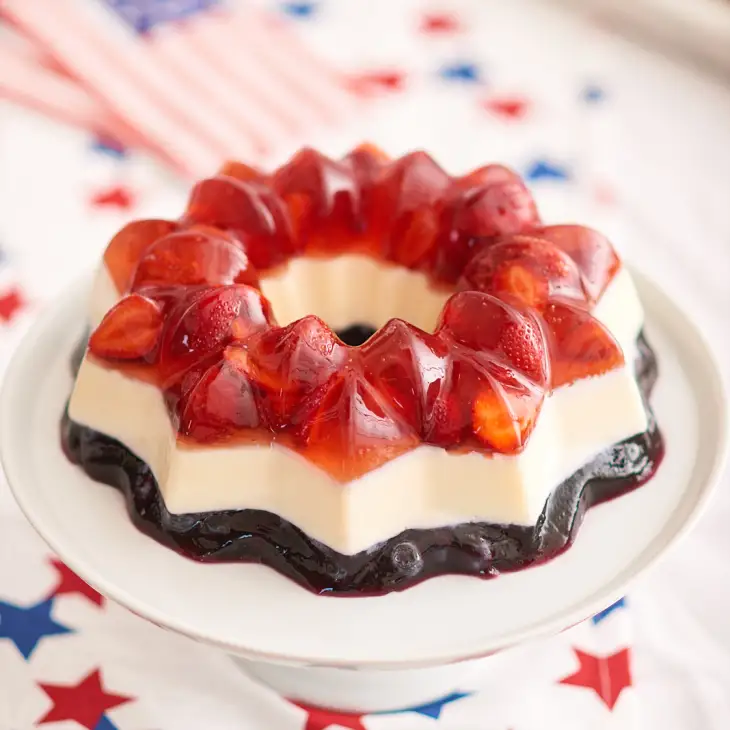
This red, white, and blue gelatin mold is full of real fruit juice and fresh fruit, and there’s not a single box of flavored gelatin in sight.
- SERVES: 10 to 12
INGREDIENTS
FOR THE RED LAYER:
- Cooking spray
- 2 cups cranberry juice cocktail, divided
- 2 (1/4-ounce) packets unflavored powdered gelatin
- 1/4 cup granulated sugar
- 1 cup thinly sliced fresh strawberries
FOR THE WHITE LAYER:
- 1 cup cold water
- 2 (1/4-ounce) packets unflavored powdered gelatin
- 1 cup boiling water
- 1 (14-ounce) can sweetened condensed milk
- 1 tablespoon vanilla extract
FOR THE BLUE LAYER:
- 2 1/4 cups 100% blueberry juice, divided
- 2 (1/4-ounce) packets unflavored powdered gelatin
- 1/4 cup granulated sugar
- 1 cup fresh blueberries
INSTRUCTIONS
MAKE THE RED LAYER:
- Coat a 10-cup Bundt cake pan or gelatin mold with cooking spray; set aside.
- Place 1 cup of the cranberry juice in a medium bowl (with a volume of at least 4 cups). Sprinkle with the gelatin and let sit at least 5 minutes for the gelatin to bloom and absorb the juice. Place the remaining 1 cup of cranberry juice and the sugar in a small saucepan and bring to a full simmer over medium-high heat, stirring to dissolve the sugar. Pour over the gelatin mixture and whisk until the gelatin is completely dissolved.
- Refrigerate until thickened, gel-like, and a piece of strawberry dropped inside remains suspended in the middle instead of floating, about 1 hour and 20 minutes (check after 1 hour). Meanwhile, make the white layer.
MAKE THE WHITE LAYER:
- Place the cold water in a medium or large bowl. Sprinkle with the gelatin and let sit for 5 minutes for the gelatin to bloom and absorb the water. Add the boiling water and whisk until the gelatin is completely dissolved.
- Add the sweetened condensed milk and vanilla and whisk to combine. Set aside at room temperature. Set a timer for 45 minutes. When the timer goes off, make the blue layer (leave the white layer at room temperature).
MAKE THE BLUE LAYER:
- Place 1 1/4 cups of the blueberry juice in a medium or large bowl. Sprinkle with the gelatin and let sit for 5 minutes for the gelatin to bloom and absorb the juice. Place the remaining 1 cup of blueberry juice and sugar in a small saucepan and bring to a simmer over medium-high heat, stirring to dissolve the sugar. Pour over the gelatin mixture and whisk until the gelatin is completely dissolved.
- Refrigerate the mixture until it is quite thick and a blueberry dropped inside remains suspended in the middle instead of floating, about 1 hour 20 minutes.
FINISH THE RED LAYER:
- When the red layer is ready, gently fold in the strawberries. Spoon into the pan or mold and spread into an even layer. Refrigerate until set but not firm, and still slightly sticky when you touch the top, about 15 minutes more.
FINISH THE WHITE LAYER:
- When the red layer is ready, pour the room-temperature white layer (re-whisk again if a skin has formed) over the red layer.
- Return to the refrigerator and chill until set but not firm and still slightly sticky when you touch the top, about 45 minutes.
FINISH THE BLUE LAYER:
- When the blue layer is ready, gently fold in the blueberries. Spoon into the pan or mold on top of the white layer. Refrigerate until set, at least 4 hours, but preferably overnight. Do not unmold until ready to serve.
UNMOLD AND SERVE:
- To remove the gelatin from the mold, carefully invert the mold onto a serving plate and let the jello fall gently from the mold onto the plate. This will take 2 to 3 minutes. (If it does not come out, fill the sink or a large, wide pot — wider than your mold — with warm tap water.
- Dip the outside of the mold in the water for 10 seconds. Remove from the water, dry the outside of the mold, and flip out onto a serving plate.) Cut into slices and serve.